After you sign up for Internet access for your MacBook, your ISP sends you a sheet of paper covered with indecipherable stuff that looks like Egyptian hieroglyphics. Don’t worry; those are the settings that you need to connect to your ISP. After you get them in Mac OS X, you should be surfing the web like an old pro.
External modem Internet connection for your MacBook
Follow these steps to set up your Internet connection if you’re using your MacBook’s external USB modem:
Click the System Preferences icon in the Dock and choose Network.
Select External modem from the list at the left side of the pane.
Enter the settings for the type of connection that your ISP provides:
If your ISP tells you to use PPP (Point-to-Point Protocol): Click the Configure IPv4 pop-up menu and choose Using PPP. If your ISP provided you with DNS Server or Search Domain addresses, type them now in the corresponding boxes.
If you’re using AOL: Click the Configure IPv4 pop-up menu and choose AOL Dialup. If AOL provided you with DNS Server or Search Domain addresses, click in the corresponding box and type them now.
If you’re using a manual connection: Click the Configure IPv4 pop-up menu and choose Manually. Then click in the IP Address, DNS Servers, and Search Domains fields and enter the respective settings provided by your ISP.
If you need to enter PPP settings, click the Advanced button.
In their respective fields, enter the account name, password, telephone number, and (optionally) the service provider name and an alternative telephone number provided by your ISP.
To automate your dial-up connection (allowing Lion to call your ISP whenever your system needs the Internet), click the Connect Automatically When Needed check box to enable it.
Press Command+Q to exit System Preferences and save your changes.
Your external USB modem must use a 64-bit driver to work with Lion, so make sure the modem you buy is listed as specifically supporting Mac OS X Lion.
Ethernet hardware connection for your MacBook
Follow these steps to set up your Internet connection if you’re using a network, cable modem, or DSL connection:
Click the System Preferences icon in the Dock and choose Network.
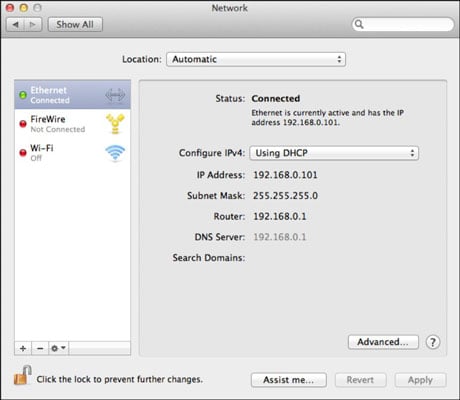
Select Ethernet from the list on the left of the pane to display the settings that you see here.

Enter the settings for the type of connection that your ISP provides:
If your ISP tells you to use Dynamic Host Configuration Protocol (DHCP): Choose Using DHCP from the Configure IPv4 pop-up menu, and your ISP can automatically set up virtually all the TCP/IP settings for you! (No wonder DHCP is so popular these days.)
If you won’t be using DHCP: Choose Manually from the Configure IPv4 pop-up menu. Then enter the settings provided by your ISP in the IP Address, Subnet Mask, Router, and DNS Servers fields.
If your ISP uses PPPoE (Point-to-Point Protocol over Ethernet), click the Configure IPv4 pop-up menu and choose Create PPPoE Service.
Type an identifying name for the PPPoE service.
Click Done.
Enter the password for your PPPoE connection.
Press Command+Q to exit System Preferences and save your changes.
Lion can get down and dirty in the configuration trenches as well! To launch an assistant to help with the configuration process, click the Assist Me button and then click Assistant on the Assistant’s welcome screen.

