If you don't want to sync the e-mail accounts on your Mac or PC, you can set up an e-mail account on your iPad mini manually. It's not quite as easy as clicking a box and syncing your iPad mini, but it's not rocket science either. Here's how you get started:
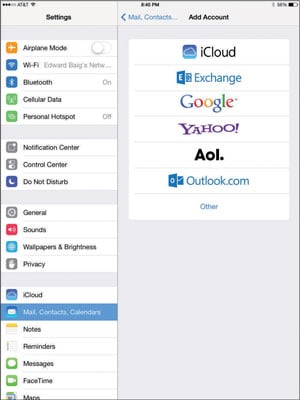
If you have no e-mail accounts on your iPad mini, the first time you launch Mail, you see the Welcome to Mail screen. Your choices are iCloud, Microsoft Exchange (business e-mail), Google (Gmail), Yahoo!, AOL, Microsoft Outlook.com, and Other.
If you have one or more e-mail accounts on your iPad mini already and want to add a new account manually, tap Settings on the Home screen and then tap Mail, Contacts, Calendars➪Add Account.
You see an Add Account screen shown, with the same account options that are shown on the Welcome to Mail screen.
How to set up an e-mail account with iCloud, Gmail, Yahoo!, AOL, or Microsoft Outlook.com on an iPad mini
If your account is with iCloud, Google Gmail, Yahoo!, AOL, or Outlook.com, follow these steps:
Tap the appropriate button on the Welcome to Mail (or Add Account) screen.
Enter your name, e-mail address, password, and optional description
You can describe this account (such as Work or Personal), but the field tends to fill in automatically with the same contents in the Address field unless you tell it differently.
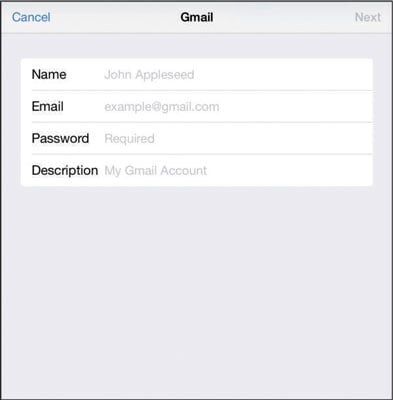
Tap the Next button in the upper-right corner of the screen.
You're finished. That's all there is to setting up your account. You can now proceed to “See Me, Read Me, File Me, Delete Me: Working with Messages.”
How to set up an e-mail account with another provider on an iPad mini
If your e-mail account is with a provider other than iCloud, Gmail (Google), Yahoo!, AOL, or Microsoft (Outlook.com), you have a bit more work ahead of you. You need a bunch of information about your e-mail account that you may not know or have handy.
We suggest that you scan the following instructions, note the items you don't know, and go find the answers before you continue. To find the answers, look at the documentation you received when you signed up for your e-mail account or visit the account provider's website and search there.
Here's how you set up an account:
Starting at the Home screen, tap Settings➪Mail, Contacts, Calendars➪Add Account➪Other.
Under Mail, tap Add Mail Account.
Fill in the name, address, password, and description in the appropriate fields, and then tap Next.
With any luck, that's all you'll have to do. The iPad will look up and hopefully be able to retrieve your account credentials. If that doesn't happen, continue with Step 4.
Tap the button at the top of the screen that shows the type of e-mail server this account uses: IMAP or POP.
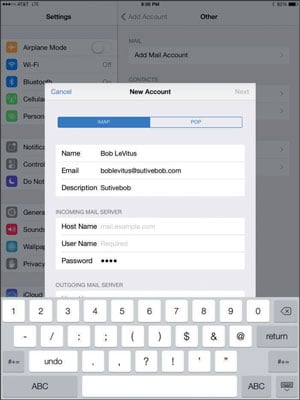
Fill in the Internet hostname for your incoming mail server, which looks something like.
Fill in your username and password.
Enter the Internet hostname for your outgoing mail server, which looks something like.
Enter your username and password in the appropriate fields.
Tap the Next (sometimes Save) button in the upper-right corner to create the account.
You're now ready to begin using your account.
Some outgoing mail servers don't need your username and password. The fields for these items on your iPad mini note that they're optional. Still, it is suggested that you fill them in anyway. It saves you from having to add them later if your outgoing mail server does require an account name and password, which almost all do these days.