
After you have chosen your method of FTP for your website (which may include purchasing, downloading, and installing a standalone application), your next step is to set up the remote connection to the host server. This process involves configuring the FTP client with a session profile for the connection to your domain. Profiles normally include the following bits of information:
The URL of the domain being accessed or a special FTP address provided by the host, as in www.mywebsite.com.
The host-provided username and password to access the site via FTP
Additional host-related information that may be required by the FTP application or server to assist with making the connection to the remote server, such as the host type, account name, initial remote directory, and firewall information
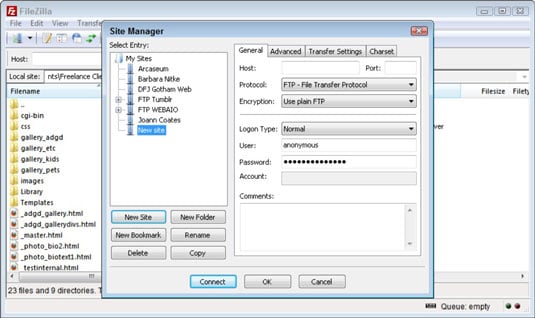
Before a connection to the remote server can be established, each FTP session profile requires a profile name, host name/address, user ID, and password.
By contrast, Dreamweaver users must manage a site and set up the remote access information before being able to use the program’s built-in FTP tools. If you are using another coding editor for FTP, you should be able to easily adapt most of these steps.
Launch Dreamweaver and choose Site→Manage Sites.
The Manage Sites dialog box opens. If you have already managed a site for the files you intend to transfer, that site’s name should appear in the dialog box. If you haven’t managed a site for this web project, you must manage a site before continuing.
To create a managed site, click the New Site button in the Manage Sites dialog box.
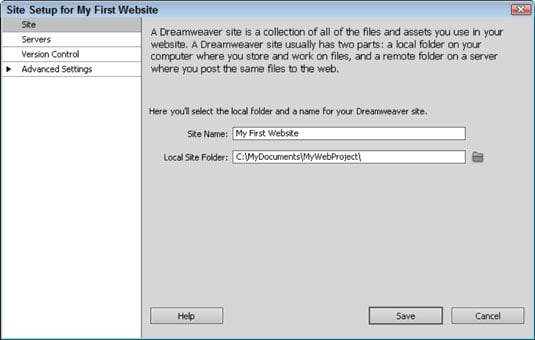
The Site Setup dialog box opens with the Site category selected.
Enter a name for the site in the Site Name text box and the location of the site on your local computer in the Local Site Folder text box.
The name you give your site is solely for your own use and does not appear anywhere on the published site, but it does help you identify the site by name within the Manage Sites dialog box. The local site folder tells Dreamweaver where to find the files for this site so that it can perform special functions like sitewide updates.
In the Category section on the left of the dialog box, select the Servers option. Then, on the right, click the Add New Server (plus sign) button.
The dialog box now displays FTP configuration fields. The Connect Using setting defines the protocol by which files will be transferred between your local computer and the remote server. In this case, it’s preset to FTP.
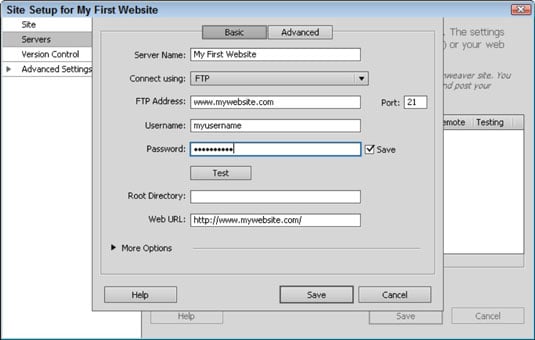
In the FTP Address field, enter the host address where the files will be uploaded to.
This can be either the domain name preceded by www or ftp, such as www.mydomain.com or ftp.mydomain.com, or the domain’s IP address (which should have also been given to you by the host provider). If you’re not sure which one to enter, try www.mydomain.com first, and if that doesn’t work, refer to the information about FTP access furnished by the host provider or system administrator.
(Optional) If your host provider requires the additional input of a host or root directory, enter that information in the Root Directory field.
A host directory or root directory is the location on the remote server where files for your domain will be kept. Typical host directories are often www, public_html, or some specialized name such as /b52/domainname.
If this information is required for FTP access on your host server, your host provider would have furnished this information to you along with the user ID and password. Therefore, if you don’t have (or think your site doesn’t have) a host directory, leave this field blank.
Enter the Username and Password information for the remote server.
Some host providers refer to this information as your Login ID, username, or user ID.
Click the Test button to verify the connection to the remote server.
If the remote information you have entered is accurate and your computer can make an FTP connection to the remote server, Dreamweaver displays a Connection Established success message. Congratulations! You may proceed to Step 9.
If, on the other hand, your computer fails to make a connection to the remote server, you see an error message. Go back and check the spelling of all the information you have entered in the dialog box to ensure that the information is accurate. Typos and incorrect letter case can prevent the connection from being established. Test again until a connection is established.
If, despite your attempts, you still can’t establish a connection to the remote server, contact your host provider or system administrator for assistance. Sometimes resetting the password allows you to establish a connection.
To save this configuration so that you may use this remote connection in the future, select the Save check box next to the Password text box.
This is a very useful feature because it allows you to forget about the username and password and establish a connection to the remote server more quickly when transferring files in the future.
Click the Save button to close the FTP settings pop-up window. Then click the Save button to close the Site Definition dialog box and return to the Manage Sites dialog box. Lastly, click the Done button to close the Manage Sites dialog box.
If you’ve decided to use a different FTP client than Dreamweaver, take a moment to configure your chosen FTP client with the appropriate session profile details for your website. Most FTP tools allow you to either test the connection or make a live connection to verify that your session profile information is accurate.
After you have established a successful remote FTP connection with your domain’s host computer, you’re ready to transfer files between your local computer and the remote host.