Adding items to the Fixed Asset list
To add a piece of furniture, some bit of equipment or machinery, or another item of long-lived value to the Fixed Asset list, follow these steps:-
Choose Lists→Fixed Asset Item List to display the Fixed Asset list.
QuickBooks displays the Fixed Asset Item List window. Initially, because you haven’t yet added any assets, the list shows no assets.
Have assets you’ve purchased already? You can edit the original purchase transaction and add the fixed asset to the list during editing.
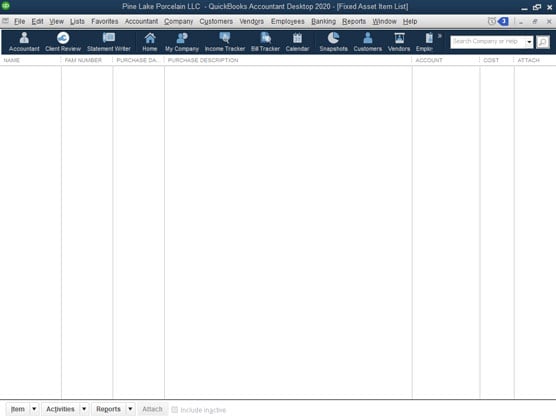 The Fixed Asset Item List window
 -
Tell QuickBooks that you want to add an item to the Fixed Asset list.
Click the Item button (lower left) and then choose New from the menu that QuickBooks displays. QuickBooks displays the New Item window.
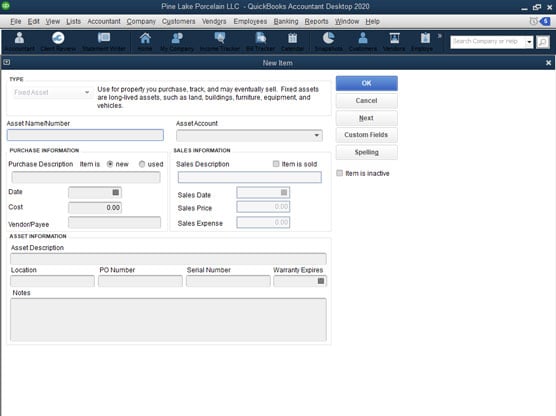 The New Item window
 -
Name the asset.
Give the asset a unique name. You might give a piece of furniture a name like Leather couch, a computer a name like HP Pavilion, and a vehicle a name like a 2017 Ford F-150 pickup truck.
-
Select the appropriate fixed asset account.
From the Asset Account drop-down list, select the fixed asset account in which the asset you’re describing should be placed. A leather couch used in your opulent reception area, for example, might be placed in a furniture and equipment fixed asset account. A delivery truck might be placed in a vehicles fixed asset account.
QuickBooks, as you might guess, supplies a bunch of accounts automatically, but you may not see the account you need or want in the Asset Account drop-down list. You can add a new asset account on the fly by entering a new account name and pressing Enter. When QuickBooks sees that the fixed asset account isn’t yet set up, it prompts you to set up the new fixed asset account.
-
Describe the purchase terms.
Use the Purchase Information area to describe the item that you purchased and the purchase terms. For example, you want to indicate whether the item is new or used by selecting either the New or Used radio button. You can provide a purchase description, purchase date, purchase cost, and even identify the vendor by using the other, self-explanatory boxes in the Purchase Information area.
-
(Optional) Describe the asset in further detail.
The Asset Information area at the bottom of the New Item window provides additional text boxes that you can use to describe the asset. The area provides a humongous field in which to place a lengthy asset description, for example. You also have fields you can use to identify the asset location, the original purchase order (PO) number, the asset’s serial number, and the warranty expiration date.
If these fields aren’t adequate, heck, QuickBooks even supplies a Notes area that you can use to write a small ode to your asset or record some other bit of relevant asset information.
-
Save the asset item description.
Click OK to simultaneously save the new asset item description and close the New Item window. Or, click Next to save the new asset item description but leave the New Item window displayed.
Adding fixed asset items on the fly
You can add items to the Fixed Asset list, as described in the preceding paragraphs. Alternatively, you can add an item to the Fixed Asset list when you record the bill that records the vendor invoice for the asset or when you record the check that pays the vendor invoice for the asset.
Here’s how this works: If you told QuickBooks that you want to maintain a Fixed Asset list, QuickBooks prompts you to add a fixed asset item when you categorize, or debit, a fixed asset account while entering a bill or recording a check.To collect the information required to set up the fixed asset item, QuickBooks displays the same New Item window. The steps for filling in the New Item window also work when adding fixed asset items on the fly.
Editing items on the Fixed Asset list
To edit a fixed asset item — say you made a mistake entering some bit of information — follow these steps:-
Choose Lists→Fixed Asset Item List.
QuickBooks displays the Fixed Asset Item List window.
-
Double-click the item that you want to edit.
QuickBooks displays the Edit Item window.
 The Edit Item window
 -
Update the asset description.
As necessary, update the information shown in the Purchase Information and the Asset Information areas. Note, too, that if you want to record the disposal of an asset, you can select the Item Is Sold check box. Then QuickBooks enables the Sales Information area’s text boxes. You can use these to identify the sales date, price, and amount of selling expenses.
QuickBooks doesn’t do any bookkeeping with the purchase and/or sales information shown in the New Item and Edit Item windows. It doesn’t add an asset to the balance sheet because you set up a fixed-asset item, for example. And QuickBooks won’t calculate the gain or loss on disposition of the asset because you enter sales information. You need to do that yourself — or have your accountant do that — by using either standard QuickBooks transactions or traditional journal entries.