Depending on what your photos will be used for, you may need to adjust the Image Size and Image Quality on your Nikon D5500.Here’s a few tips for Image Size and Image Quality on your camera:
Both options affect picture quality and file size.
Choose a high Image Quality setting — Raw (NEF) or JPEG Fine — and the maximum Image Size setting (Large) for top‐quality pictures and large file sizes.
Combining the lowest Quality setting (JPEG Basic) with the lowest Size setting (Small) greatly shrinks files, enabling you to fit lots more pictures on your memory card, but it also increases the chances that you’ll be disappointed with the quality of those pictures, especially if you make large prints.
Now for the lowdown on how to monitor and adjust the setting: First, to see which options are currently in force, check the Information screen or Live View display.

To adjust the settings, you have two choices:
Information display control strip: Press the i button or tap the i icon on the Information screen to access the control strip. Choose the option you want to change — Image Size or Image Quality — to display a screen showing the available settings. For example, choosing the Image Quality option takes you to the screen shown on the right, where you can select the setting you want to use.
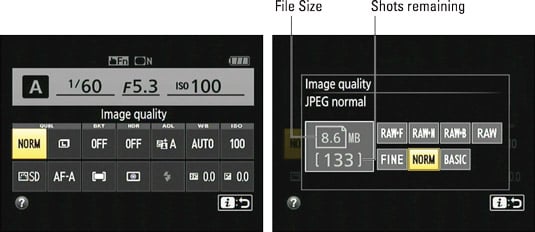 You can adjust both settings quickly via the Information display control strip.
Notice that in the screen, the left side of the display shows the file size that will result from your selected setting along with the number of pictures that will fit on the memory card at that size (8.6MB and 133 images). Keep in mind that certain other factors also affect the file size, such as the level of detail and color in the subject.
Shooting menu: As an alternative, you can adjust the settings via the Shooting menu. If you select the Image Size setting from the menu, the options screen shows the pixel counts for each setting.
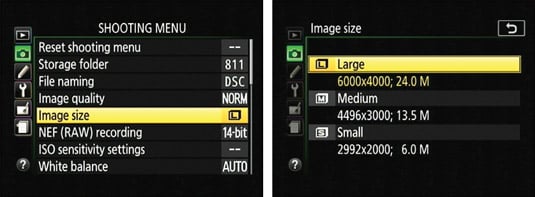 You also can set Image Size and Image Quality via the Shooting menu.
When you choose the Raw (NEF) option, all pictures are automatically captured at the Large resolution setting. However, if you choose one of the Raw+JPEG settings, the JPEG version is captured at the selected Image Size setting.
In addition, you can specify the bit depth of Raw files. Make the call through the NEF (RAW) Recording option on the Shooting menu. You can choose 12 or 14 bits. If you opt for 14 bits, which enables the file to contain more color data, understand that doing so increases the file size. A 12‐bit Raw file has a size of 19.7MB; a 14‐bit file, 24.4MB.
