


When you connect Windows 10 to a new network for the first time, through a wireless network, a cable network, or a mobile USB modem, you’re asked whether you want to allow your PC to be discoverable by other PCs and devices on that network.
If you select Yes, your computer can find PCs, devices, and content on this network and to automatically connect to devices like printers and TVs. When you select Yes, you set the network profile to Private.
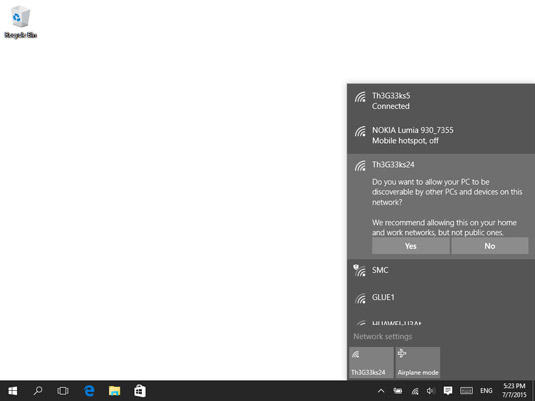
Make your home or work network private if it’s used by people and devices you trust. By default, network discovery is turned on, and you can see other computers and devices that are part of the network. This allows other computers from the network to access your computer, and you can create or join a HomeGroup.
If you select No, you disable all these preceding features, and you set the network profile to Public. This profile is appropriate when you’re in public places such as airports, cafes, and libraries. Network discovery and sharing are turned off. Other computers from the network can’t see your computer. This setting is also useful when your computer is directly connected to the Internet (such as via direct cable/modem connection or mobile Internet).
A third network location profile called a domain network is available for enterprise workplaces. Only a network administrator can set it or change it. This profile is applied only when you’re connected to the network at your workplace.
Except for a domain network, you can easily change profiles for a network after you connect to it.
If you set an incorrect profile when you connect to a new network, you can always change the profile. If you agreed to allow Windows 10 find PCs, devices, and content on your network, then you have set the Private network profile, which makes your Windows 10 device discoverable on the network. If you didn’t agree to let Windows 10 find PCs, devices, and content, you set the Public network profile, which doesn’t allow network sharing.
To change the network profile in Windows 10, follow these steps:
Open Settings.
Click Network & Internet.
The list of network and Internet related settings appears.
Click Ethernet or Wi-Fi, depending on the type of network you’re connected to.
Information about the network you’re connected to appears.
If you’re connected to a wired network, click the name of the network you’re connected to. If you’re connected to a wireless network, click Advanced Options under the list of available wireless networks.
The list of settings available for your network connection is shown.
Set the Find Devices and Content switch to Off or On, depending on whether or not you want to turn on sharing.
Close Settings.
 Changing the network profile in Windows 10.
To enable network sharing, set the Find Devices and Content switch to On. To disable network sharing, set the switch to Off.

