
After neglecting scanner owners in Windows 8, Windows 8.1 makes amends with a new Start screen app that specifically handles the chore of turning physical paper into computer files. Dubbed simply Scan, the new app doesn’t work with older scanners, unfortunately. But if your scanner is relatively new, the Scan app is a refreshing change from complicated scanner menus.
![[Credit: ©iStockphoto.com/lolostock]](https://www.dummies.com/wp-content/uploads/472333.image0.jpg)
Setting up a new scanner for the first time? Be sure to unlock it by sliding a lever or turning a dial on the scanner to the unlock position. That lock protects the scanner during shipping, but you must turn it off before use.
Follow these steps to scan something into your computer:
From the Start screen, open the Scan app.
The Scan app appears on the screen. If it complains that your scanner isn’t connected, make sure you’ve connected the USB cord between your computer and the scanner and that the scanner is turned on.
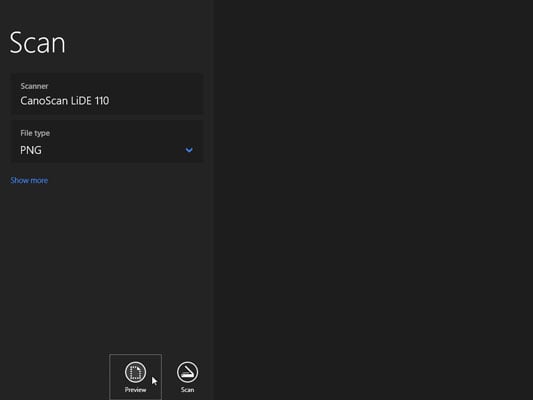
The Scan app appears, listing your scanner’s name and the file type used for saving your files. (The PNG file type is widely accepted by most programs.)
If the app doesn’t recognize your scanner, your scanner is too old. You’re stuck with the scanner’s bundled software — if it works — or, unfortunately, buying a new scanner.
(Optional) To change the settings, click the Show More link.
The app’s default settings work fine for most jobs. The Show More link offers these options for specific types of scans:
Color mode: Choose Color for color items, like photos and glossy magazine pages. Choose Grayscale for nearly everything else and choose Black and White only for line drawings or black-and-white clip art.
Resolution (DPI): For most work, the default 300 works fine. Higher resolution scans (larger numbers) bring more detail but consume more space, making them difficult to e-mail. Lower resolution scans show less detail but create smaller file sizes.
Save File To: The Scan app creates a Scan folder in your PC’s Pictures folder, where it stores your newly scanned images. You can change the Scan folder’s name or even create a different folder for each scanning session.
Click the Preview button to make sure your scan appears correct.
Click the Preview icon, shown in the margin, and the Scan app makes a first pass, letting you preview a scan made with your chosen settings.
If the preview doesn’t look right, make sure you’ve made the right choice for your job in Color Mode, described in the preceding step. If the preview shows a blank white page, make sure you’ve unlocked the scanner as described in the scanner’s bundled instruction sheets.
If you’re scanning a smaller item that doesn’t fill the entire scanner bed, look for the circle markers in each corner of the preview scan. Drag each circle inward to surround the area you want to copy.
Click the Scan button. When the scan finishes, click the View button to see your scan.
The Scan app scans your image with the settings you’ve chosen in the previous steps and then saves your image in your Pictures folder’s Scan folder.
The Scan app works well for fast, easy scans. But because it relies on the simple, built-in Windows software, your scanner’s built-in control buttons won’t work.
If you want the buttons to work or you need finer control over your scans, skip the Scan app, head for the desktop, and install the scanner’s bundled software. (On some scanner models, Windows Update installs the scanner’s bundled software automatically as soon as you plug in the scanner.)