
If your window sashes let in drafts and rattle in their channels, you may want to consider replacing windows. However, a less expensive solution is to install replacement channels in your double-hung windows. Replacing window channels is no walk on the beach, but it does give you an opportunity to clean and repair the windows while they're apart. (Okay, these jobs are no picnic, either.)
By replacing the channels, you can have windows that operate more freely and waste less energy, and you save hundreds or thousands of dollars compared to the cost of buying new windows. A typical-size channel kit costs less than $50.
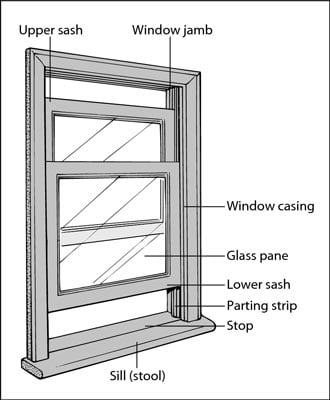
Buy new channels at a home center or glass company. They're sold in kits that range in sizes from 3 to 5 feet long, so they fit most sizes of windows. Measure the window opening from the top of the upper sash to the bottom of the lower sash; then choose a channel kit that's slightly larger.
The following steps walk you through installing new window channels.
Remove the window stops.
If the window stops are painted, use a razor knife to cut through the paint film along the line where the stops meet the jambs. To avoid breaking the stops, use a thin pry bar, pry only at nail locations, and work carefully.
Pull out the lower sash and then pry out the parting strip to remove the upper sash.
Set the sash aside for later, when you can clean it, repaint it, or install new weather-stripping.
Release the sash cords from the slots in the sash.
Pull the sash cord out of the groove in the edge of the sash. Sometimes, the knotted end is held in place by a small nail. If this is the case, pull out the nail to remove the sash cord.
If you're replacing the channels in a double-hung window, this is a good time to replace the sash cords, as well. If your replacement channels are spring-loaded, the sash weights are no longer necessary. In this case, remove and discard the old sash weights and cord and stuff fiberglass insulation loosely into the cavities.
If necessary, cut the new channels to length with a hacksaw.
Remember: Old windows may not be square. Carefully measure each side of the window jamb and cut the channels to fit. Note that the bottom of the channel is cut at a slight angle to match the slope of the sill. If the precut angle matches the slope of your windowsill, trim the top of the channel; if the angle is different, cut the bottom of the channel to the same angle as your sill.
Inspect and clean the sash and stops.
If paint is peeling, now is the time to repaint the windows, while they're out of the frame. To prevent paint runs, lay the sash flat on a workbench or across two sawhorses. Sand the sash carefully to remove any dried paint runs or other roughness from the frames and stops. You want to apply only a thin film of paint on the sash, so thin the paint a bit by adding a small amount of water (to latex paint) or mineral spirits (to alkyd paint).
Painted surfaces do not slide easily against each other. For this reason, some parts of the window sash, such as the backside of the meeting rails and the inside edges of the stops, are left unpainted. Because painting channels or the edges of the sash may cause them to stick, don't paint any exposed bare wood.
Reassemble the window.

Replace the upper sash first — it goes in the outside channel — and then place the lower sash in the inside channel. Hold the channels against the sashes and place the bottom of the channels into the window jamb. Then push the assembly into the jamb so that the channels rest against the outside window stop. The unit will stay in place while you install the inside stops.
Before you nail the stops permanently in place, test to make sure that the windows operate freely. Don't push the stops too tight against the channels, or the windows will be hard to open.