
In Nikon ViewNX 2, you can convert your D5300 Raw files to the JPEG format or, for top picture quality, to the TIFF format. Follow these steps to try it out:
Open ViewNX 2 and click the thumbnail of the Raw file that you want to process.
You may want to set the program to Image Viewer mode, so that you can see a larger preview of the image. Just choose View-->Image Viewer to switch to this display mode.
To give the photo even more room, also hide the Browser panel, which normally occupies the left third of the window, and the Filmstrip panel that usually runs across the bottom of the window. Choose Window-->Browser and Window-->Filmstrip to toggle those window elements on and off.
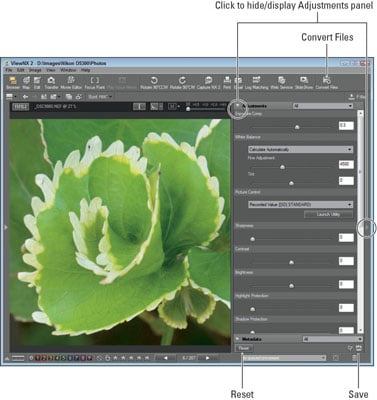
Display the Adjustments panel.
Show and hide this panel and the Metadata panel by choosing Window-->Edit or by clicking the triangle on the far right side of the window. You can then display and collapse the individual panels by clicking the triangles to the left of their names. To allow the maximum space for the Raw conversion adjustments, collapse the Metadata panel.
To display all available settings, choose All from the Adjustments drop-down list.
You may need to use the scroll bar on the right side of the panel to scroll the display to see all the options.
Use the panel controls to adjust the image.
The preview in the image window reflects the default conversion settings chosen by Nikon, but you can play with any of the settings. If you need help understanding any of the options, open the built-in Help system (via the Help menu), where you can find descriptions of how each adjustment affects the image.
To return to the original image settings, click the Reset button at the bottom of the panel.
Click the Save button.
This step stores your conversion settings as part of the image file but doesn't actually create the processed image file. Don't worry, though. Your original Raw data remains intact; all that's saved with the file is a “recipe” for processing the image, which you can change at any time.
To save the processed file, choose File-->Convert Files.
You see the Convert Files dialog box.
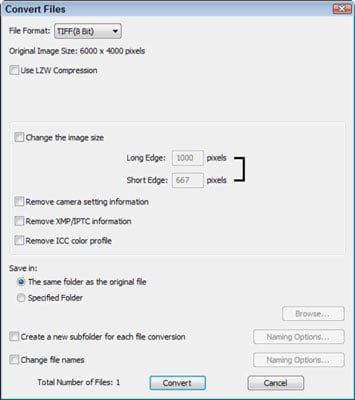
Choose TIFF (8 Bit) from the File Format drop-down list.
TIFF is the best format because it retains your processed file at the highest image quality. (This format has long been the preferred format for print publication.) Don't choose JPEG; the JPEG format applies lossy compression, thereby sacrificing some image quality.
As for the 8 Bit part of the option name: A bit is a unit of computer data; the more bits you have, the more colors your image can contain. Although you can create 16-bit TIFF files in the converter, some photo-editing programs either can't open them or limit you to a few editing tools, so you should stick with the standard, 8-bit image option.
Deselect the Use LZW Compression option.
Although LZW compression reduces the file size somewhat and does not cause any quality loss, some programs can't open files that were saved with this option enabled, so turn it off.
Deselect the Change the Image Size check box.
This step ensures that you retain all the original pixels in the processed image.
Deselect each of the three Remove check boxes.
If you select the check boxes, you strip image metadata—the extra text data that's stored by the camera—from the file. Unless you have some specific reason to do so, clear all three check boxes so that you can continue to access the metadata when you view the processed image in programs that know how to display metadata.
Select a storage location for the processed TIFF file.
You do this in the Save In area of the dialog box. Select the top option to save your processed file in the same folder as the original. Or, to put the file in a different folder, select the Specified Folder button.
If you do, you see the name of the currently selected alternative folder below the button; change the storage destination by clicking the Browse button and then selecting the drive and folder where you want to put the file.
By selecting the Create a New Subfolder for Each File Conversion check box, you can put your TIFF file into a separate folder within the destination folder. With this check box enabled, click the Naming Options button and then specify how you want to name the subfolder.
Specify whether you want to give the processed TIFF a different filename from the original Raw image.
To do so, select the Change File Names check box, click the Naming Options button, and enter the name you want to use.
If you don't change the filename, the program gives the file the same name as the original Raw file. However, you don't overwrite that Raw file because you're storing the copy in a different file format (TIFF). In Windows, the filename of the processed TIFF image has the three-letter extension TIF.
Click the Convert button.
A window appears in order to show you the progress of the conversion process. When the window disappears, your TIFF image appears in the storage location you selected in Step 11.
One neat thing about working with Raw images is that you can easily create as many variations of the photo as you want. For example, you might choose one set of options when processing your Raw file the first time and then use an entirely different set to create another version of the photo.