The Raw file format enables you to capture images as raw data on your Rebel t5i. Although you can print Raw files immediately if you use the Canon software, you can’t take them to a photo lab for printing, share them online, or edit them in your photo software until you process them using a raw converter tool. You can do the job using Digital Photo Professional.
After downloading photos to your computer, follow these steps:
Open Digital Photo Professional, click the thumbnail of the image you want to process, and choose View→Edit in Edit Image Window.
Your photo appears inside an editing window. The exact appearance of the window may vary depending on your program settings. If you don’t see the Tool palette on the right side of the window, choose View→Tool Palette or click the Tool Palette icon to display it. (Other View menu options enable you to customize the window display.)
Choose Adjustment→Work Color Space to choose the color space.
By default, the program uses the color space selected when you shot the picture (sRGB or Adobe RGB, Shooting Menu 2). But you can select from a couple of other options if you prefer. The color space determines the spectrum of colors your image can contain; sRGB is the best option if you're not yet schooled in this subject.
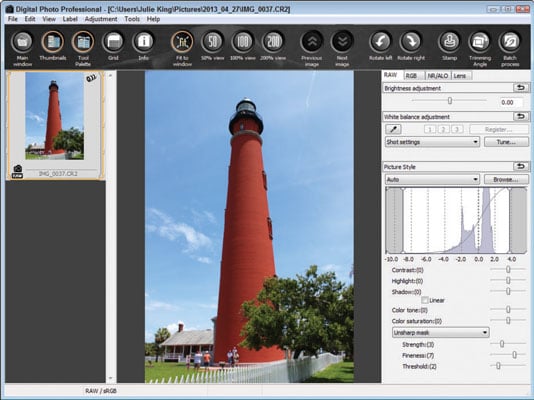
Adjust the image using controls in the Tool palette.
The Tool palette offers four tabs of controls for adjusting photos. You can find complete details in the program's Help system, but here are some tips for a couple critical options:
Raw tab: On this tab, you find controls for tweaking exposure, white balance, color, and sharpness. For white balance, you can choose a specific setting, or click the little eyedropper and then click an area of the image that should be white, black, or gray to remove any color cast. Using the Picture Style option, you can apply one of the camera’s Picture Style options to the photo.
If you captured the picture in Live View and set the aspect ratio to anything other than 3:2, the thumbnail image at the bottom of the Raw tab shows a border over the image to indicate how the photo will be cropped. Remember, Raw images are captured using the 3:2 aspect ratio — and then the Raw processing function crops the original to the aspect ratio you chose.
To change the aspect ratio or crop area, choose Tools→Start Trimming/Angle Adjustment tool, which displays your picture in a separate editing window. Drag inside the crop box to reposition it; click the Clear button to remove the crop box. Then use the Aspect Ratio option to set a new aspect ratio for the picture and drag in the window to create a new crop box. Click OK.
RGB tab: From this tab, you adjust exposure further by using Tone Curve adjustment, a tool that may be familiar to you if you’ve done any advanced photo editing. You can make additional color and sharpness adjustments here as well, but make those changes using the controls on the Raw tab instead.
NR/ALO tab: On this tab, you find controls for softening image noise and can apply the Auto Lighting Optimizer effect here instead of using the in-camera correction.
Lens tab: Click the Tune button to access the options that enable you to access certain lens correction options, including the Peripheral Illumination and Chromatic Aberration features.
At any time, you can revert the image to the original settings by choosing Adjustment→Revert to Shot Settings.
Choose File→Convert and Save.
You see the standard file-saving dialog box with a few additional controls. Here’s the rundown of critical options:
Save as type: Choose Exif-TIFF (8bit). This option saves your image in the TIFF file format, which preserves all image data. Don’t choose the JPEG format; doing so is destructive to the photo because of the lossy compression that's applied.
Output Resolution: This option does not adjust the pixel count of an image, as you might imagine. It only sets the default output resolution to be used if you send the photo to a printer. The final resolution will depend on the print size you choose, however.
Embed ICC Profile in Image: Select this check box to include the color-space data in the file. If you then open the photo in a program that supports color profiles, the colors are rendered more accurately. ICC refers to the International Color Consortium, the group that created color-space standards.
Resize: Clear this check box so that your processed file contains all its original pixels.
Enter a filename, select the folder where you want to store the image, and then click Save.
A progress box appears, letting you know that the conversion and file saving is going forward. Click the Exit button (Windows) or the Terminate button (Mac) to close the progress box when the process is complete.
Click the Main Window button (upper-right corner of program window) to return to the image browser.
Close Digital Photo Professional.
You see a dialog box that tells you that your Raw file was edited and asks whether you want to save the changes.
Click Yes to store your raw-processing “recipe” with the Raw file.
The Raw settings you used are then kept with the original image so that you can create additional copies of the Raw file easily without having to make all your adjustments again.
If you regularly shoot in the Raw format, take the time to explore the Digital Photo Professional Help system so that you can take advantage of its other features.