Excel 2010 offers a couple ways to send your Excel data to the printer. The Quick Print button often is all you need — it just sends the current page to the printer to create a single copy. But if your printing needs are different, Excel 2010's Print panel lets you customize how, what, where, and how many you print.
Quick printing a worksheet
Printing an Excel 2010 worksheet is a breeze if you can use the default print settings to print a single copy of all the cells in the current worksheet. Simply add the Quick Print button to the Quick Access toolbar (by clicking the Customize Quick Access Toolbar button and then clicking Quick Print on its drop-down menu).
When you click the Quick Print button, Excel routes the print job to the Windows print queue, which acts like a middleman to send the job to the printer. While Excel sends the print job to the print queue, Excel displays a Printing dialog box to inform of its progress (displaying such updates as Printing Page 2 of 3). After this dialog box disappears, you are free to go back to work in Excel.
Printing from the Print panel
Printing with the Quick Print button is fine if all you want is a single copy of all the information in the current worksheet. If you want more copies, or more or less data (such as all the worksheets in the workbook or just a cell selection within a particular worksheet), then you need to print from the Print panel in Excel 2010's new Backstage view.
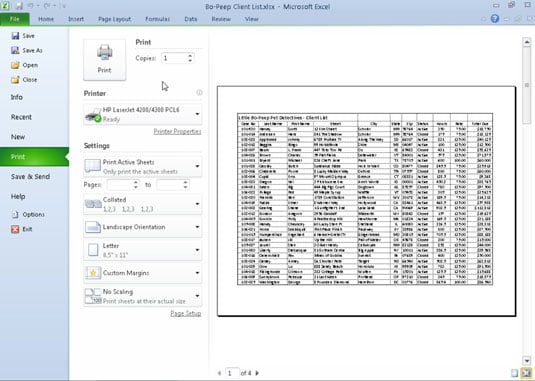
Excel provides several ways to open the Print panel:
Press Ctrl+P.
Click the File tab and choose Print.
Press Alt+FP.
After you open the Print panel, change any settings as needed, and click the Print button on the Print panel to begin printing.
Canceling a print job
If you need to stop the printing while a print job is in the process of being sent to the print queue, click the Cancel button in the Printing dialog box. If this dialog box has already vanished (after Excel finishes shipping to the print queue), you must open the dialog box for your printer and cancel printing from there:
Right-click the printer icon in the Notification area at the far right of the Windows taskbar to open its shortcut menu.
Select Open All Active Printers from the shortcut menu.
This opens the dialog box for the printer with the Excel print job in its queue.
Select the Excel print job that you want to cancel in the list box of your printer's dialog box.
Choose Document→Cancel from the menu bar, and then click Yes to confirm that you want to cancel the print job.
Wait for the print job to disappear from the queue in the printer's dialog box and then click the Close button.