If you like the feel of painting on a canvas, you’ll appreciate the Selection Brush tool in Photoshop Elements. Using two different modes, you can either paint over areas of an image that you want to select or paint over areas you don’t want to select.
This great tool also lets you make a basic, rudimentary selection with another tool, such as the Lasso, and then fine-tune the selection by brushing additional pixels into or out of the selection.
Here’s the step-by-step process of selecting with the Selection Brush:
Select the Selection Brush from the Tools panel.
Or simply press the A key. Press Shift+A if the Quick Selection tool is visible. This tool works in either Edit Full or Edit Quick mode.
Specify your Selection Brush options on the Options bar.
 Selection Brush settings on the Options bar.
Here’s the rundown on each option:
Brush Presets: Choose a brush from the presets drop-down panel. To load additional brushes, click the downward-pointing arrow to the left of Default Brushes and choose the preset library of your choice. You can select the Load Brushes command from the panel pop-up menu.
Brush Size: Specify a brush size, from 1 to 2500 pixels. Enter the value or drag the slider.
Mode: Choose between Selection and Mask. Choose Selection if you want to paint over what you want to select. Choose Mask if you want to paint over what you don’t want.
If you choose Mask mode, you must choose some additional overlay options. An overlay is a layer of color (that shows onscreen only) that hovers over your image, indicating protected or unselected areas.
You must also choose an overlay opacity between 1 and 100 percent. You can change the overlay color from the default red to another color. This option can be helpful if your image contains a lot of red.
Hardness: Set the hardness of the brush tip, from 1 to 100 percent.
If your mode is set to Selection, paint over the areas you want to select.
You see a selection border. Each stroke adds to the selection. (The Add to Selection button in the Options bar is automatically selected.) If you inadvertently add something you don’t want, simply press the Alt (Option on the Mac) key and paint over the undesired area.
You can also select the Subtract from Selection button on the Options bar. After you finish painting what you want, your selection is ready to go.
If your mode is set to Mask, paint over the areas that you don’t want to select.
When you’re done painting your mask, choose Selection from the Mode drop-down menu, or simply choose another tool from the Tools panel, in order to convert your mask into a selection border. Remember that your selection is what you don’t want.
While you paint, you see the color of your overlay. Each stroke adds more to the overlay area. When working in Mask mode, you’re essentially covering up, or masking, the areas you want to protect from manipulation. That manipulation can be selecting, adjusting color, or performing any other Elements command.
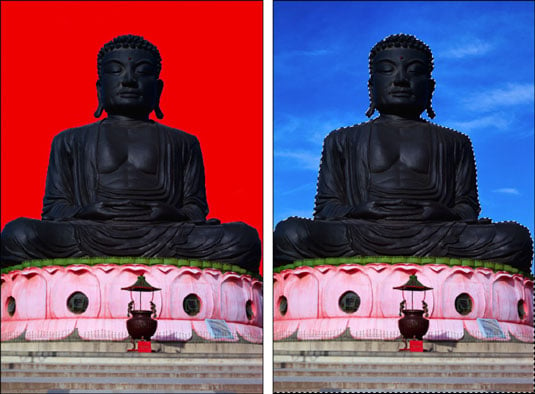 Credit: Corbis Digital StockThe Selection Brush allows you to make a selection (right) by creating a mask (left).
If you painted your selection in Mask mode, your selection border is around what you don’t want. To switch to what you do want, choose Select→Inverse.
Which mode should you choose? Well, it’s up to you. But one advantage to working in Mask mode is that you can partially select areas. By painting with soft brushes, you create soft-edged selections. These soft edges result in partially selected pixels. If you set the overlay opacity to a lower percentage, your pixels are even less opaque, or “less selected.”