In bridge, you need to look at a hand and determine whether you need to create any extra winners to make your contract. Count your losers (in your hand and the dummy’s), suit by suit, and determine whether a straightforward plan of attack will do or whether you need to create extra winners to make your contract.
For the hand in this image, your contract is for ten tricks, and West leads the ♥K. You count up the following losers:
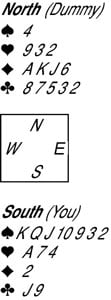
Spades: One loser, the ♠A, a trick they’re sure to take.
Hearts: Two immediate losers (after you play the ♥A). The dummy’s hearts can’t cover your two remaining small hearts, the ♥7 and the ♥4.
Diamonds: No losers! In fact, you have one sure extra winner (the ♦A and ♦K. One covers your ♦2 and you still have an extra winner). You may have two extra winners if you want to risk a finesse by leading a low diamond to the ♦J.
Clubs: Two immediate losers: The dummy doesn’t have any winners that can cover the 9 and J.
You have to take ten tricks, so you can afford only three losers. But you have five — count ’em, five — losers. The situation looks a little bleak, doesn’t it? To make matters worse, all your losers are immediate after your ♥A is gone. The only resource you have is your diamond suit.
Getting rid of one heart or club loser by playing the ♦AK isn’t enough. You need to get rid of two losers if you want to make your contract. So what can you do? Go for a finesse:
Win the first trick with the ♥A.
Lead a low diamond, the ♦2, to the ♦J in the dummy.
If your finesse works, you can play the ♦AK, and because you have no more diamonds in your hand, you can discard two losers in either hearts or clubs.
If the finesse loses (because East takes your ♦J with the vQ), you’ll lose your contract big time. However, you can console yourself knowing that you made the right play, the gutsy play, the bridge play, the play that allows you to make your contract if the finesse works.
But what if you need to take only nine tricks with the same opening lead (West’s ♥K). In this contract, you can afford to lose four tricks, so you only have to get rid of one of your five losers to make the hand. Life is now a lot less challenging:
Win the first trick with the ♥A.
Play the ♦AK from the dummy, discarding one loser from your hand on the second winning diamond.
Play a spade.
No risky finesse is necessary in this contract — your loser count tells you how to play your diamond suit.
With all this finessing and creating extra winners going on, you may lose sight of your goal, which is making your final contract. Don’t take any unnecessary risks, such as a finesse, unless you need to do so to make your contract.