When you're hanging wallpaper, the seams and corners can present problems. Don’t despair. If you follow these tips, you can have seams and corners that look professional. For a perfect seam, the seaming method depends, in part, on the location.
For example, at inside corners (or out-of-plumb outside corners), use a wrap-and-overlap seam, in which one drop wraps the corner about 1⁄2 inch and the other drop overlaps the first drop and ends right in the corner.
Working with butt seams
The most common midwall seam is the butt seam, where the two edges touch but don’t overlap. As you hang each drop, position it next to the preceding one so that the edges just touch. If you don’t get it right, peel it back as needed to reposition it. If the paper still needs adjustment, push carefully with two outstretched hands.
Don't force misaligned paper into position by pushing it. Overworking the paper stretches it, and when the paper returns to its normal expanded size, the seam will open. You might also tear the wallcovering.
Use a seam roller to seal the seam. Be firm but don’t press so hard that you roll out all the adhesive. As you finish hanging each drop, check the previous seam. If the edge has lifted, lightly reroll it. If it has pulled apart, smooth the paper toward the seam or give it a little tap toward the seam with the smoothing brush.
Making relief cuts
Anytime you turn a corner or paper around an obstacle, such as a window, you need to make a relief cut in the paper. Only one cut is required at right angles. When papering around rectangular obstructions, such as electrical outlets, however, you need to make four cuts; one cut must originate from each corner, and the cuts should connect to form an X. You need to make many closely spaced relief cuts around a curve, such as an archway or the base of a round light fixture.
To make a relief cut, smooth the paper as close to the obstacle as possible. Then make the cut in place with a razor knife or crease the paper at the edge of the obstacle and peel it back to make the cut.
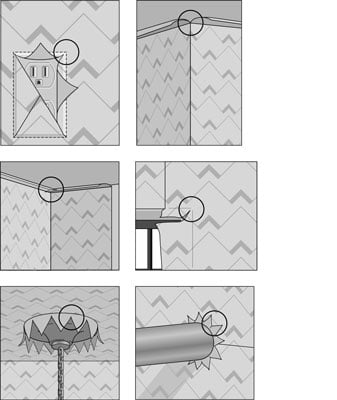
The following situations call for relief cuts:
Inside and outside wall corners: Smooth the wallcovering up to the corner. Make a relief cut out from the corner. Start the cut at the ceiling-wall-corner intersection and extend it to the edge of the paper. Then wrap the corner.
Electrical switch and receptacle boxes: Paper over the outlet. Starting at each corner, make a diagonal cut so that all cuts connect to form an X. Trim the flaps by making cuts from corner to corner around the perimeter.
Window and door trim: Cut the paper, leaving a 2-inch allowance at the trim. Smooth the paper up to the side of the trim and crease it into the corner formed by the trim and the wall. Make a diagonal relief cut starting precisely at the 90-degree corner of the trim and extending out to the edge of the paper. The smooth the paper over the window and door and roll the seam. Finally, trim the flaps with a razor knife and straightedge.
Round or curved obstacles: Smooth the paper up to the closest edge of the obstacle and make a relief cut up to that edge. Smooth a little more and make one relief cut on each side of the first cut. Continue smoothing and cutting.
Handrail or pipe: Make a single cut from the obstacle to the nearest edge of the paper. Then proceed with the multiple relief cuts. As you complete the circle, smooth and seam the long cut as you would any butt seam.