
To install a CMS for your HTML5 and CSS3 site, you need to download these components and install them on your server. A CMS package typically contains many different kinds of files. Most are primarily PHP programs with HTML/HTML pages and CSS. Most CMSs also include databases written in MySQL.
Download the latest version of WebsiteBaker.
Download the .zip file. (The CMS is all web code, so it doesn't matter which operating system you use.)
Create a subdirectory on your web root.
If you use a local server, create a new subdirectory under (or wherever you save your web files). If you're on a remote server, use FTP or the file management tool to create the subdirectory you want the files to go in.
Copy all WebsiteBaker files to the new directory.
The .zip file you download from WebsiteBaker contains a directory. Copy all files and folders in this directory to your new directory.
Navigate to the new directory in your browser.
Be sure you have Apache and MySQL turned on. If you're on a local machine, be sure to use the mechanism to find the directory.
If all is well, you see the WebsiteBaker Installation Wizard.
Most CMSs work in a similar way: You install a set of base files to the server, and then the system helps you get the other systems configured. Here's how to install WebsiteBaker:
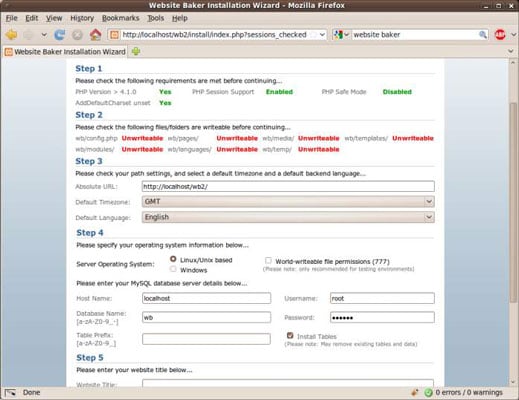
Check system configuration.
The Step 1 section of the installation wizard ensures all the needed components are available on your server.
Ensure folders are writable.
The CMS will need to write files to the server. If you're in a Unix-based system, you may have to check the file permissions to ensure all files and folders specified in this section can be written to. Each specified file or folder can be set to 777 permission.
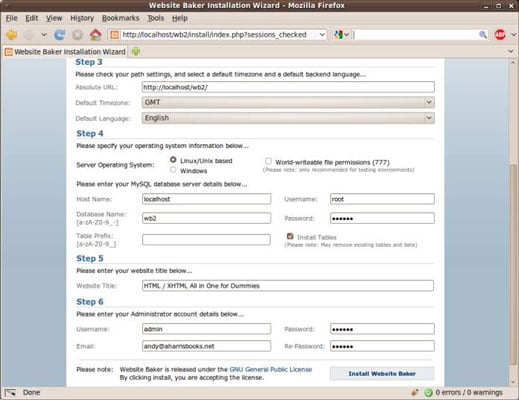
Set default settings.
Specify the path to the CMS, the default time zone, and the default language.
Specify your operating system.
Windows has its own way of doing things, so let WebsiteBaker know whether you're using Windows or a Unix-based system. (Mac OSX and Linux are both Unix-based.)
Include database information.
Supply the information needed so WebsiteBaker can get to your database. Supply a database name as well as the username and password you want to use to access the database. Check the Install Tables option to have WebsiteBaker automatically build the database you need.
Enter the website name.
This name appears on all the site's pages (but you can change it later).
Create an administrator account.
The admin account will have the ability to change the site. Create a user named admin with a password you can remember.
Install the CMS.
Press the Install WebsiteBaker button to install the CMS.
If all goes well, you're greeted by the administration page.
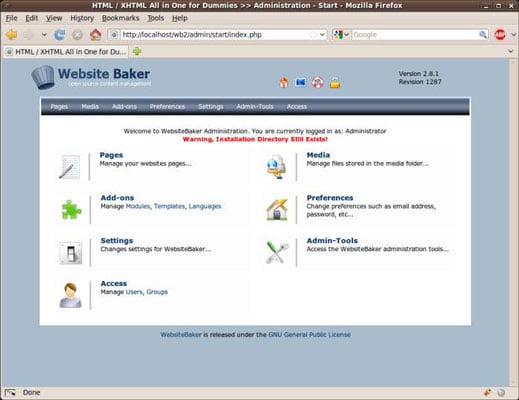
The final step of installing your CMS is to remove the install directory. This directory contains the scripts and tools you used to install the CMS. If you leave it in place, bad guys can reinstall your CMS from the web and destroy your settings.
Use your file management or FTP tool to delete the install directory from your WebsiteBaker directory as soon as you're satisfied the installation went well. When you do this, the warning about the installation directory will disappear.
Instead of installing the CMS manually, many hosting services have automated installation scripts for popular CMSs that you can use. Freehostia has built-in support for WebsiteBaker, but the automated systems tend to have older versions of the software. You should still know how to set up the CMS by hand.