Playing a keyboard involves your whole body. Just wiggling your fingers about isn’t enough; you need to consider your sitting/standing position, your neck and shoulders, your arms and wrists, and even your legs and feet. Good position and posture helps you to play better and to avoid any pain that can arise from developing bad habits.
Proper posture for keyboard playing
First things first: Playing a keyboard should never hurt, cramp, or fatigue your hands, wrists, arms, or shoulders. Good playing posture is an important part of your technique and very important to avoid pain and fatigue; here are some guidelines for getting in the right position:
Relax your hands. You don’t need to keep them tense or to use undue pressure to hold the note down. After you’ve played a key, any further movements don’t affect how the note sounds.
Be sure your back is straight and you aren’t lifting your shoulders.
If you’re feeling any strain or pain, stop right away and reconsider your physical position.
When you sit at the keyboard, your arms should hang relaxed from the shoulder. Bend your elbows so your arm forms a straight line from the elbow across the wrists to the finger. If you’re sitting too high or too low, this straight line may not happen; you should either adjust the height of your chair/bench or the stand the keyboard is on.
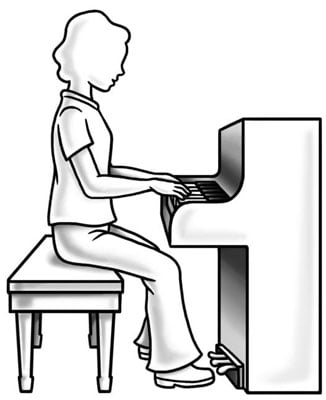
If you’re standing while playing the keyboard, you still want the same level arm position, at least for your main piano-type keyboard. If you’re using multiple keyboards stacked vertically on the same stand, the upper keyboard can’t be at the perfect position, but try not to position it too high; your arms and shoulders will fatigue quickly when reaching up to play it.
How to shape your hand and fingers
How you hold your hand and shape your fingers enables you to use them as little hammers to easily play notes and move your hand position around the keyboard. Here’s a simple trick to form the perfect bent finger position:
Lay your hand flat on a table/surface.
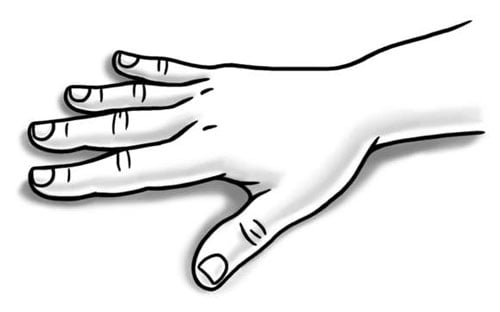
2. Keeping the heel of your palm on the surface, slowly pull your fingers in so they curl inward.
The back of your hand (at the knuckles) will rise up a bit as you do this step. When your fingertips are on the surface, you’re in good position.

Some teachers describe this position as looking like you could cup a small tennis ball in your hand. You can try that as well. The result is that your fingers are arched nicely, the tips of your fingers are ready to touch the keys, and your thumb forms a straight line back to your wrist and across your forearm.