After you create a SmartArt graphic in a worksheet, Excel 2010 provides many ways to format the graphic on the SmartArt Tools contextual tabs. For example, you can change the color scheme and style of the graphic, and you can make formatting changes to the individual shapes in the graphic.
Change the color scheme and style
To change the color scheme and style of the SmartArt graphic, follow these steps:
On the SmartArt Tools Design tab, click the Change Colors button in the SmartArt Styles group.
A gallery of color options appears.
Select the color combination you want to use.
Click the More button in the SmartArt Styles group.
A gallery of styles appears.
Pause your mouse over any selection to see a description of the selection and review how your chart looks in a particular style.
Some choices are subtler than others. Several are three-dimensional, and some even include special features such as soft or glowing edges.
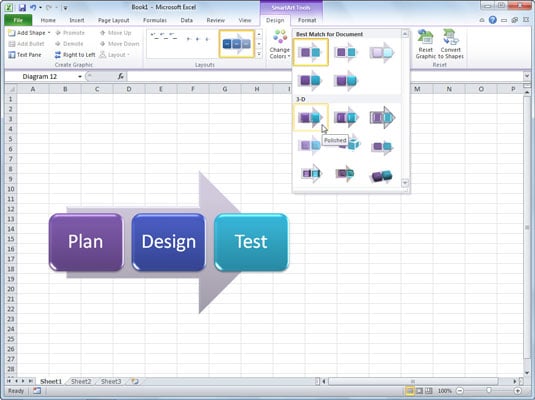 Pick a color scheme and style.
Select the choice best suited for your SmartArt graphic.
Change a shape style
Use the following steps to change the style of individual shapes in the SmartArt graphic:
Select a shape box you want to change.
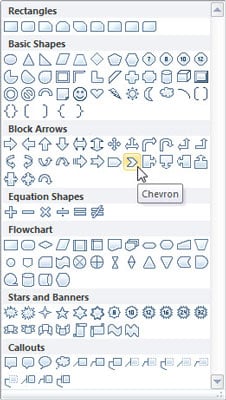
On the SmartArt Tools Format tab, click the Change Shape button in the Shapes group.
A gallery of shapes appears.
Select the shape you want to use.
The selected shape box changes to the new style.
 Emphasize a shape by changing the style of the shape box.
(Optional) With the shape box still selected, click the Larger button in the Shapes group on the SmartArt Tools Format tab.
The selected shape grows in size.
Modify other shape attributes
Follow these steps to change other attributes of the individual shapes in a SmartArt graphic:
Select the shape box(es) you want to change.
If you want to change the frame instead of the individual shapes, don't select any individual shapes.
Choose from the following options in the Shape Styles group on the SmartArt Tools Format tab:
Shape Fill: Select an option such as Picture, Gradient, or Texture. Although you can use a picture to fill a shape, this might make the text difficult to read.
Shape Outline: Select an option for the line outlining the shape. Choose Weight to select a heavier border line style or choose Dashes to select a different border style.
Shape Effects: Select a special effect such as Shadow or Glow. Most options offer an additional fly-out with secondary options.