


You can use the Allow Users to Edit Ranges command button in the Changes group on the Review tab of the Excel 2013 Ribbon to enable the editing of particular ranges in the protected worksheet by certain users. When you use this feature, you give certain users permission to edit particular cell ranges, provided that they can correctly provide the password you assign to that range.
To give access to particular ranges in a protected worksheet, you follow these steps:
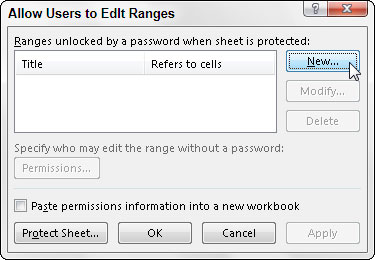
Click the Allow Users to Edit Ranges command button on the Ribbon’s Review tab or press Alt+RU.
Note that the Allow Users to Edit Ranges command button is grayed out and unavailable if the worksheet is currently protected. In that case, you must remove protection by clicking the Unprotect Sheet command button on the Review tab before you retry Step 1.
Excel opens the Allow Users to Edit Ranges dialog box, where you can add the ranges you want to assign.
Click the New button.

Doing this opens the New Range dialog box where you give the range a title, define its cell selection, and provide the range password.
If you wish, type a name for the range in the Title text box; otherwise, Excel assigns a name such as Range1, Range2, and so on.
Next, you designate the cell range or nonadjacent cell selection to which access is restricted.
Click the Refers to Cells text box and then type in the address of the cell range (without removing the = sign) or select the range or ranges in the worksheet.
Next, you need to enter a password that’s required to get access to the range. Like all other passwords in Excel, this one can be up to 255 characters long, mixing letters, numbers, and spaces. Pay attention to the use of upper- and lowercase letters because the range password is case-sensitive.
Type in the password for accessing the range in the Range Password dialog box.
You need to use the Permissions button in the New Range dialog box to open the Permissions dialog box for the range you’re setting.
Click the Permissions button in the Range Password dialog box.
Next, you need to add the users who are to have access to this range.
Click the Add button in the Permissions dialog box.
Doing this opens the Select Users or Groups dialog box, where you designate the names of the users to have access to the range.
Click the name of the user in the Enter the Object Names to Select list box at the bottom of the Select Users or Groups dialog box. To select multiple users from this list, hold down the Ctrl key as you click each username.
If this list box is empty, click the Advanced button to expand the Select Users or Groups dialog box and then click the Find Now button to locate all users for your location.
You can then click the name or Ctrl+click the names you want to add from this list, and then when you click OK, Excel returns you to the original form of the Select Users or Groups dialog box and adds these names to its Enter the Object Names to Select list box.
Click OK in the Select Users or Groups dialog box.
Doing this returns you to the Permissions dialog box where the names you’ve selected are now listed in the Group or User Names list box. Now you need to set the permissions for each user. When you first add users, each one is permitted to edit the range without a password.
To restrict the editing to only those who have the range password, you need to click each name and then select the Deny check box.
Click the name of the first user who must know the password and then select the Deny check box in the Permissions For list box.

You need to repeat this step for each person in the Group or User Names list box that you want to restrict in this manner.
Repeat Step 10 for each user who must know the password and then click OK in the Permissions dialog box.
As soon as you click OK, Excel displays a warning alert dialog box, letting you know that you are setting a deny permission that takes precedence over any allowed entries, so that if the person is a member of two groups, one with an Allow entry and the other with a Deny entry, the deny entry permission rules (meaning that the person has to know the range password).
Click the Yes button in the Security alert dialog box.
Doing this closes this dialog box and returns you to the New Range dialog box.
Click OK in the New Range dialog box.
Doing this opens the Confirm Password dialog box where you must accurately reproduce the range password.
Type the range password in the Reenter Password to Proceed text box and then click the OK button.
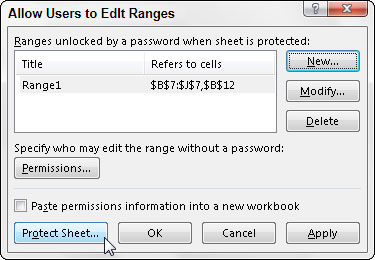
Doing this returns you to the Allow Users to Edit Ranges dialog box where the title and cell reference of the new range are displayed in the Ranges Unlocked by a Password When Sheet Is Protected list box.
If you need to define other ranges available to other users in the worksheet, you can do so by repeating Steps 2 through 14.
When you finish adding ranges to the Allow Users to Edit Ranges dialog box, you’re ready to protect the worksheet. If you want to retain a record of the ranges you’ve defined, go to Step 15. Otherwise, skip to Step 16.
(Optional) Select the Paste Permissions Information Into a New Workbook check box if you want to create a new workbook that contains all the permissions information.
When you select this check box, Excel creates a new workbook whose first worksheet lists all the ranges you’ve assigned, along with the users who may gain access by providing the range password. You can then save this workbook for your records. Note that the range password is not listed on this worksheet — if you want to add it, be sure that you password-protect the workbook so that only you can open it.
Now, you’re ready to protect the worksheet. If you want to do this from within the Allow Users to Edit Ranges dialog box, you click the Protect Sheet button to open the Protect Sheet dialog box.
If you want to protect the worksheet later on, you click OK to close the Allow Users to Edit Ranges dialog box and then click the Protect Sheet command button on the Review tab of the Ribbon (or press Alt+RPS) when you’re ready to activate the worksheet protection.
Click the Protect Sheet button to protect the worksheet; otherwise, click the OK button to close the Allow Users to Edit Ranges dialog box.
If you click the Protect Sheet button, Excel opens the Protect Sheet dialog box, where you can set a password to unprotect the sheet. This dialog box is also where you select the actions that you permit all users to perform in the protected worksheet.
After you turn on protection in the worksheet, only the users you’ve designated are able to edit the cell range or ranges you’ve defined. Of course, you need to supply the range password to all the users allowed to do editing in the range or ranges at the time you distribute the workbook to them.

