
When you review an image, you decide whether it’s a keeper. If while reviewing an image on your Canon EOS 7D Mark II, you don’t like the image for any reason, you can delete it. However, deleting images needs to be done with extreme caution because the task can’t be undone. After you delete an image from your card, it’s gone forever.
To delete a single image:
Press the Playback button to display the last viewed image, or last photo taken, and then use the Quick Control dial to navigate to the image you want to delete.
Each time you rotate the dial, you display a different image. Sometimes you’ll just know that an image is a clunker as soon as it appears on the LCD monitor.
You can also review the images as thumbnails and delete an image. If you decide this is faster, press the Set button to fill the monitor with the image before you delete it.
Press the Erase button.
The Erase menu appears at the bottom of your monitor. At the risk of being redundant, deleting an image can’t be undone. At this stage, you still have the chance to stop this action by highlighting Cancel and then pressing Set.

Rotate the Quick Control dial to highlight Erase and then press the Set button.
The image is deleted.
You can also mark multiple images for deletion. This is similar to deleting a bunch of images in an image-editing program. Images should be reviewed on a computer in which you have a bigger screen and it’s easier to examine images in detail.
Deleting in the camera should be used only for obvious clunkers, such as out of focus images, or when you photographed a moving target like a bird in flight and cut off half his body. But some may find deleting multiple images useful, and you can do so with your EOS 7D Mark II. To delete multiple images:
Press the Menu button.
The last used camera menu displays on the camera LCD monitor.
Press the Quick Control button to navigate to the Play tab and then use the multi‐controller button to highlight the Play1 menu.
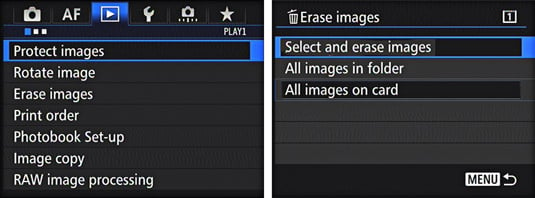
Rotate the Quick Control dial to highlight Erase Images and then press the Set button.
The options for erasing images display on the camera LCD monitor.
Rotate the Quick Control dial to highlight Select and Erase Images.
Press Set.
A single image displays on the camera LCD monitor unless you’re viewing multiple thumbnails while reviewing. If you are reviewing single images and prefer to view thumbnails while marking images for deletion, press the Index/Reduce/Magnify button to view three images as thumbnails.
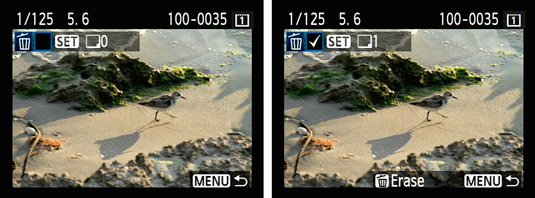
Press Set to mark an image for deletion.
After you mark an image for deletion, a check mark appears.
If you’re viewing multiple images as thumbnails, rotate the Quick Control dial to highlight an image and then press Set to mark it for deletion. After you mark a thumbnail for deletion, a check mark appears above it. You can view one image at a time. The thumbnails are too small to give you enough information to determine whether an image needs to be deleted.
If you accidentally select an image for deletion that you don’t want to delete, press Set to deselect the image.
If you’re viewing thumbnails and want to see the bigger picture before you mark an image for deletion, press the Index/Reduce/Magnify button to display a single image on the monitor. Press the button again to zoom in, and then use the multi‐controller button to pan to different parts of the image.
Review other images and mark the duds for deletion.
A check mark appears on the display when you mark an image for deletion. The total number of images you’ve marked for deletion appears to the right of the word Set in the LCD monitor.
Press the Erase button to delete the images.
The Erase Images menu displays. At this stage, you still have the chance to back out if you navigate to the Cancel button and press Set.
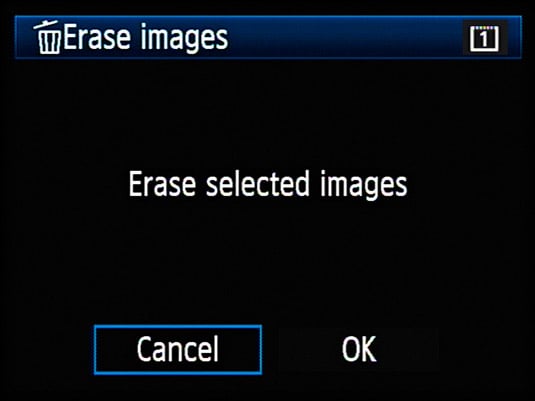
Rotate the Quick Control dial to highlight OK and then press Set.
Faster than a bullet from a gun, the images are toast.
Your camera also has menu options to erase all images in a folder or on the card. This type of heavy lifting needs to be done with your computer and not in the camera because erasing images uses battery power. After all the heavy work is done on the computer, format the camera card and then you’re ready to shoot up a storm.
If you do a lot of work away from your main computer and need to download cards after a day of shooting, consider investing in one of the small netbook computers, or travel with a laptop if you own one. You can install your image‐editing software on the netbook, download images from a card, and then do some preliminary winnowing and editing. Currently, you can purchase a fairly potent netbook for less than $300.