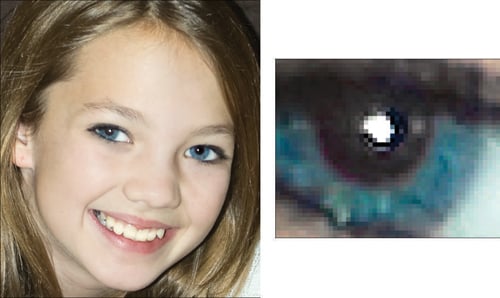
The first decision you need to make with your Canon EOS 70D, in order to decide upon an Image Quality setting, is how many pixels you want your image to contain. Pixels are the little square tiles from which all digital images are made; pixel is short for picture element. You can see some pixels close up in the right image in the following figure, which shows a greatly magnified view of the eye area in the left image.
The number of pixels in an image is referred to as its resolution. Your Canon 70D offers five resolution levels, which are assigned the generic labels Large, Medium, and Small (1–3) and are represented by the initials L, M, and S (1–3). The following table shows you the pixel count that results from each option.
| Symbol | Setting | Pixel Count |
|---|---|---|
| L | Large | 5472 x 3648 (20MP) |
| M | Medium | 3648 x 2432 (8.9MP) |
| S1 | Small 1 | 2736 x 1824 (5.0MP) |
| S2 | Small 2 | 1920 x 1280 (2.5MP) |
| S3 | Small 3 | 720 x 480 (0.30MP) |
In the table, the first pair of numbers in the Pixel Count column represents the image pixel dimensions — the number of horizontal pixels and the number of vertical pixels. The values in parentheses indicate the total resolution, which you get by multiplying the horizontal and vertical pixel values. This number is usually stated in megapixels, or MP for short. The camera displays the resolution value using only one letter M, however. Either way, 1MP equals 1 million pixels.
To choose the right setting, you need to understand the three ways that pixel count affects your pictures:
Print size: Pixel count determines the size at which you can produce a high-quality print. How many pixels you need depends on your photo printer. You typically need anywhere from 200 to 300 pixels per linear inch, or ppi, of the print. To produce an 8 x 10 print at 200 ppi, for example, you need a pixel count of 1600 x 2000, or just less than 2MP.
Screen display size: Resolution doesn’t affect the quality of images viewed on a monitor, television, or other screen device the way it does for printed photos. Instead, resolution determines the size at which the image appears. This issue is one of the most misunderstood aspects of digital photography. Just know that you need way fewer pixels for onscreen photos than you do for printed photos. In fact, the smallest resolution setting available on your camera, 720 x 480 pixels, is plenty for e-mail sharing. At larger sizes, the recipient usually can’t view the entire picture without scrolling the display (or the photo is resized to fit the monitor, which defeats the purpose of having a large file in the first place).
File size: Every additional pixel increases the amount of data required to create a picture file. So, a higher-resolution image has a larger file size than a low-resolution image.
So what do you do if you aren’t sure how large you want to print your images? What if you want to print your photos and share them online? Here are some recommendations:
Always shoot at a resolution suitable for print. You then can create a low-resolution copy of the image in your photo editor for use online.
For everyday images, Medium is a good choice. The Large setting tends to be overkill for most casual shooting, creating huge files for no good reason. Keep in mind that even at the Medium setting, your pixel count (3648 x 2432) is enough to produce an 8 x 10 print at 300 ppi.
Choose Large for an image that you plan to crop, print very large, or both. The benefit of maxing out resolution is that you have the flexibility to crop your photo and still generate a decent-sized print of the remaining image. The following figure offers an example. When shooting this photo, the photographer couldn’t get closer to the butterfly than the first picture shows. But because the resolution was set to Large, he was able to crop the shot to the composition in the right image and still produce a good print.

Reduce resolution if shooting speed is paramount or you’re running out of space on your memory card. When you’re shooting action and the shot-to-shot capture time is slower than you’d like, dialing down the resolution may help. And of course, fewer pixels means that you can fit more images in the space available on your memory card. You’ll see the shots-remaining value in the displays increase as you choose a lower resolution setting.