Crochet a newsboy cap, and you'll be as stylish as Hollywood and music stars. This crocheted newsboy cap allows you to use crocheting techniques to shape the hat and its brim. The yarn used in this project looks like suede but is much easier to care for.
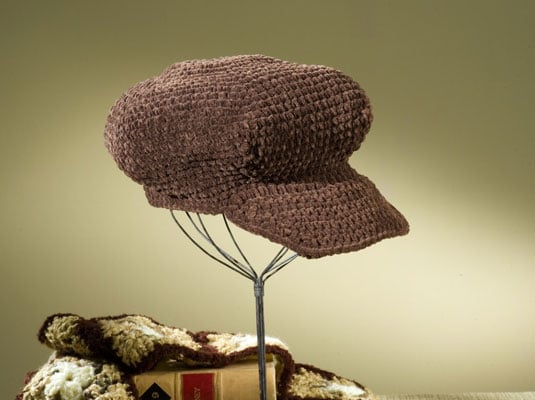
Create this coffee suede beret with these materials and vital statistics:
Size: One size fits most adults
Yarn: Lion Brand Yarn “Lion Suede” bulky-weight yarn (100% polyester), Article #210 (3 oz. [85 g], 122 yds [110 m] each skein): 3 skeins of #126 Coffee
Hook: Crochet hook size I-9 U.S. or size needed to obtain gauge
Stitch markers
Measurement: 21 in. in circumference
Gauge: First 7 rnds = 4 in.
Stitches used: Chain stitch (ch), slip stitch (sl st), single crochet (sc). Dec 1 sc: (Insert hook in next st, yo, draw yarn through st) twice, yo, draw yarn through 3 loops on hook . Long single crochet (lsc): Working over sc in current row, sc in sc 2 rows below.
Stitch in circles to create the beret:
Create the beret body by following this stitch pattern:
Foundation chain: Ch 2.
Rnd 1 (right side): Work 6 sc in 2nd ch from hook (6 sc), do not join. Continue to work in a spiral, marking beg of each rnd, moving marker up as work progresses.
Rnd 2: 2 sc in each sc around (12 sc).
Rnd 3: Sc in next sc, 2 sc in next sc , rep from to around (18 sc).
Rnd 4: Sc in each of next 2 sc, 2 sc in next sc , rep from to around (24 sc).
Rnd 5: Sc in each of next 3 sc, 2 sc in next sc , rep from to around (30 sc).
Rnd 6: Sc in each of next 4 sc, 2 sc in next sc , rep from to around (36 sc).
Rnd 7: Sc in each of next 5 sc, 2 sc in next sc , rep from to around (42 sc).
Rnd 8: Sc in each of next 6 sc, 2 sc in next sc , rep from to around (48 sc).
Rnd 9: Sc in each of next 7 sc, 2 sc in next sc , rep from to around (54 sc).
Rnd 10: Sc in each of next 8 sc, 2 sc in next sc , rep from to around (60 sc).
Rnd 11: Sc in each of next 9 sc, 2 sc in next sc , rep from to around (66 sc).
Rnd 12: Sc in each of next 10 sc, 2 sc in next sc , rep from to around (72 sc).
Rnd 13: Sc in each of next 11 sc, 2 sc in next sc , rep from to around (78 sc).
Rnd 14: Sc in each of next 12 sc, 2 sc in next sc , rep from to around (84 sc).
Rnd 15: Sc in each of next 13 sc, 2 sc in next sc , rep from to around (90 sc).
Rnd 16: Sc in each of next 29 sc, (2 sc in next sc, sc in each of next 14 sc) twice, 2 sc in next sc, sc in each of next 30 sc (93 sc).
Rnd 17: Sc in each of next 29 sc, (2 sc in next sc, sc in each of next 15 sc) twice, 2 sc in next sc, sc in each of next 31 sc (96 sc).
Rnds 18–19: Sc in each sc around (96 sc).
Rnd 20: Sc in each of next 29 sc, (dec 1 sc in next 2 sc, sc in each of next 15 sc) twice, dec 1 sc in next 2 sc, sc in each of next 31 sc (93 sc).
Rnd 21: Sc in each of next 29 sc, (dec 1 sc in next 2 sc, sc in each of next 14 sc) twice, dec 1 sc in next 2 sc, sc in each of next 30 sc (90 sc).
Rnd 22: Dec 1 sc in next 2 sc, sc in each of next 13 sc , rep from to around (84 sc).
Rnd 23: Dec 1 sc in next 2 sc, sc in each of next 12 sc , rep from to around (78 sc).
Rnd 24: Dec 1 sc in next 2 sc, sc in each of next 11 sc , rep from to around (72 sc).
Rnd 25: Dec 1 sc in next 2 sc, sc in each of next 10 sc , rep from to around (66 sc).
Rnds 26–27: Sc in each sc around (66 sc).
Rnd 28: Sc in each sc around (66 sc), sl st in first sc to join. Fasten off.
Follow this stitch pattern to create the bottom of the visor:
Row 1: With right side facing, skip first 20 sc, join yarn in next sc, ch 1, work 1 lsc in sc, lsc in each of next 25 sc (26 lsc), turn.
Row 2: Ch 1, working in front loops of sts, sc in each of first 8 sc, (2 sc in next sc, sc in each of next 8 sc) twice (28 sc), turn.
Row 3: Ch 1, working in both loops of sts, dec 1 sc in first 2 sc, sc in each sc across to last 2 sc, dec 1 sc in last 2 sc (26 sc), turn.
Row 4: Ch 1, dec 1 sc in first 2 sc, sc in each of next 6 sc, 2 sc in next sc, sc in each of next 8 sc, 2 sc in next sc, sc in each of next 6 sc, dec 1 sc in last 2 sc (26 sc), turn.
Row 5: Ch 1, dec 1 sc in first 2 sc, sc in each sc across to last 2 sc, dec 1 sc in last 2 sc (24 sc), turn.
Row 6: Ch 1, dec 1 sc in first 2 sc, sc in each of next 5 sc, 2 sc in next sc, sc in each of next 8 sc, 2 sc in next sc, sc in each of next 5 sc, dec 1 sc in last 2 sc (24 sc), turn.
Row 7: Ch 1, dec 1 sc in first 2 sc, sc in each sc across to last 2 sc, dec 1 sc in last 2 sc (22 sc), turn.
Row 8: Ch 1, dec 1 sc in first 2 sc, sc in each of next 4 sc, 2 sc in next sc, sc in each of next 8 sc, 2 sc in next sc, sc in each of next 4 sc, dec 1 sc in last 2 sc (22 sc), turn.
Row 9: Ch 1, dec 1 sc in first 2 sc, sc in each sc across to last 2 sc, dec 1 sc in last 2 sc (20 sc). Fasten off.
Crochet the top of the visor with this stitch pattern:
Row 1: With right side facing, join yarn in rem loop of first st in Row 1 of visor bottom, ch 1, working in rem loops, sc in each of first 8 sc, (2 sc in next sc, sc in each of next 8 sc) twice (28 sc), turn.
Rows 2–8: Rep Rows 3–9 of Step 2. Fasten off.
Finish the cap with these basic stitches:
With right side facing, join yarn in center st at back of beret, sl st in each st around to first row of visor, working through double thickness of visor bottom and top, matching sts, sc in each sc around entire front edge of visor, sl st in each st around edge of beret, sl st in first sl st to join. Fasten off.