Submit and Reset buttons help the user tell the browser what to do with a form on your website. You can use HTML to create buttons to either submit or reset your form, using the element with the following type and value attributes:
Submit: Visitors have to tell a browser when they’re done with a form and want to send the contents. You create a button to submit the form to you by using the following markup:
<input type="submit" value="Submit">
You don’t use the name attribute for the Submit and Reset buttons. Instead, you use the value attribute to specify how the browser labels the buttons for display.
Reset: Visitors need to clear the form if they want to start all over again or decide not to fill it out. You create a button to reset (clear) the form by using the following markup:
<input type="reset" value="Clear">
You can set the value to anything you want to appear on the button. In our example, we set ours to Clear. Of course, you can use something that’s more appropriate to your website if you’d like.
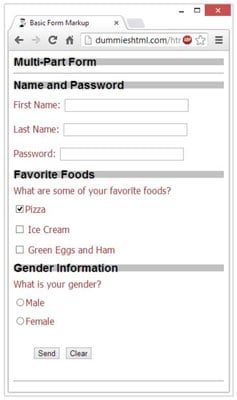
This listing shows an example of markup to create Submit and Reset buttons named Send and Clear, respectively. It’s the listing for a complete multipart form.
<!DOCTYPE html>
<html>
<head>
    <title>Basic Form Markup</title>
    <meta charset="UFT-8" />
    <style type="text/css">
      h1 {background-color: silver;
          color: black;
          font-size: 1.2em;
          font-family: Arial, Verdana, sans-serif;}
      hr {color: blue;
          width: thick;}
      body {font-size: 12pt;
            color: brown;
            font-family: Tahoma, Bodoni, sans-serif;
            line-height: 0.8em;}
    </style>
</head>
<body>
  <h1>Multi-Part Form</h1>
  <hr />
    <div>
      <form action="bin/guestbook.php" method="post">
        <h1>Name and Password</h1>
          <p>First Name: <input type="text" name="firstname" size="30"
             maxlength="25"></p>
          <p>Last Name: <input type="text" name="lastname" size="30"
             maxlength="25"></p>
          <p>Password: <input type="password" name="psswd" size="30"
             maxlength="25"></p>
        <h1>Favorite Foods</h1>
          <p>What are some of your favorite foods?</p>
          <p><input type="checkbox" name="food" value="pizza"
              checked="checked">Pizza</p>
          <p><input type="checkbox" name="food" value="icecream">
              Ice Cream</p>
          <p><input type="checkbox" name="food" value="eggsham">
              Green Eggs and Ham</p>
        <h1>Gender Information</h1>
          <p>What is your gender?</p>
          <p><input type="radio" name="gender" value="male">Male</p>
          <p><input type="radio" name="gender" value="female">Female</p>
        <p style="line-height: 2em; margin: 2em;">
          <input type="submit" value="Send">
          <input type="reset" value="Clear">
        </p>
     </form>
    </div>
  <hr>
</body>
</html>
This figure shows how a browser renders these buttons in a form.