
Photo album is just PowerPoint 2016's term for inserting many photographs into a presentation all at once. You don't necessarily have to stuff the photo album with travel or baby pictures for it to be a proper photo album.
The Photo Album is a wonderful feature because you can use it to dump a bunch of photos in a PowerPoint presentation without having to create slides one at a time, insert the photos, and endure the rest of the rigmarole. Create a photo album to quickly place a bunch of photos on PowerPoint slides.
Creating your photo album
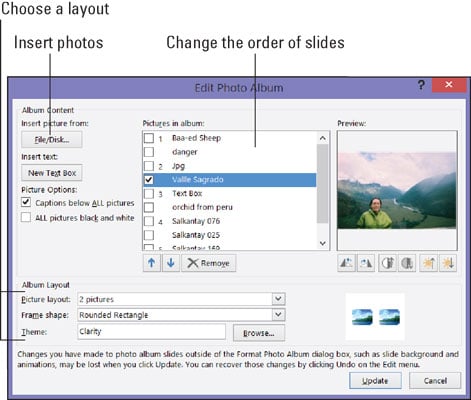
PowerPoint creates a new presentation for you when you create a photo album. To start, take note of where on your computer the photos you want for the album are. Then go to the Insert tab and click the Photo Album button. You see the Photo Album dialog box, as shown here. For such a little thing, the Photo Album dialog box offers many opportunities for constructing a PowerPoint presentation. Your first task is to decide which pictures you want for your album. Then you choose a slide layout for the pictures.
Inserting pictures and creating slides
Here is the lowdown on choosing pictures for a photo album:
Inserting photos: Click the File/Disk button and choose photos in the Insert New Pictures dialog box. You can select more than one photo at a time by Ctrl+clicking. The filenames of photos you selected appear in the Pictures in Album box. Slide numbers appear as well so that you know which photos are on which slides.
Deciding how photos are framed: Open the Frame Shape drop-down list and choose an option for placing borders or rounded corners on your photos. (This option isn't available if you choose Fit to Slide on the Picture Layout drop-down list.)
Inserting a text box: Insert a text box if you want to enter commentary in your photo album. In the Pictures in Album box, select the picture or text box that you want your new text box to go after and then click the New Text Box button. Later, you can go into your presentation and edit the placeholder text, which PowerPoint aptly enters as Text Box.
Providing captions for all pictures: To place a caption below all the pictures in your photo album, select the Captions Below ALL Pictures check box. PowerPoint initially places the picture file name in the caption, but you can delete this caption and enter one of your own. (To select this option, you must choose a picture layout option besides Fit to Slide.)
Changing the order of pictures: Select a picture in the Pictures in Album box and then click an arrow button to move it forward or backward in the presentation.
Changing the order of slides: Ctrl+click to select each picture on a slide. Then click an arrow as many times as necessary to move the slide forward or backward in the presentation.
Removing a picture: Select a picture in the Pictures in Album box and click the Remove button to remove it from your photo album. You can Ctrl+click pictures to select more than one.
Choosing a layout for slides
Your next task is to go to the bottom of the Photo Album dialog box and choose a layout for the slides in the presentation. Open the Picture Layout drop-down list to choose one of the seven picture layouts:
Choose Fit to Slide for a presentation in which each picture occupies an entire slide.
Choose a "pictures" option to fit 1, 2, or 4 pictures on each slide.
Choose a "pictures with" option to fit 1, 2, or 4 pictures as well as a text title frame on each slide.
Changing the look of pictures
The Photo Album dialog box offers a handful of tools for changing the look of the pictures. When you use these tools, keep your eye on the Preview box — it shows you what you're doing to your picture.
Making all photos black and white: Select the ALL Pictures Black and White check box.
Rotating pictures: Click a Rotate button to rotate a picture clockwise or counterclockwise.
Changing the contrast: Click a Contrast button to sharpen or mute the light and dark colors or shades in the picture.
Changing the brightness: Click a Brightness button to make a picture brighter or more somber.
Choosing a frame shape for pictures: If you opted for a "picture" or "picture with" slide layout, you can choose a shape — Soft Edge Rectangle, Compound Frame, or others — for your pictures on the Frame Shape drop-down list.
Choosing a theme for your photo album: If you selected a "picture" or "picture with" slide layout, you can choose a theme for your slide presentation. Click the Browse button and choose a theme in the Choose Theme dialog box.
At last, click the Create button when you're ready to create the photo album. PowerPoint attaches a title slide to the start of the album that says, Photo Album with your name below.
Putting on the final touches
Depending on the options you chose for your photo album, it needs all or some of these final touches:
Fix the title slide: Your title slide should probably say more than the words Photo Album and your name.
Fill in the text boxes: If you asked text boxes with your photo album, by all means, replace PowerPoint's generic text with meaningful words of your own.
Write the captions: If you asked for photo captions, PowerPoint entered photo file names below photos. Replace these file names with something more descriptive.
Editing a photo album
To go back into the Photo Album dialog box and rearrange the photos in your album, go to the Insert tab, open the drop-down list on the Photo Album button, and choose Edit Photo Album on the drop-down list. You see the Edit Photo Album dialog box. It looks and works exactly like the Photo Album dialog box. Of course, you can also edit your photo album by treating it like any other PowerPoint presentation. Change the theme, fiddle with the slides, and do what you will to torture your photo album into shape.