When you set your Canon EOS 60D to the P, Tv, or Av exposure modes, you can enjoy the benefits of autoexposure support but retain some control over the final exposure. If you think that the image the camera produced is too dark or too light, you can use a feature known as Exposure Compensation, which is sometimes also called EV Compensation. (The EV stands for exposure value.)
Whatever you call it, this feature enables you to tell the camera to produce a darker or lighter exposure than what its autoexposure mechanism thinks is appropriate. Best of all, this feature is probably one of the easiest on the camera to understand. Here’s all there is to it:
Exposure compensation is stated in EV values, as in +2.0 EV. Possible values range from +5.0 EV to -5.0 EV.
A setting of EV 0.0 results in no exposure adjustment.
For a brighter image, you raise the EV value. The higher you go, the brighter the image becomes.
For a darker image, you lower the EV value. The picture becomes progressively darker with each step down the EV scale.
By default, the exposure is adjusted in 1/3 stop increments. In other words, you can shift from EV 0.0 to EV +0.3, +0.7, +1.0, and so on. But you can change the adjustment to 1/2-stop increments if you want to shift the exposure in larger jumps. To do so, change Custom Function I-1, and select 1/2-Stop.
In most cases, a 2-stop exposure compensation range is more than enough; a setting beyond that is typically useful only for creating HDR (high dynamic range) images. If you find yourself needing more than 2 stops of compensation, revisit the exposure settings and try to correct the problem there.
Here’s how to dial in exposure compensation:
When the Shooting Setting screen is displayed, press Q to activate the Quick Control mode.
The Q button is just above the Quick Control dial.
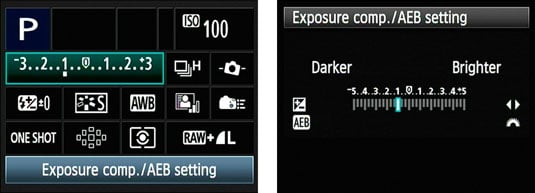
Use the multicontroller to highlight the exposure meter.
Rotate the Quick Control dial to move the exposure indicator left or right along the meter.
Rotate the dial to the left to lower the Exposure Compensation value and produce a darker exposure.
Rotate the dial to the right to raise the value and produce a brighter exposure.
To return to no adjustment, rotate the dial until the exposure indicator is back at the center position on the meter.
Alternatively, highlight the exposure meter and press Set. Rotate the Quick Control dial as above to change the amount of exposure compensation, and press Set to lock in the change.
As an alternate to the alternate, you can set exposure compensation from Shooting Menu 2.
Don’t use the Main Dial in either case. It sets the Autoexposure Bracketing (AEB) distance.
Press Q or the shutter button halfway to exit the Quick Control screen.
Note that unlike the LCD methods, which show the exact amount of exposure compensation up to +/-5 stops, the viewfinder displays only +/-2 stops. You can dial in more than those two stops, but you have to count clicks for any adjustment past +/-2 stops of exposure compensation because the viewfinder gives you no hints to how many more or fewer than 2 stops you selected.
In the viewfinder display, you see little triangles at both ends of the meter to remind you that you exceeded the normal 2-stop range of compensation.
How the camera arrives at the brighter or darker image you request depends on the exposure mode:
In Av (aperture priority) mode: The camera adjusts the shutter speed but leaves your selected f-stop in force. Be sure to check the resulting shutter speed to make sure that it isn't so slow that camera shake or blur from moving objects is problematic.
In Tv (shutter priority) mode: The opposite occurs: The camera opens or stops down the aperture, leaving your selected shutter speed alone.
In P (programmed autoexposure) mode: The camera decides whether to adjust aperture, shutter speed, or both to accommodate the Exposure Compensation setting.
These explanations assume that you have a specific ISO setting selected rather than Auto ISO. If you do use Auto ISO, the camera may adjust that value instead.
Keep in mind, too, that the camera can adjust the aperture only so much, according to the aperture range of your lens. The range of shutter speeds is limited by the camera. So if you reach the end of those ranges, you have to compromise on either shutter speed or aperture or adjust ISO.
A final, and critical, point about exposure compensation: When you power-off the camera, it doesn’t return you to a neutral setting (EV 0.0). The setting you last used remains in force for the Creative Zone exposure modes until you change it.