
Connecting source devices into your home theater is as simple as using the right cables to connect them to the back of your A/V receiver. (The A/V receiver or controller in a home theater provides a central connection point for all the wires in your home theater.)
Take a look at the back of any typical A/V receiver, like this one. That’s a lot of jacks, but they’re there to give you a flexible, home theater system that can do what you need it to do.
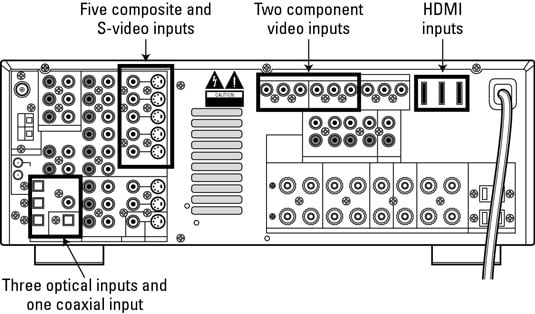
Each component in your A/V system has a set of audio connections or video connections or both to your A/V receiver. The receiver itself connects to your speakers and to your display (with another set of audio and video cables).
Remember the following when connecting source devices to the A/V receiver:
Keep your right and left in mind with audio cables. Any device that connects with analog audio cables has two connections (the cables themselves usually, but not always, come in attached stereo pairs). One jack (the right) is usually colored red, and the other is colored white. Make sure that you connect the left output on the source device to the corresponding left input on the back of your receiver.
Use digital audio connections whenever possible. Use coaxial or optical digital audio cables to connect DVD players, game consoles, DSS receivers, or any source that has a digital audio output. If you want to use Dolby Digital or DTS with any of these sources, you must use the digital audio connection. The great thing about digital audio connections is that there’s just one — no getting left and right confused.
Keep track of which connections you use on your receiver. It’s fine to plug sources into jacks on your receiver with labels that differ from the device you’re plugging in. For example, if you have a video game console (but no corresponding Game inputs on your receiver), you can plug the game console into those Laser Disc player inputs — assuming, of course, that you don’t have a laser disc player in your system. This is where keeping track of your connections comes in handy. To send the audio and video from the game console to your speakers and display, you have to select the laser disc input on your receiver.
Fancy A/V receivers and controllers often have assignable inputs that let you select the names that correspond with each set of inputs on the back of the receiver or controller.
Use an extra set of audio and video cables to connect your recording systems. Your receiver has an extra set of A/V output connectors that correspond with its VCR inputs (usually labeled VCR1, VCR2, and so on). When you connect your VCR or PVR to these inputs, use an extra set of cables to connect the receiver back to the inputs on these sources (labeled Audio In and Video In on the back of the source). This lets you route audio and video through the receiver for recording purposes.
Use the highest-quality video connections available to you. If you can use digital video connections (HDMI or DVI), do! Otherwise, use component video if your sources have these connections. If you must, use S-video for sources that don’t have component video connections, such as DSS receivers. Some sources (such as many VCRs) have only composite video connections.