In addition to practical photo-correction tools, the Nikon D7200's Retouch menu offers some special-effects tools. To create after-the-shot effects, try the following Retouch menu options:
Cross Screen: This tool adds a starburst effect to the brightest part of the image.
To get to this tool, choose Retouch > Filter Effects > Cross Screen. You see a preview along with options that enable you to adjust the number of points on the star, the intensity of the effect, the length of the star's rays, and the angle of the effect. To update the preview after changing a setting, select Confirm. When you're happy with the effect, select Save.
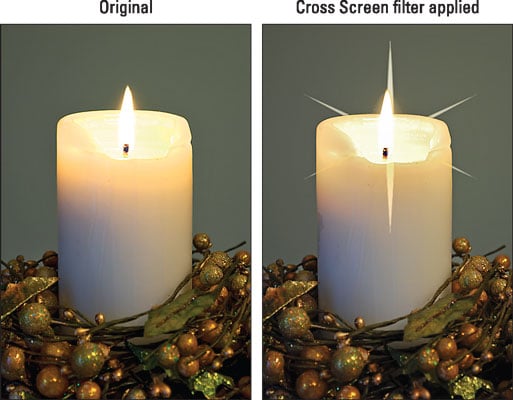 The Cross Screen filter adds a starburst effect to the brightest parts of the photo.
Soft: Another one of the Filter Effects options, the Soft tool blurs your photo to give it a dreamy, watercolor-like look. You can choose from three levels of blur: Low, Normal, and High.
Color Outline: This tool turns your photo into a black-and-white line drawing.
Color Sketch: This filter creates an image similar to a drawing done in colored pencils. You can modify the effect through two options: Vividness, which affects the boldness of the colors; and Outlines, which determines the thickness of outlines.
Fisheye: This tool distorts your subject to make it appear that you took the photograph using a fisheye lens, which produces an ultra-wide, circular perspective (sort of like the view you see through a security-door peephole).
Miniature Effect: Have you ever seen an architect's small-scale models of planned developments? The Miniature Effect filter attempts to create a photographic equivalent by applying a strong blur to all but one portion of an image, as shown. For this example, the focus point is set on the part of the street occupied by the cars.
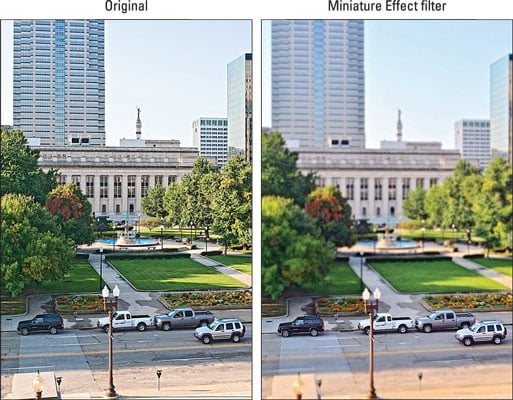 The Miniature Effect filter throws all but a small portion of a scene into very soft focus.
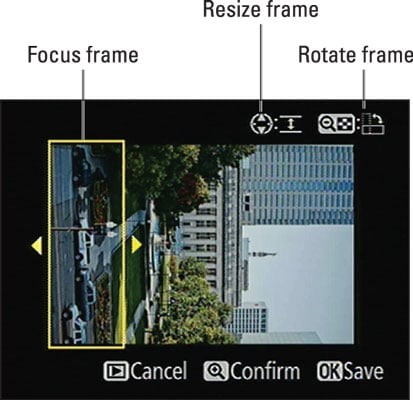 The area inside the yellow box will remain in focus.
Rotate the box 90 degrees: Press the Zoom Out button.
Position and resize the box: When the focus box is oriented horizontally, press the Multi Selector up/down to move it. Press right/left to resize it. If the box is oriented vertically, use the opposite maneuvers.
This filter works best if you shoot your subject from a high angle; otherwise, you don't get much of a miniaturization result.
Selective Color: This effect desaturates (removes color from) parts of a photo while leaving specific colors intact. For example, in the following figure, everything is desaturated but the yellows and peaches in the rose.
You can select up to three colors to retain and specify how much a color can vary from a selected one and still be retained. Make your wishes known as follows:
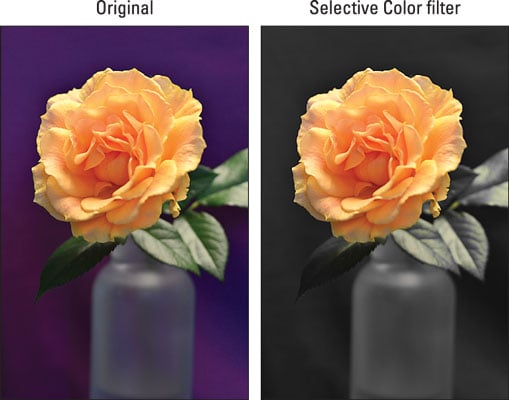 The Selective Color filter was used to desaturate everything but the rose petals.

Select the first color to be retained. Use the Multi Selector to move the yellow box, labeled Color selection box in the following figure, over the color. Then press the AE-L/AF-L button. The chosen color appears in the first color swatch at the top of the screen.
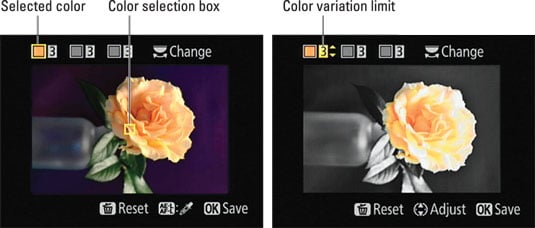 To select a color you want to keep, move the yellow box over it and press the AE-L/AF-L button.
Set the range of the selected color. Rotate the command dial to display a preview of the desaturated image and highlight the number box to the right of the color swatch, as shown on the right. Then press the Multi Selector up or down to choose a value from 1 to 7. The higher the number, the more a pixel can vary in color from the selected hue and still be retained. The display updates to show you the impact of the setting.
Choose one or two additional colors. Rotate the Main command dial to highlight the second color swatch and then repeat the selection process. Walk the same path to retain a third color, if desired.

Reset a color swatch box. To empty a selected swatch box, press the Delete button. To reset all swatch boxes, hold down the button until a message asks whether you want to get rid of all selected colors. Select yes to go forward.