Class styles, which are also sometimes called custom class styles, custom styles, or custom classes, in Cascading Style Sheets (CSS) are for those times when you want to create a special style and then selectively apply it to an unlimited number of elements or objects on a web page.
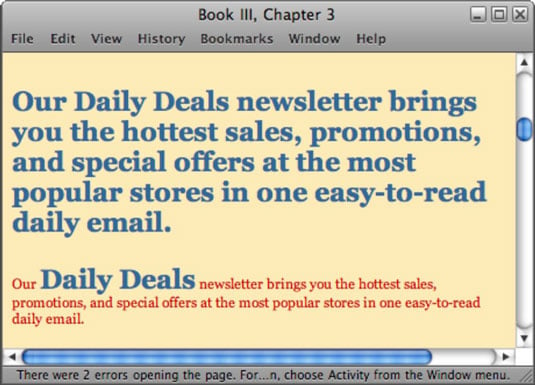
For example, in the sentence “Our Daily Deals newsletter brings you the hottest sales, promotions, and special offers at the most popular stores in one easy-to-read daily e-mail,” you could create a custom class style to modify the words Daily Deals and then apply that style to those words in the HTML.
When writing the class styles in the CSS file, be sure to include a period (.) directly before the selector name, as shown here:
<b>.dailydeals</b> {
 font-family: Georgia, "Times New Roman", Times, serif;
 font-size: 23px;
 font-weight: bold;
 color: #336699;
}
The presence of the period performs two functions:
It helps you to quickly identify, at a glance, the class styles from other types of styles when reviewing your CSS code.
Perhaps more importantly, it informs browsers that the style is a custom class that will be selectively applied to content on the page.
When you create a class style, you can name the selector anything you like, as long as it isn’t the name of a currently used HTML tag.
For example, it would be a really bad idea to create a class style called .body or .p. So, in keeping with the concept of semantic HTML, try to name your class styles after the function they’ll be performing, such as .highlight or .imageborder.
When you’re finished writing out the style rules in the CSS for your class style, you can apply the style to any object in the HTML document by adding the class attribute to the opening container tag of the object or content being styled:
<p <b>class="dailydeals"</b>>Our Daily Deals newsletter brings you the hottest sales, promotions, and special offers at the most popular stores in one easy-to-read daily e-mail.</p>
When specifying the class style in the HTML code with the class attribute, the period that is required in the CSS when creating the style definition doesn’t need to be placed in front of the style name in between the quotation marks, as shown in the previous code.
If you prefer that the class style be applied only to one or two words or a short phrase instead of all the elements within a container tag, you can selectively apply the class style to your object(s) using the tag with the class attribute:
<p>Our <b><span class=</b><b>"</b><b>dailydeals</b><b>"</b><b>></b>Daily Deals<b></span></b> newsletter brings you the hottest sales, promotions, and special offers at the most popular stores in one easy-to-read daily e-mail.</p>
The tag is an inline tag used to apply styling to elements within the flow of document text. This tag is essentially an empty HTML container tag that does nothing until you tell it to do something by applying an attribute to it, such as adding the class, id, or style attribute to style content.
The illustration shows the difference between adding a class attribute to a
tag (top) versus adding it to a tag that surrounds specific content (bottom).