


When you set the Mode dial to the advanced exposure modes, Shooting Menu 2 offers a Flash Control option. Using this menu item, you can adjust flash power, and the Flash Control option also enables you to customize a few other aspects of the built-in flash as well as control an external flash.
To explore your options, choose Flash Control, as shown on the left in the following figure, to access the screen shown on the right in the figure. Here's the rundown of the available options:
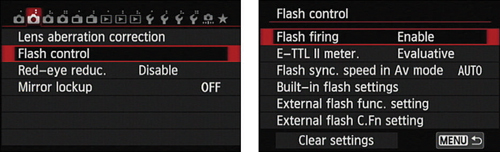
Flash Firing: Normally, this option is set to Enable. If you want to disable the flash, choose Disable. However, you don't have to take this step in most cases — just close the flash if you don't want to use flash.
What's the point of this option, then? Well, if you use autofocusing in dim lighting, the camera may need some help finding its target. To that end, it sometimes emits an AF-assist beam from the flash head. The beam is a series of rapid pulses of light. If you want the benefit of the AF-assist beam but you don't want the flash to fire, disable flash firing. Remember that you have to pop up the flash unit to expose the lamp that emits the beam. You also can take advantage of this option when you attach an external flash head.
E-TTL II Meter.: This option enables you to switch from the default flash metering approach, called Evaluative. If you instead select the Average option, the flash is always used as the primary light source. Typically, this results in more powerful (and possibly harsh) flash lighting and dark backgrounds.
Flash Sync. Speed in Av Mode: This is the option that prevents the shutter speed from dropping beyond a certain level when you shoot in the Av exposure mode.
Built-in Flash Settings: Select this option, as shown on the left in the figure below, to display the screen shown on the right. The options work like so:
 These advanced flash options affect only the built-in flash.
Flash mode: This option enables you to set the flash power manually instead of having the camera set it automatically. If you select the option, the Flash Exposure Compensation control on the menu (see the right screen in the above figure) is replaced by a Flash Output option. Set the flash power through that option.
Shutter Sync: By default, the flash fires at the beginning of the exposure. This flash timing, known as 1st Curtain sync, is the best choice for most subjects. However, if you use a very slow shutter speed and you're photographing a moving object, 1st Curtain sync causes the blur that results from the motion to appear in front of the object, which doesn't make much visual sense.
To solve this problem, you can change the Shutter Sync option to 2nd Curtain sync, also known as rear-curtain sync. In this flash mode, the motion trails appear behind the moving object. The flash fires twice in this mode: once when you press the shutter button and again at the end of the exposure.
Flash Exposure Compensation: This setting adjusts the power of the built-in flash.
Wireless Func.: When you enable this option, you can use the built-in flash to trigger remote flash units.
External Flash controls: The last two options on the Flash Control list relate to external flash heads; they don't affect the built-in flash. They apply only to Canon EX-series Speedlites that enable you to control the flash through the camera. Refer to the flash manual for details.
Clear Settings: Choose this option to access three settings that restore flash defaults. The first one, Clear Built-in Flash Set, restores the settings for the built-in flash. Sorry, you probably could have figured that out for yourself. The second option restores defaults for external flash settings, and the third restores the external flash head's Custom Function menu settings.
You can probably discern from these descriptions that most of these features are designed for photographers schooled in flash photography who want to mess around with advanced flash options. If that doesn't describe you, don't worry about it. The default settings selected by Canon will serve you well in most every situation — the exception is flash exposure compensation, which you can just as easily adjust via the Quick Control screen instead of digging through the menus.

