
Built into the ViewNX 2 software for your Nikon D7100 is a handy image-downloading tool called Nikon Transfer 2. Follow these steps to use it:
Attach your camera to the computer or insert a memory card into your card reader.
Depending on what software you have installed on your system, you may see a dialog box asking you how to download your photos. If the window that appears is the Nikon Transfer 2 window, skip to Step 3.
Similarly, if you see a Windows dialog box that contains the Nikon Transfer 2 option, click that option and skip to Step 3.
If nothing happens, travel to Step 2.
Launch Nikon Transfer 2 (if it isn’t already open).
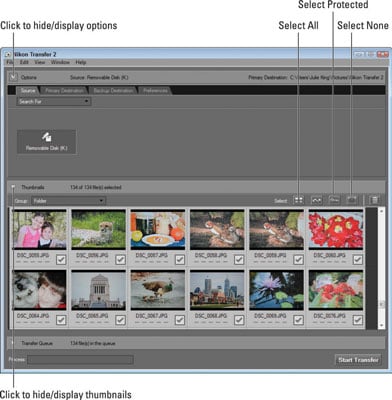
Open Nikon ViewNX 2 and then choose File→Launch Transfer or click the Transfer button at the top of the window. The window shown appears. (If you use a Mac, the window decor is slightly different, but the main controls and features are the same.)
Display the Source tab to view thumbnails of your pictures.
Don’t see any tabs? Click the Options triangle to display them. Then click the Source tab. The icon representing your camera or memory card should be selected. If not, click the icon.
Thumbnails of your images appear in the bottom half of the dialog box. If you don’t see the thumbnails, click the Thumbnails arrow to open the thumbnails area.
Select the images that you want to download.
Click a thumbnail to highlight it and then click the box in the lower-right corner of the thumbnail to select that image for downloading.
Select protected images only. If you used the in-camera function to protect pictures, you can select just those images by clicking the Select Protected icon.
Select all images. Click the Select All icon, also labeled in the figure.
Select no images. Click the Select None icon. Use this trick if you accidentally select all photos but don’t want to import all of them.
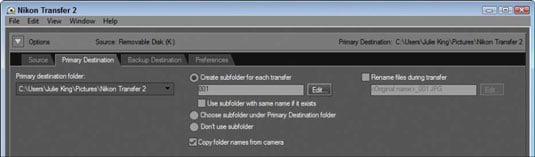
Click the Primary Destination tab at the top of the window.
The top of the transfer window now offers options that enable you to specify where and how you want the images to be stored on your computer.
Choose the folder where you want to store the images from the Primary Destination Folder drop-down list.
If the folder you want to use isn’t in the list, open the drop-down list, choose Browse from the bottom of the list, and then track down the folder and select it.
In the center portion of the dialog box, you get a batch of additional storage-folder options. If you’re uncertain about which options to choose, the program’s Help system spells everything out; choose Help→ViewNX 2 Help to access it.
Tell the program whether you want to rename the picture files during the download process.
If you do, select the Rename Files during Transfer check box. Then click the Edit button to display a dialog box where you can set up your new filenaming scheme. Click OK after you do so to close the dialog box.
(Optional) Set a backup destination.
This option is great if you back up photos to a secondary hard drive. You can download your photos to your primary image-storage drive and to the backup at the same time. To take advantage of this feature, click the Backup Destination tab, select the Backup Files box, and then use the other panel options to specify where you want the files to go.
Click the Preferences tab to set the rest of the transfer options.
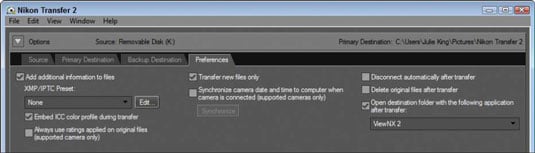
The tab shown takes over the top of the program window. Here you find a number of options that enable you to control how the program operates. Rather than covering all of them, which are explained quite nicely in the program’s Help system (access it via the Help menu), here are just three of the most helpful and critical options.
Transfer New Files Only: This option, when selected, ensures that you don’t waste time downloading images that you’ve already transferred but are still on the memory card.
Delete Original Files after Transfer: Turn off this option. Otherwise, your pictures are automatically erased from your memory card when the transfer is complete. Always make sure the pictures really made it to the computer before you delete them from your memory card.
Open Destination Folder with the Following Application after Transfer: You can tell the program to immediately open your photo program after the transfer is complete. Choose ViewNX 2, as shown in the figure, to view, organize, and edit your photos using that program. To choose another program, open the drop-down list, select Browse, and select the program from the dialog box that appears. Click OK after doing so.
Your choices remain in force for any subsequent download sessions, so you don’t have to revisit this tab unless you want the program to behave differently.
When you’re ready to start the download, click the Start Transfer button.
It’s located in the lower-right corner of the program window. After you click the button, the Process bar in the lower-left corner indicates how the transfer is progressing. Again, what happens when the transfer completes depends on the choices you made in Step 10; if you selected Nikon ViewNX 2 as the photo program, it opens and displays the folder that contains your just-downloaded images.