
Excel 2010 offers a document recovery feature that can help you if your computer crashes due to a power failure or an operating system freeze or shutdown. Excel's AutoRecover feature saves your workbooks at regular intervals. In the event of a computer crash, Excel displays a Document Recovery task pane the next time you start Excel after rebooting the computer.
Changing the AutoRecover save interval
When you first start using Excel 2010, the AutoRecover feature is set to automatically save changes to your workbook (provided that the file has already been saved at least once) every ten minutes. You can shorten or lengthen this interval as you see fit. To do so, follow these steps:
Click the File tab and then choose Options.
The Excel Options dialog box appears.
Click the Save tab.
The Save options appear in the right pane.
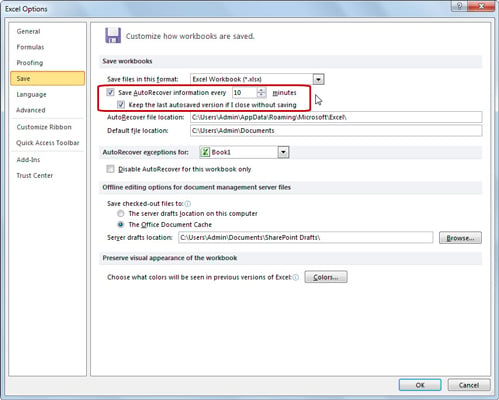 Change AutoRecover settings in the Excel Options dialog box.
Use the spinner buttons or enter a new automatic save interval into the Save AutoRecover Information Every xx Minutes text box.
Click OK to close the Excel Options dialog box.
In Excel 2010, you can recover the last autosaved version of a file if you accidentally closed the file without saving. On the Save tab of the Excel Options dialog box, ensure that the Keep the Last Autosaved Version If I Close Without Saving check box is selected (as well as the Save AutoRecover Information Every xx Minutes check box). Then you can later recover the unsaved file by clicking the File tab, choosing Recent, and selecting Recover Unsaved Workbooks.
Recovering documents after a system crash
When you open Excel 2010 after a system crash, the Document Recovery task pane shows the available versions of the workbook files that were open at the time of the crash. It identifies the original version of the workbook file and when it was saved along with the recovered version of the file and when it was saved.
To open the recovered version of a workbook (to see how much of the work it contains that was unsaved at the time of the crash), follow these steps:
Position the mouse pointer over the workbook listed in the Document Recovery task pane.
Click the drop-down menu beside the document name and click Open on the pop-up menu.
(Optional) After you open the recovered version, you can save the workbook.
To save the recovered version of a workbook without bothering to first open it up, follow these steps:
Position the mouse pointer over the workbook listed in the Document Recovery task pane.
Click the drop-down menu beside the document name and click Save As on the pop-up menu.
Save the workbook.
If you want to permanently abandon the recovered version (leaving you with only the data in the original version), click the Close button at the bottom of the Document Recovery task pane. To retain the files for later viewing, click the Yes button before clicking OK. To retain only the original versions of the files shown in the task pane, click the No button instead.