The Canon 60D’s Creative Auto mode might be better named “Full Auto Plus.” This mode is set up initially to work the same way as Full Auto. But if you don’t like the results you get, you can make the following adjustments for your next shot:
Enable or disable the flash.
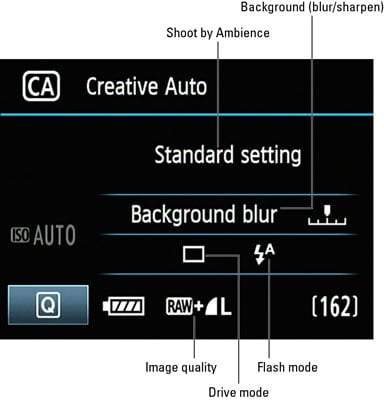
Adjust color and contrast through the Shoot by Ambience option.
Soften or sharpen the apparent focus of the picture background.
Select from four Picture Styles, which affect the color and sharpness of the image. One of the available options creates a black-and-white photo.
Although Creative Auto is great for beginners to have an easy way to have a little more input on their pictures, Creative Auto still doesn’t give you anywhere near the level of creative control you get in the advanced exposure modes. That said, if you’re feeling overwhelmed by all the new stuff that comes with digital SLR photography and you’re not ready to dive into the more advanced exposure modes, Creative Auto is a good choice. Here’s how to use it:
Set the Mode dial on top of the camera to the CA setting.
Press the Quick Control button.
Press the multicontroller to move the highlight over the setting you want to adjust.
Adjust the highlighted setting by rotating the Main dial.
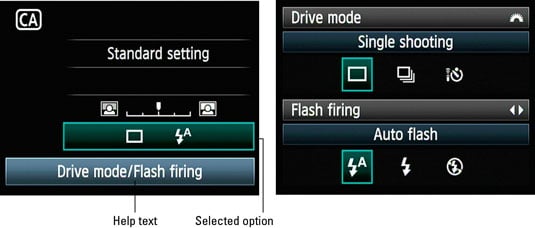
For Drive and Flash options, you must press the Set button to display a screen containing all possible settings. Then use the Main dial to change the top setting or the Quick Control dial to change the bottom setting. Then press Set to return to the Quick Control screen.
To adjust another setting, press Set again and use the multicontroller to highlight it.
After you select all the settings you want to change, press the shutter button halfway and release it, or press the Quick Control button again.
The monitor returns to the normal Shooting Settings display, and you’re ready to take your picture.
The settings you choose remain in effect from shot to shot. If you turn the camera off or switch to a different exposure mode, though, the settings return to their defaults.
Now for the explanations of how the four Creative Auto options work:
Shoot by Ambience: This setting enables you to alter how the camera processes the photo.
Background (blur/sharpen): The middle option on the Creative Auto screen gives you some control over depth of field.
Unfortunately, this feature doesn’t play nice with the flash. If you set the flash mode to On, the bar becomes dimmed and out of your reach when the flash pops up. Ditto if you set the flash mode to Auto and the camera sees a need for flash.
Assuming that the flash doesn’t get in your way, move the little indicator on the bar to the left to shorten depth of field, which makes distant objects appear blurrier. (Remember that after highlighting the bar, you just rotate the Main dial to move the indicator.) Shift the indicator to the right to make distant objects appear sharper.
Drive mode: You can choose from three of the Drive mode options: Single Shooting, Low Speed Continuous, and Self-timer: 10sec/Remote Control.
Flash: You can choose from three flash settings:
Auto: The camera fires the flash automatically if it thinks extra light is needed to expose the picture.
On: The flash fires regardless of the ambient light.
Off: The flash doesn’t fire.
For the Auto and On settings, you can use the Red-Eye Reduction flash feature.