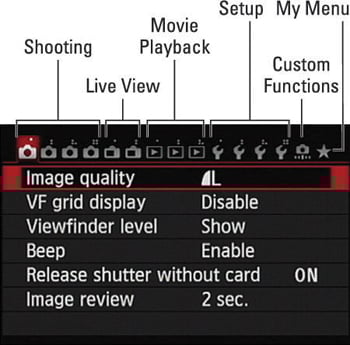
Camera menus on your Canon EOS 70D are organized into the categories labeled in the following figure. However, which menus appear depends on the exposure mode. For example, if you’re shooting in Scene Intelligent Auto mode — represented by the green A+ on the Mode dial — you see only a handful of menus because you have limited control over camera operation in that mode. To access the full complement of menus, as shown in the figure, set the Mode dial to one of the advanced exposure modes: P, Av, Tv, M, B, or C.
Note, too, that when you set the camera to Movie mode, the two Live View menus are replaced by Movie menus 1 and 2 (not shown in the figure). The icon changes to a little movie-camera symbol to indicate the shift.
Familiarize yourself with the process of navigating menus and selecting menu options:
Display menus. Press the Menu button. The highlighted menu icon marks the active menu; options on that menu appear automatically on the main part of the screen. In the above figure, Shooting Menu 1 is active, for example.
The number of dots above the icon tells you the menu number — one dot for Shooting Menu 1, two dots for Shooting menu 2, and so on.
Select a different menu. You have these options:
Touchscreen: Tap the menu icon.
Main dial or Multi-controller: Rotate the Main dial to or press the Multi-controller left or right to scroll through the menu icons.
As you scroll through the menus, notice that the icons that represent the menus are color coded. The Shooting menus and Live View/Movie menu icons are red; Playback menu icons are blue; Setup menus are a lovely yellow; the Custom Functions menu is orange; and the My Menu icon is green.
Select and adjust a menu setting. Again, you have a choice of techniques:
Touchscreen: Tap the menu item to display a screen of options related to that item. For example, to adjust the picture Image Quality, display Shooting Menu 1, as shown in the above figure, and then tap Image Quality to display the screen shown in the following figure. Tap the setting you want to use and then tap Set to return to the menu.
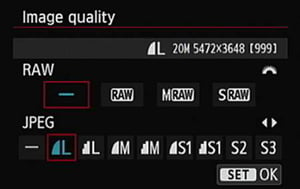 Tap the option you want to use and then tap the Set icon to lock in your choice.
In some cases, the available options appear right next to the menu item; just tap the setting you want to use to select it and return to the normal menu display. No need to tap a Set icon.
Quick Control dial and Set button: Rotate the Quick Control dial to scroll up or down to highlight the feature you want to adjust. Then press the Set button to display the available options. In most cases, you then use the Quick Control dial to highlight the desired option and press Set again.
You can mix and match techniques, by the way: For example, even if you access a menu option via the control keys, you can use the touchscreen techniques to select a setting.
Exit menus and return to shooting. Press the shutter button halfway and release it or press the Menu button again.