
A still portrait is a photograph of a subject who isn’t moving. Assuming that a subject is willing to pose (or you catch her in a moment of relative calm), the classic portraiture approach is to keep the subject sharply focused while throwing the background into soft focus. This artistic choice emphasizes the subject and helps diminish the impact of any distracting background objects in cases where you can’t control the setting. The following steps show you how to achieve this look with a Canon EOS 60D:
-
Set the Mode dial to Av (aperture priority autoexposure) and then select the lowest possible f-stop value.
A low f-stop number opens the aperture, which shortens depth of field, or the range of sharp focus. So, dialing in a low f-stop value is the first step in softening your portrait background. (And, yes, the f-stop range available to you depends on your lens.) Keep in mind that the farther your subject is from the background, the more background blurring you can achieve at any one f-stop.
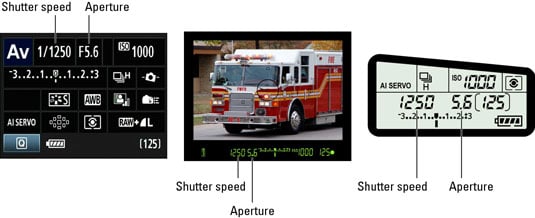
If you choose a mode in the Creative Zone, you can monitor the current aperture and shutter speed in the Shooting Settings display, in the viewfinder display (middle), and on the top LCD display (right).
-
To further soften the background, zoom in or get closer (or both).
Zooming in to a longer focal length also reduces depth of field, as does moving physically closer to your subject.
Avoid using a lens with a short focal length (a wide angle lens) for portraits. A short focal length can cause features to appear distorted, similar to the way people look when you view them through a security peephole in a door.
-
For indoor portraits, shoot flash-free, if possible.
Shooting by available light rather than by flash produces softer illumination and avoids the problem of red-eye. To get enough light to go flash-free, turn on room lights or, during daylight, pose your subject next to a bright window.
-
For outdoor portraits, use a flash.
Even in bright daylight, a flash adds a beneficial splash of light to a subject’s face.
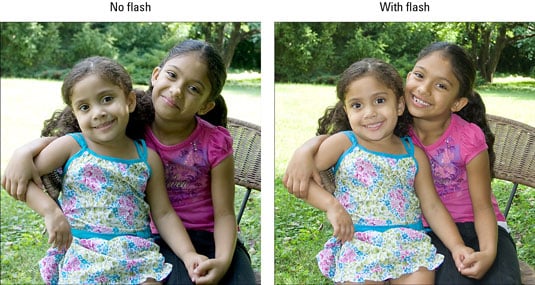
Unfortunately, the camera doesn’t let you use flash in Portrait mode if the light is very bright. In the Av exposure mode, just press the Flash button on the side of the camera to enable the flash; adjust flash strength in Quick Control mode by adjusting the Flash exposure compensation. In Creative Auto mode, set the flash to the Flash On (fill flash) setting.
In dim lighting, the camera may select a slow shutter speed when you enable the built-in flash in Av mode, so keep an eye on that value and use a tripod if necessary to avoid blurring from camera shake.
-
Press and hold the shutter button halfway to engage exposure metering and, in Autofocus mode, to lock in focus.
Make sure that an active autofocus point falls over your subject. (In the viewfinder, active autofocus points turn red.) For the best results, try to set focus on your subject’s eyes; manually selecting a focus point can help in portrait shooting, too.
Alternatively, you can lock in a meter reading by pressing the AE Lock button and activating the autofocus by pressing AF-ON.
-
Press the shutter button the rest of the way to capture the image.
Again, these steps are but a starting point for taking better portraits. A few other tips can also improve your people pics:
-
Before pressing the shutter button, do a quick background check. Scan the entire frame for intrusive objects that may distract the eye from the subject (utility poles and phone wires seem to be everywhere).
-
Frame the subject loosely to allow for later cropping to a variety of frame sizes. Because your camera produces images that have an aspect ratio of 3:2, your portrait perfectly fits a 4 x 6-inch print size, but requires cropping to print at any other proportions, such as 5 x 7 or 8 x 10.
-
Pay attention to white balance if your subject is lit by both flash and ambient light. If you use the automatic White Balance setting (AWB), photo colors may be slightly warmer or cooler than neutral because the camera can become confused by mixed light sources.
-
When flash is unavoidable, try these tricks to produce better results. The following techniques can help solve flash-related issues:
-
Indoors, turn on as many room lights as possible and let in natural light, too.
-
Try setting the flash to Red-Eye Reduction mode when shooting nighttime and indoor portraits.
-
For night pictures, try Night Portrait mode. In this autoexposure mode, the camera automatically selects a slower shutter speed than normal.
-
For professional results, use an external flash with a rotating flash head. Then aim the flash head upward so that the flash light bounces off the ceiling and falls softly down on the subject. Not only will the light be more flattering on the subject, but this will also help avoid problems with glare, as you see in the following figure.

-
To reduce shadowing from the flash, move your subject farther from the background. Moving the subject away from the wall helps eliminate background shadows.
-