Canon does a good job of making it easy for you to change the most commonly used camera settings in the Canon EOS 60D menu system. The menus are organized logically, so it's pretty easy to find what you need.
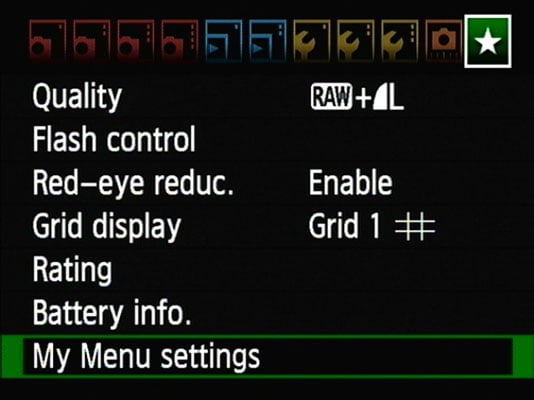
To make finding your favorite options even simpler, the EOS 60D enables you to create your own custom menu containing up to six items from the camera’s other menus. The last item on the list, My Menu Settings, is always on the menu because you use this option to set up (and later change) your custom menu. Logically enough, the custom menu goes by the name My Menu and is represented by the star icon in the upper-right corner of the screen.
To create your menu, take these steps:
Set the camera Mode dial to a mode in the Creative Zone.
You can add menu items and order them from the custom menu only in P, Tv, Av, M, B, or C exposure modes.
Press the Menu button and display the My Menu screen.
Initially, the screen shows only a single item (the My Menu Settings option, which always appears in this menu).
Highlight My Menu Settings and press Set.
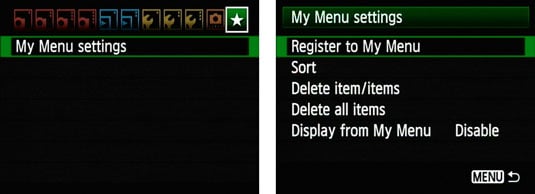
Highlight Register to My Menu and then press Set.
You see a scrolling list that contains every item on the camera’s other menus.
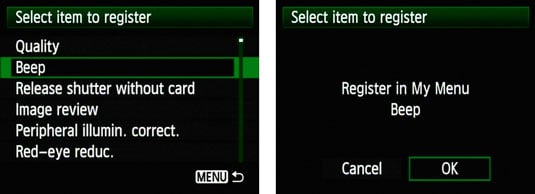
Highlight an item you want to include on your custom menu.
To add a specific Custom Function to your menu, scroll past the four Custom Function categories to find and highlight the individual function. The items named C.Fn I through IV simply put that Custom Functions menu item on your menu, and you still have to wade through multiple levels of steps to reach your function.
Press Set.
You see a confirmation screen.
Highlight OK and press Set.
You return to the list of menu options. The option you just added to your menu is dimmed in the list.
Repeat Steps 5-7 to add up to five additional items to your menu.
Press the Menu button.
You see the My Menu screen, where the items you added to the menu should appear.
After creating your menu, you can further customize and manage it by following these suggestions:
Give your menu priority. You can tell the camera that you want it to automatically display your menu any time you press the Menu button. To do so, select My Menu Settings on the main My Menu screen and then press Set. Highlight Display from My Menu and press Set. Highlight Enable and press Set again.
Change the order of the list of menu items. Once again, highlight My Menu Settings and press Set. Then highlight the Sort option and press Set. Highlight a menu item, press Set, and then use the multicontroller to move the item up or down in the list. Press Set to glue the menu item in its new position. Press Menu to return to the My Menu Settings screen; press Menu again to return to your custom menu.
Delete menu items. Display your menu, highlight My Menu Settings, and press Set. Then, to delete a single item, highlight Delete and press Set. Highlight the menu item you want to remove and press Set again. Highlight OK and press Set again to confirm your decision. To remove all items from your custom menu, choose Delete All Items, press Set, highlight OK, and press Set again.