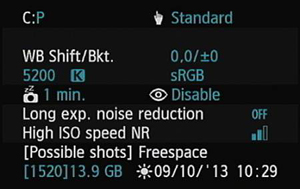
The screen that appears on your Canon EOS 70D with your first press of the Info button displays a different collection of settings depending on your exposure mode. In the advanced exposure modes (P, Tv, Av, M, B, and C), you see the data shown in the following figure. In the automatic exposure modes, some of this data is dimmed because you don’t have access to the related camera settings in those modes.
Moving from top to bottom of the screen, here’s your decoder ring to each line of data:
Camera User Setting mode and Touch Control setting: If you create a custom exposure mode, you can determine which exposure mode you used to set up that custom mode by looking at the C: item on the screen. Here, the letter P indicates that the P (programmed exposure) mode was the basis of the C mode.
On the right side of the line, you see the current Touch Control setting on Setup Menu 3, which enables you to adjust the sensitivity of the touchscreen or disable it altogether.
White Balance Shift/Bracketing: This line relates to color options. When all the values are 0, as in the figure, White Balance Shift and White Balance Bracketing are both turned off.
Color Temp and Color Space: Two more color settings, the first value shows you the Kelvin temperature of your selected white-balance option, and the second shows you the color space, which is either sRGB or Adobe RGB.
Auto Power Off and Red-Eye Reduction flash mode: The first value is linked to the Auto Power Off feature, which puts the camera to sleep after a specified period of inactivity. You can change the value via Setup Menu 2. The second symbol denotes whether Red-Eye Reduction flash is enabled; that feature is controlled via Shooting Menu 2.
Long Exposure Noise Reduction: When you use a slow shutter speed (long exposure time), a grain-like defect called noise can creep into your picture. This screen item tells you whether you enabled the Long Exposure Noise Reduction feature, designed to combat this type of noise.
High ISO Speed NR: Using a high ISO (light sensitivity) setting can also produce noise, so the camera offers a tool designed to combat that type of noise as well. The High ISO Speed NR item on the Camera Settings screen tells you what strength you selected for related menu item, found on Shooting Menu 4. Two bars, as in the figure, indicates that the Standard setting is in force.
Possible Shots/Freespace: The blue values under this labels indicate how much storage space remains on your camera memory card. How many pictures you can fit into that space depends on the Image Quality setting you select.
Date/Time/Zone: Here you see what the camera thinks is the current date and time; you can change its clock via the Date/Time/Zone item on Setup Menu 2. The little sun symbol means that you told the camera to automatically adjust its clock to account for daylight saving time.