


When you select a Quality setting that results in a JPEG image file, the Canon EOS 60D tries to enhance your photo while it’s processing the picture. Unlike Highlight Tone Priority, which concentrates on preserving highlight detail only, Auto Lighting Optimizer adjusts both shadows and highlights to improve the final image tonality.
In the fully automatic exposure modes, as well as in Creative Auto, you have no control over how much adjustment is made. In the exposure modes of the Creative Zone, you can decide whether to enable Auto Lighting Optimizer. You also can request a stronger or lighter application of the effect than the default setting.
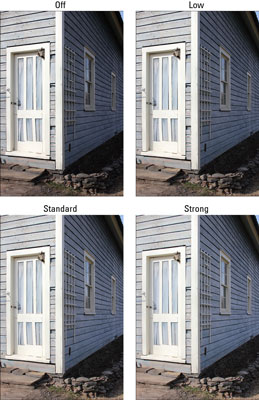
Given the level of improvement that the Auto Lighting Optimizer correction made to this photo, you may be thinking that you’d be crazy to ever disable the feature, but it’s important to note a few points:
The level of shift that occurs between each Auto Lighting Optimizer setting varies dramatically depending on the subject. This particular example shows a fairly noticeable difference between the Strong and Off settings. You don’t always see this much impact from the filter, though. Even in this example, it’s difficult to detect much difference between Off and Low.
Although the filter improved this particular scene, at times you may not find it beneficial. For example, maybe you’re purposely trying to shoot a backlit subject in silhouette or produce a low-contrast image. Either way, you don’t want the camera to insert its opinions on the exposure or contrast you’re trying to achieve.
Because the filter is applied after you capture the photo, while the camera is writing the data to the memory card, it can slow your shooting rate, just like using the Highlight Tone Priority feature.
In some lighting conditions, the Auto Lighting Optimizer can produce an increase in image noise.
The corrective action taken by Auto Lighting Optimizer can make some other exposure-adjustment features less effective. So turn it off if you don’t see the results you expect when you’re using the following features:
Exposure compensation
Flash compensation
Automatic exposure bracketing
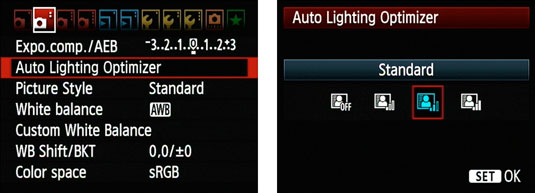
By default, the camera applies Auto Lighting Optimizer at the Standard level. If you want to experiment with other settings, visit Shooting Menu 2 and select Auto Lighting Optimizer. You have four choices: Standard, which is the default level of correction, Strong, Low, and Disable (or Off). Highlight your preference and press Set again to lock the setting. The adjustment remains in force until you revisit the Shooting menu to change the setting. Again, you have this control only in the Creative Zone; in the fully automatic exposure modes, the filter is always applied at the Standard level.
If you’re not sure what level of Auto Lighting Optimizer might work best or you’re concerned about the other drawbacks of enabling the filter, consider shooting the picture in the Raw file format. For Raw pictures, the camera applies no permanent post-capture tweaking, regardless of whether this filter or any other one is enabled. Then, by using Canon Digital Photo Professional, the software provided free with the camera, you can apply the Auto Lighting Optimizer effect when you convert your Raw images to a standard file format.

