
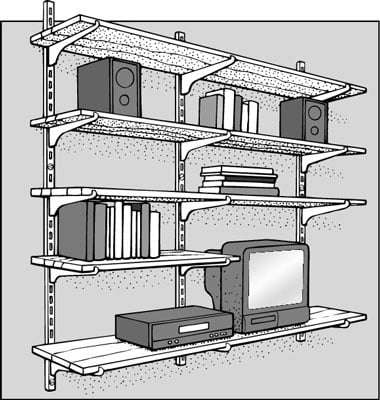
If you need more storage space or just want to display artwork or a collection of clocks on your wall, you can build shelves. A shelving system is made up of three basic components: shelves, standards (long vertical slotted strips fastened to the wall), and brackets that fit into grooves along the length of the standards. Because the shelf sits on top of these brackets, you can adjust the height of shelving for a variety of configurations.
Before you invest in a shelving system, consider these shopping tips:
Make a preliminary shopping/learning expedition to select a shelving system and pick up a planning brochure with the system's standard and bracket specifications.
Decide how many shelves you want and how you want to arrange them. Make a sketch of the wall, noting the location of wall studs so that you can plan the design.
Choose the standard size and shelf depth and style to fit the items you plan to store and display. Plan to space the standards about 32 inches apart and allow a maximum overhang of one-sixth of the shelf length.
If you must fasten the shelf to a hollow wall, choose mounting anchors based on their weight-bearing capacity. Don't be embarrassed to ask for help!
Read the directions on the package, noting how many uprights and brackets and what width and length of shelves are included. Most systems have brackets for at least two widths of shelving, so make sure that you buy the correct sizes. Some systems include the mounting hardware; some don't. Don't leave the store without everything you need.
Follow these steps for installing a component shelf system with standards and brackets:
Use a stud finder to locate the studs on the wall; they're usually placed 16 inches apart. (Some are 24 inches apart.)
Plan to install each standard on the center of the stud. Make light pencil marks on all the wall studs in the vicinity of the spot where you plan to install the shelving unit. (You may have to adjust the exact location slightly so that the standards are attached to the studs.)
A low-tech way to find a wall stud is to check at wall receptacles, removing the cover plate if necessary. There's always a stud on one side or the other. Or remove the shade from a lamp and set the lamp with bare bulb about a foot away from the wall to highlight fastener locations. Or get down on your hands and knees and look at where the baseboard molding has nailheads showing. Wherever you see a nailhead, especially if they appear to be 16 inches apart, it's likely that there is a stud behind it.
Mark the location for the top screw hole on the first standard and drill a small pilot hole through its top hole.
Screw in the top of the standard, but don't tighten it all the way.
You should be able to swivel the standard left and right.
Use a carpenter's level to straighten the standard so that it's plumb and then mark the location of another mounting screw.
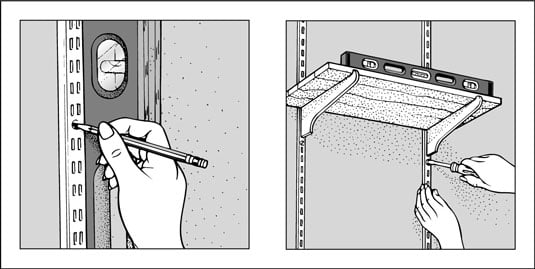
Swing the bracket to one side and then drill a pilot hole for the mounting screw.
Reposition the upright and install the mounting screw.
Locate the proper position of the second standard.
To position the second standard, place a shelf support bracket in the standard hanging on the wall. Then install another shelf support bracket in the same slot of a second standard. Hold the second standard over the next wall stud and then place a level (alone or on a piece of shelving) on the brackets and move the new standard up or down until the shelf is level.
Mark the location on the wall of one of the mounting screws for the second standard and install it as you did the first one.
Repeat with the remaining standards.
Install the shelf support brackets into the standards.
These brackets usually tap into slots that lock them in place.
Install the shelves.