The weekend has rolled around, and the weather’s great (mild, sunny, and not much wind), so you’ve decided that you’re going to inspect your beehive. But you can’t just dash out and tear the top off the hive. You have to get yourself ready for this special occasion.
Odorless beekeeping
You need to know that bees don’t react well to bad body odor. So, please don’t inspect your bees when you’re all sweated up after a morning jog. Take a shower first. Brush your teeth. On the other hand, don’t try to smell too good, either!
Avoid using colognes, perfumes, or scented hairsprays. Sweet smells can attract more attention from the bees than you want.
Be sure to remove your leather watchband before visiting your bees. They don’t like the smell of leather or wool, and these materials retain body odor. Removing any rings from your fingers also is a good idea. It isn’t that bees don’t like pretty jewelry. But in the rare event that you take a sting on your hand, you don’t want your fingers swelling up when you’re wearing a decidedly nonexpandable ring.
Beekeeping clothing
Always wear your veil when you’re inspecting your hive. Doing so keeps the bees away from your face and prevents them from getting tangled in your hair.
If a bee ever gets under your veil, try not to panic. It isn’t that big a deal. She’s unlikely to sting you unless you squeeze her. Simply walk away from the hive and slip off your veil. Don’t remove your veil at the hive, and don’t thrash around screaming and yelling. Doing so only upsets the bees, and the neighbors will think you’ve gone wacky.
New beekeepers need to wear a long-sleeved shirt. Light colors and smooth fabrics (like cotton) are best, because bees don’t like dark colors, or the smell of wool or leather (material made from animals). Using elastic, Velcro straps, or rubber bands around the cuff of each pant leg and sleeve keeps clothing bee-tight, unless, of course, you think you might actually like having curious bees traveling up inside your trousers.
You can use gloves if you feel you absolutely must. They impair your sense of touch and make your movements clumsy. Save your gloves for unfavorable weather, moving colonies around, or for use during the late summer and honey-harvesting time (when the colony’s population is large and bees tend to be more defensive).
Lighting your smoker for beekeeping
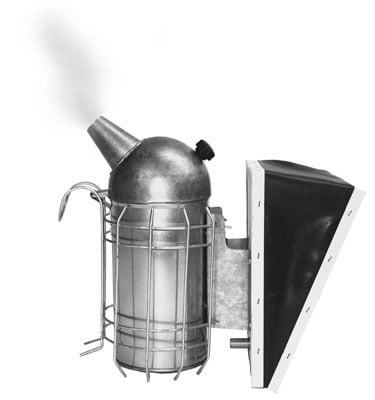
The smoker is the beekeeper’s best friend. Yet for many, keeping a smoker lit can be the trickiest part of beekeeping. It doesn’t have to be. What you’re trying to achieve is enough thick, cool smoke to last throughout your inspection. You certainly don’t want your smoker to poop out as soon as you’ve opened the hive.
Begin with a loosely crumpled piece of newspaper about the size of a tennis ball. Light the paper and place it in the bottom of the smoker. Nest it in place using your hive tool. Gently squeeze the bellows a few times until you’re sure that the paper is burning with a flame.
Add dry matchstick-size kindling, pumping the bellows as you do. As it ignites (you’ll hear it crackling), slowly add increasingly thicker kindling. Ultimately, the fattest of your twigs will be about as thick as your thumb. None of the kindling need be more than four or five inches in length. The kindling needs to fill three quarters of the smoker, and must be thoroughly packed from side to side. Using your hive tool, occasionally stoke the fire. Keep pumping. When your kindling has been burning for about 10 minutes, and embers are glowing, it’s time to add the real fuel.
Use a fuel that burns slowly and gives off lots of smoke. The bees really don’t care what you use, but avoid using anything synthetic or potentially toxic.
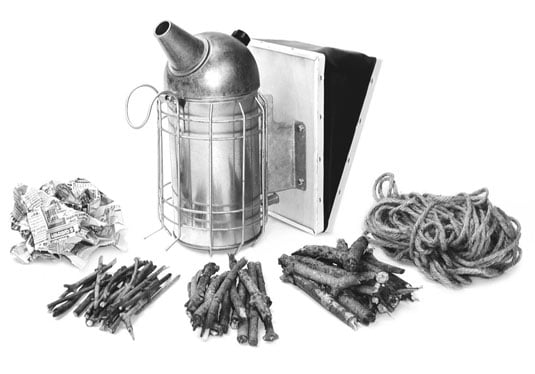
Pack the smoker right to the top with your preferred fuel, as you continue to gently pump the bellows. When billows of thick, cool, and white smoke emerge, close the top. Pump the bellows a few more times. Use a long, slow pumping method when working the bellows, rather than short, quick puffs. Doing so produces more and thicker smoke than short puffs.
Congratulations! You’re now ready to approach the hive. Your smoker should remain lit for many hours.
Make certain the smoke coming out of the smoker is “cool”. You don’t want to approach the hive with a smoker that is producing a blast furnace of smoke, fire, and sparks. Place your hand in front of the chimney as you gently work the bellows and feel the temperature of the smoke. If it feels comfortable to you, it will to the bees, too.