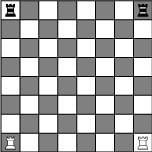
 Figure 1: The starting position of the rooks.
What is that piece, anyway?
No, a rook isn't a tower, and it isn't a castle! The rook appears a bit shorter and squatter than the other pieces, which partly accounts for the perception of it as a heavy piece.The rook and queen are sometimes referred to as heavy or major pieces because the rook and its own king, or the queen and its own king, can checkmate an enemy king by themselves. Minor pieces — the knight and the bishop — cannot, by themselves, checkmate an enemy king with only their own king for assistance. The real heavies in chess are the rooks and queens.
This heavy thing can be taken too far, of course. The rook is far from a plodding piece, and the player that gets their rooks into the game most effectively often turns out to be the winner. In the history of chess, the rook developed from the chariot: It is both fast and strong and therefore of considerable value. Unfortunately, it begins the game tucked into a corner and usually has to wait for the other pieces to settle into their preferred squares before receiving any attention.Moving the rook
The rook can move any number of squares — but only in straight lines, up and down, or side to side. Again, think of the chariot. After a chariot gets up a head of steam, turning corners isn't easy. Have you ever seen Ben Hur? It's just like that, but without the spikes.
The rook has the freedom to move any number of squares horizontally or vertically, as indicated in Figure 2 (on the left). On the right side of Figure 2, you can see that the rook can't move to a square occupied by one of its own pieces — nor can it jump over the piece and move to any of the other squares along that rank.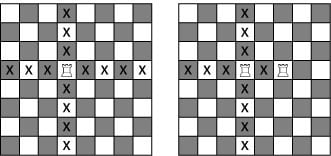 Figure 2: The rook can move up and down or side-to-side, but it cannot jump one of its own pieces.
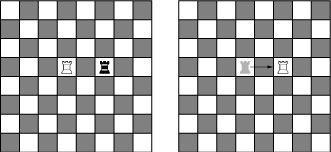 Figure 3: Two rooks, charging into battle.