A quilt's borders can be wide or narrow, pieced or appliqued, or a combination of techniques. Always try to choose a border that complements rather than clashes with your blocks.
For example, if you have stitched together some busy-looking blocks in bright colors, consider adding a simple border. Its simplicity will complement the complexity of your blocks. If you choose a border as complicated as your block design, that complex border could detract from your design by making it impossible to tell where the block ends and the border begins. In contrast, if your blocks are simple and traditional, multiple bands of borders may be just what you need to set them off. The idea is to make sure that all the elements of your design combine to make it eye-catching.
Selecting a border type
Although you can have dozens of border options to think about when planning your quilt, you most likely will use one of two basic types.The easiest and most common border style is the plain border, shown in Figure 1. You can stitch the plain border with squared corners or with mitered corners, depending on your expertise. A mitered corner is stitched at a 45-degree angle to the sides of the quilt.
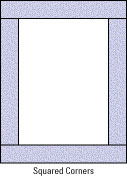
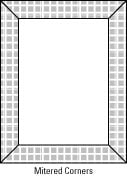
The squared-corner border is the simpler of the two to stitch. You can use a single wide length of fabric, or you can use several different plain borders together in one quilt.
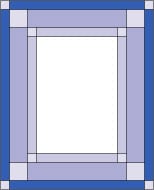
Borders with cornerstones are simple borders with the addition of a square in the corner of each border (see Figure 2). The cornerstones can be a complementing or contrasting fabric, or you can use pieced or appliqued blocks that complement the center area of your quilt.
Calculating border size
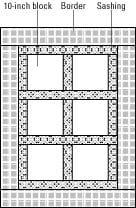
Calculating border size is really pretty simple. Just total all the finished measurements and add your seam allowances.For example, suppose that the quilt in Figure 3 is made of 10-inch square blocks with one-inch wide sashing strips, and you want a finished border that is 10 inches wide.
To find the size you need to cut for the borders:
1. Find the size of the side borders by adding up the blocks (three 10-inch-square blocks = 30 inches) plus the sashing (four 1-inch-wide strips = 4 inches): 30 inches + 4 inches = 34 inches
The finished size of your side border will be 10 wide x 34 inches long, but this is not the cutting measurement — yet. You need to add your 1/4-inch seam allowances to each side of this measurement, because this figure is the finished measurement. You certainly have not yet stitched the borders in place, so the borders are not finished, right? The seam allowances are the areas of fabric along the edges that will be taken up by the stitching. This area needs to be added to the finished measurements, or the border strips will be too narrow and too short after you stitch them to the quilt top.
2. Add 1/4-inch seam allowances to all four sides of the finished measurement.
This results in 101/2 inches x 341/2 inches as the cutting size of the side borders. Now to cut two borders using this measurement — one border for each side.
3. Find the measurement for the upper and lower borders by adding the blocks (two blocks at 10 inches = 20 inches) plus the sashing (three strips that are 1 inch wide = 3 inches) and the finished width of the side borders that you fiddled with in the previous steps (two borders that are 10 inches wide = 20 inches).
Now you have a finished measurement of 10 inches wide by 20+3+20= 43 inches long.
4. Add the 1/4-inch seam allowances to all four sides of the 10-inch x 43-inch length.
The final measurement for the upper and lower borders is 101/2 inches x 431/2 inches. You need to cut two of them this size — one for the top edge and one for the bottom.
Did you have any trouble?
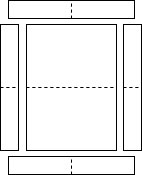
You're not alone if when you assembled the quilt center area, your stitching wasn't exactly perfect and your seam allowances were not quite 1/4 inch. You may even discover that the left side of your quilt center is longer than the right side of your quilt. That's okay; you can tweak it into shape by creatively cutting the borders!Here's a nice simple method for cutting your borders while squaring up the quilt top at the same time, making those uneven measurements jive once again! To keep things simple, assume that the border width in Figure 4 is 10 inches.

1. Measure the length of the quilt top down the center.
2. Round off the measurement to the nearest inch (assume this quilt center is 33 inches long).
Since the border is going to be 10 inches wide, you now have a measurement of 10 inches x 33 inches.
3. Add 1/4-inch seam allowances to all four sides.
This makes the length to cut 101/4 inches x 331/4 inches.
4. Measure the quilt from side to side and include the borders.
Assuming that the width of the quilt is 22 inches, and your side borders are 10 inches wide, your unfinished measurement will be 10 inches + 10 inches + 22 inches.
5. Add the 1/4-inch seam allowances to all four sides.
You've now got a cutting measurement of 101/2 inches x 421/2 inches.
Stitching the borders to your quilt
Before you stitch the border to your quilt, you need to prepare the border strips so that everything will (hopefully) come out okay. You don't want to end up with too little or too much border fabric in proportion to your quilt top (kind of like ending up with too much cake at the end of your frosting).First, fold each of the four border strips in half to find the centers of the strips and press the center of each border to form a crease, or place a pin at the halfway point to mark it. Find the centers of all four sides of the quilt top as well in the same manner (fold and press or mark with a pin). After you mark the centers, you're ready to stitch.
As shown in Figure 5, align the center of the border with the center of the quilt top, having the right sides together. Pin through the layers at the center marking to hold them together while stitching. Add a pin to each end to hold the ends together, too.
Stitch the border to the quilt along its length, easing in any excess fabric using the technique described next:
- Be sure to ease the excess fabric in place when you stitch.
- To do this, place the side that has the excess (whether it be the border or the quilt top) next to the feed dogs of your machine. These feed dogs will help ease the extra length for you. Now, start stitching, holding back the top (shorter) layer slightly and allowing those feed dogs to do their job of feeding that lower layer of fabric as shown in Figure 6.
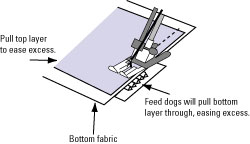
- Stitch the borders to the quilt, placing the side that needs easing toward the feed dogs and pulling back on the top layer to ease.