You can create bias strips by simply sewing strips together. Many quilters prefer this stitch-as-you-go method because it’s a good way to use up an odd-size piece of fabric. Because you're cutting bias strips instead of a perfect square, it doesn’t matter if your choice of binding fabric has been cut into previously.
To cut bias strips using this technique, follow these easy steps:
Using a ruler, mark lines on a piece of fabric on a 45-degree angle to the grain line. Space the lines the width you need for your strips.
Most see-through rulers intended for rotary cutting have 45-degree lines already marked on them, so they’re especially useful for this task.
Cut the strips apart using a rotary cutter.
You can use scissors if you prefer.
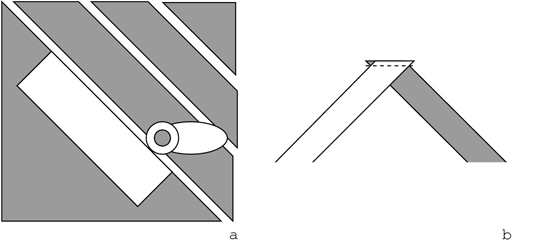 You can make bias binding by cutting strips on a diagonal (a) and then sewing them together (b).
Pin together the short ends of two strips, as shown in b of the preceding figure, with the right sides together. Offset the strips so that there’s a small tail at either end of the future seam.
Offsetting the strips slightly accommodates a 1/4-inch seam allowance and produces the little tails. If you don’t offset the strips as shown in the preceding figure, you won’t have a straight smooth line along the edges of your binding.
Sew the strips together where they’re pinned, use scissors to trim off the little fabric tails, and press the seam allowances open.
Continue joining strips until you have enough length to bind your quilt.