Use a basic shell stitch to crochet this tank top, and you'll have a cool, comfortable top for warm-weather wear. This shell-stitch tank top is perfect for a starter project.

Here are the materials and vital statistics for this project:
Size: Directions are for size X-Small (4). Changes for Small (6), Medium (8–10), Large (12–14), and X-Large (16) are in parentheses.
Yarn: Artful Yarns “Fable” worsted-weight yarn (85% pima cotton/15% silk), (3.5 oz. [100 g], 184 yds [168 m] each hank): 4 (4, 5, 5, 5) hanks of #93 Little Red Riding Hood
Hook: Crochet hook size G-6 U.S. or size needed to obtain gauge
Tapestry needle
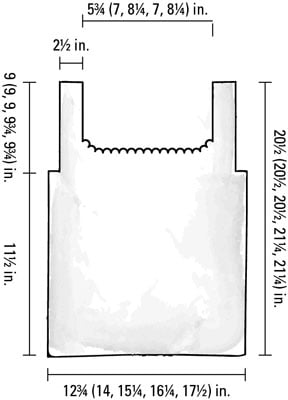
Measurements: Finished bust: 25 1/2 (28, 30 1/2, 32 1/2, 35) in. Back length: 20 1/2 (20 1/2, 20 1/2, 21 1/4, 21 1/4) in.
Gauge: 3 shells in pat = 31⁄2 in.; 7 rows in pat = 3 in.
Stitches used: Chain stitch (ch), slip stitch (sl st), single crochet (sc), double crochet (dc). Shell: 5 dc in same stitch .
Create your crocheted tank top:
Begin crocheting your top's back by following this stitch pattern:
Foundation chain: Ch 68 (74, 80, 86, 92).
Row 1 (right side): Sc in 2nd ch from hook, skip next 2 ch, shell in next ch, skip next 2 ch, sc in next ch , rep from to across (11 [12, 13, 14, 15] shells), turn.
Row 2 (wrong side): Ch 3 (first dc), 2 dc in first sc (half shell made), sc in center dc of next shell, shell in next sc, sc in center dc of next shell , rep from to across to within last sc, 3 dc in last sc (10 [11, 12, 13, 14] shells and 2 half shells), turn.
Row 3: Ch 1, sc in first dc, skip next 2 dc, shell in next sc, sc in center dc of next shell , rep from to across to within last sc, shell in next sc, skip next 2 dc, sc in last dc (11 [12, 13, 14, 15] shells), turn.
Rep Rows 2–3 for pat until back measures 11 1/2 in. from beginning, ending with Row 2 of pat.
Shape the back's armholes with this stitch pattern:
Next Row (right side): Sl st to center dc of first (first, first, second, second) shell, ch 1, sc in dc, work in established pat across to within last 1 (1, 1, 2, 2) shell(s), sc in center dc of shell (9 [10, 11, 10, 11] shells), turn, leaving rem sts unworked.
Work even in established pat for 13 (13, 13, 15, 15) more rows.
Use this stitch pattern to shape the back's right neck:
Next Row (right side): Ch 1, sc in first dc, shell in next sc, sc in center dc of next shell , rep from to twice (3 shells), turn, leaving rem sts unworked.
Next Row: Sl st to center dc of first shell, ch 1, sc in dc, shell in next sc, work in established pat across to last sc, 3 dc in last sc (2 shells and 1 half shell), turn.
Next Row: Ch 1, sc in first dc, shell in next sc, sc in center dc of next shell , rep from to once (2 shells), turn, leaving rem sts unworked.
Work even in established pat for 4 more rows. Fasten off.
Shape the back's left neck as follows:
Next Row: With right side facing, skip center 2 (3, 4, 3, 4) shells, skip next sc, join yarn in center dc of next shell, ch 1, sc in dc, work in established pat across (3 shells), turn.
Next Row: Ch 3 (first dc), 2 dc in first sc, work in established pat across to within last shell, sc in center dc of last shell (2 shells and 1 half shell), turn, leaving rem sts unworked.
Next Row: Sl st to center dc of first shell, ch 1, sc in dc, work in established pat across (2 shells), turn.
Work even in established pat for 4 more rows. Fasten off.
Begin the front of the top by following this stitch pattern:
Foundation chain: Ch 68 (74, 80, 86, 92).
Row 1 (right side): Sc in 2nd ch from hook, skip next 2 ch, shell in next ch, skip next 2 ch, sc in next ch , rep from to across (11 [12, 13, 14, 15] shells), turn.
Row 2 (wrong side): Ch 3 (first dc), 2 dc in first sc (half shell made), sc in center dc of next shell, shell in next sc, sc in center dc of next shell , rep from to across to within last sc, 3 dc in last sc (10 [11, 12, 13, 14] shells and 2 half shells), turn.
Row 3: Ch 1, sc in first dc, skip next 2 dc, shell in next sc, sc in center dc of next shell , rep from to across to last sc, shell in next sc, skip next 2 dc, sc in last dc (11 [12, 13, 14, 15] shells), turn.
Rep Rows 2–3 for pat until front measures 11 1/2 in. from beginning, ending with Row 2 of pat.
Shape the front's armholes as follows:
Next Row (right side): Sl st to center dc of 1st (1st, 1st, 2nd, 2nd) shell, ch 1, sc in dc, work in established pat across to within last 1 (1, 1, 2, 2) shell(s), sc in center dc of shell (9 [10, 11, 10, 11] shells), turn, leaving rem sts unworked.
Work even in established pat for 3 more rows.
Follow this stitch pattern to shape the front's left neck:
Next Row (right side): Ch 1, sc in first dc, shell in next sc, sc in center dc of next shell , rep from to twice (3 shells), turn, leaving rem sts unworked.
Next Row: Sl st to center dc of first shell, ch 1, sc in dc, shell in next sc, work in established pat across to within last sc, 3 dc in last sc (2 shells and 1 half shell), turn.
Next Row: Ch 1, sc in first dc, shell in next sc, sc in center dc of next shell , rep from to once (2 shells), turn, leaving rem sts unworked.
Work even in established pat for 14 (14, 14, 16, 16) more rows. Fasten off.
Shape right neck by following this stitch pattern:
Next Row: With right side facing, skip center 2 (3, 4, 3, 4) shells, skip next sc, join yarn in center dc of next shell, ch 1, sc in dc, work in established pat across (3 shells), turn.
Next Row: Ch 3 (first dc), 2 dc in first sc, work in established pat across to within last shell, sc in center dc of last shell (2 shells and 1 half shell), turn, leaving rem sts unworked.
Next Row: Sl st to center dc of first shell, ch 1, sc in dc, work in established pat across (2 shells), turn.
Work even in established pat for 14 (14, 14, 16, 16) more rows. Fasten off.
With right sides facing each other, using tapestry needle and yarn, sew front to back across shoulders, using the whipstitch.
Beginning at lower edge of each side, matching stitches across side edges, sew side seams from lower edge to armholes.
With right sides facing each other, join yarn in side seam at lower edge of one armhole, ch 1, sc evenly around entire armhole, sl st in first sc to join. Fasten off.
Repeat armhole edging around the other armhole.