Nothing is truly perfect the first time, especially when you create things on a Samsung Galaxy tablet while typing with your thumbs at 34,000 feet during turbulence. You can do a whole slate of things with (and to) your friends in the tablet’s address book.
How to edit contact information on your Samsung Galaxy tablet
To make minor touch-ups to any contact, start by locating and displaying the contact’s information in the Contacts app. Touch the Edit icon (a pencil), and start making changes.

Change or add information by touching a field and typing with the onscreen keyboard. You can edit information as well: Touch the field to edit and change whatever you want.
Some information cannot be edited. For example, fields pulled in from social networking sites can be edited only by that account holder on the social networking site.
When you’ve finished editing, touch the Save button.
How to take a picture of a contact on your Samsung Galaxy tablet
Nothing can be more delicious than snapping an inappropriate picture of someone you know and using the picture as his contact picture on your Galaxy tablet. Then, every time he contacts you, that embarrassing, potentially career-ending photo comes up.
To use the tablet’s camera to snap a contact picture, heed these directions:
Locate and display the contact’s information.
Touch the contact’s picture.
This trick works even when the picture is one of the boring generic images.
Choose the Take Picture command.
Use the tablet’s camera to snap a picture.
Both the front and rear cameras can be used (but not both at the same time). Touch the Shutter icon to take the picture.
Review the picture.
Nothing is set yet. If you want to try again, touch the Discard button and start over in Step 4.
Touch the Save button to confirm the new image and prepare for cropping.
If you see a prompt asking you to choose an app, choose Gallery (Crop Picture) and touch the Just Once button.
Later, as you become more familiar with the tablet, you can touch the Always button, which speeds up the process.
Crop the image.
Adjust the cropping box so that it surrounds only the portion of the image you want to keep.
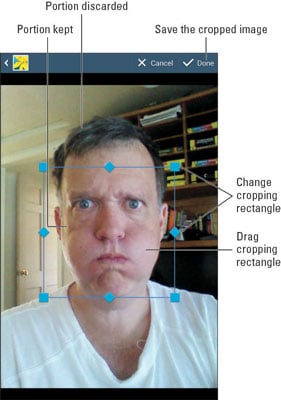
Touch the Done button to crop and save the image.
The image now appears whenever the contact is referenced on your tablet.
To remove an image from a contact, you need to edit the contact. Touch the contact’s picture while you’re editing, and then choose the Remove command.
You can also use any image stored on the tablet as a contact’s picture. In Step 3, choose the Image command to view the Gallery. Browse for and select an image, and then crop.
How to join identical contacts on your Samsung Galaxy tablet
The Galaxy Note and Galaxy Tab can pull in contacts from multiple sources (Facebook, Gmail, and Twitter), so you may discover duplicate contact entries in the Contacts app. Rather than fuss over which entry to use, you can join similar contacts. Here’s how:
Wildly scroll the Contacts list until you locate a duplicate.
Well, maybe not wildly scroll, but locate a duplicated entry. Because the address book is sorted, duplicates usually appear close together.
Select one of the duplicate contacts.
Touch the Menu button.
Choose Join Contact or Link Contact.
The window that appears lists some contacts that the tablet guesses could be identical. It also displays the entire list of contacts in case the tablet guesses incorrectly. Your job is to find the duplicate contact.
Select the duplicate contact from the list.
The accounts are merged, appearing as a single entry in the Contacts app.
Joined contacts can be discovered by looking at the Connection area when viewing the contact’s information. You’ll see more than one icon when multiple contacts have been joined.
How to separate contacts on your Samsung Galaxy tablet
The topic of separating contacts has little to do with parenting, though separating bickering children is the first step in avoiding a fight. Contacts in the address book might not be bickering, but occasionally the tablet may automatically join two contacts that aren’t really the same person. When that happens, you can split them by following these steps:
Display the contact that comes from two separate sources.
Sometimes it’s difficult to spot such a contact. An easy way for some is to see two diverse e-mail addresses for the contact, which often indicates a mismatch.
Touch the Menu button.
Choose the Separate Contact command.
You see a list of contact sources, each with a red minus icon to the right.
Touch the red minus icon by the account you want to separate, and then touch the OK button to confirm.
Repeat Step 4 for each account you want to split off.
Touch the Back button when you’re done.
You don’t need to actively look for improperly joined contacts as much as you’ll just stumble across them. When you do, feel free to separate them, especially if you detect any bickering.
How to remove a contact from your Samsung Galaxy tablet
Every so often, consider reviewing your contacts. Purge those folks whom you no longer recognize or have forgotten. It’s simple: View the forlorn contacts and touch the Trash icon. Touch the OK button to confirm. Poof! They’re gone.

Because the Contacts list is synchronized with your Gmail contacts for your Google account, the contact is also removed there.
For some linked accounts, the Contacts app won’t let you delete the account. Instead, you need to remove the account from the linked source, such as Facebook.
Removing a contact doesn’t kill the person in real life.