
GarageBand lets you disguise and fix mistakes in tracks in a number of different ways. The next time you lay down a track that's not quite perfect, don't delete the track until you've tried some of or all the following techniques.
Punching in and out to replace part of a track
If you make a mistake when you record a track, you can sometimes fix the mistake by re-recording the part with the mistake. In recording parlance, this is called punching in and punching out.
When you punch in and out in GarageBand, you choose which part you re-record by using the Cycle Region.
When you turn on the Cycle Region, the playhead loops back to the beginning of the Cycle Region every time it reaches the end. So the region plays (or records) continually until you click the Stop button or press the spacebar.
To punch in and out on a track, follow these steps:
1. With your song open, click the Cycle button (located at the bottom of the screen — the one with the curved arrows, next to the double-headed arrows) or press C to activate the Cycle Region.
A yellow ruler appears under the beat ruler showing the Cycle Region, as shown in Figure 1.
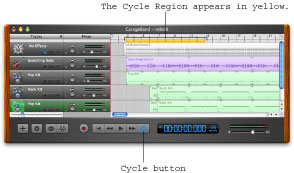
Figure 1: Click the Cycle button to turn on the Cycle Region.
The first time you use the Cycle Region, it appears at the far left end of the beat ruler, but if you move it, the Cycle Region appears where you moved it the next time you turn it on.
2. Select the track that needs fixing.
3. Find the precise part that you want to re-record by moving the playhead and listening to the track.
4. Position the Cycle Region over the part that you want to re-record.
Click and drag the middle of the yellow Cycle Region to move it; click and drag on either end to extend or shrink it.
Use the Zoom slider to zoom in on the timeline if you need to.
Click Play or press the spacebar to play the contents of the Cycle Region. If it's the exact part you want to re-record, proceed to Step 5. If it's not, continue to move, expand, and/or contract the Cycle Region until it contains only the precise portion of the track you wish to re-record, and then proceed to Step 5.
It's almost impossible to perform a decent punch in without using GarageBand's Count In feature. Choose Control --> Count In and select it.
Count In is a toggle: It's activated when there is a check mark next to its name in the menu.
5. Click the Record button (the red dot button) or press R to start recording.
6. Play the part.
If the track is a real instrument, only the first pass through the cycle region is recorded as you play. If you don't stop recording after your first pass, the second pass (and every subsequent pass) plays back what was recorded on the first pass.
But if the track is a software instrument, something different and very useful happens instead: Every pass is recorded and merged with the previous passes. So, for example, you can play snare drum on the first pass, the high-hat on the second pass, and the ride cymbal on the third pass. When you click the Stop button or press the spacebar, all three passes have been recorded on the same track. Neat, eh?
7. When you finish playing the part, click the Play button or press the spacebar to stop recording.
Now listen to the track closely and if it's not what you want, try again.
When you're finished with this punch-in, don't forget to click the Cycle button or press C to turn off the Cycle Region.
Just undo it . . . and then redo it
With GarageBand, it's easy to undo many mistakes immediately. You can undo the last thing that you did. But did you know that you can undo the next-to-last thing you did, and the thing before that one, and the thing before that, and so on?
Here's a quick list of undo and redo commands:
- To undo the previous action: Choose Edit --> Undo or press Command-Z.
- To redo what you just undid: Choose Edit --> Redo or press Command-Shift-Z; what you undid will be redone.
- To get the ultimate undo: Choose File --> Revert to Saved, and your song goes back to the way it was the last time you saved it.
The Undo and Redo features are linear, so pay close attention. It's easy to undo something good — something that you didn't want to have undone — if you just keep pressing the shortcut without watching what happens each time. Instead of relying too heavily on the Undo and Redo features, save a copy of your song before you begin undoing or redoing by choosing File --> Save As.
Splitting and joining tracks
You can take any region on any track and divide it into two or more parts. This option has many practical uses, but the one that you'll probably use most is deleting part of a region.
From a cough to a botched note, splitting a region is the most direct, easiest, and often the best way to edit out a part of a track that you no longer need.
If you trim out "dead space" in live instrument tracks, your songs will have a brighter, cleaner sound. For example, if you start recording 12 seconds before the first note the guitar plays, you should trim out the 12 seconds of dead space before the guitar kicks in. The same thing goes for vocals — if you recorded air, trim it out. That dead space has noise in it. Deleting the dead space lowers the overall noise level for your song, so if you want the cleanest, brightest mix possible, delete dead space on any real instrument track if it's longer than 2–3 seconds. It's a big hassle, but your song will sound better for your trouble.
To split a region, follow these steps:
1. To split a single region, click it once to select it; to select multiple regions, Shift-click or drag to select them all.
2. Move the playhead to the precise point where you want the split to occur.
3. Choose Edit --> Split or press Command-T.
The region will split into two regions at the playhead, as shown in Figure 2. Go ahead and try it out. I have all the time in the world.
You can split a region into as many regions as you want. If you're cutting out part of a track, you may need to add a second split to isolate the section that you want to delete. After you do that, select the section of the track that needs to go and delete it by pressing Backspace or Delete.
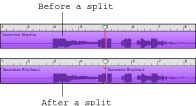
Figure 2: A region before (top) and after (bottom) being split.