


The primary colors are red, green, and blue. Mixing them together gives you other colors, the so-called secondary colors. So a red-and-green light together make a yellow one. A green-and-blue light make a cyan color, and a red-and-blue light make magenta. Turn on all three LEDs together and you make white — or, more precisely, they make a white tint.
In theory, all three LEDs on together will make white, but in practice this depends on the exact brightness of the three separate lights. They have to be identical to make a pure white; otherwise, the white looks tinted, which is not altogether a bad thing. It's not an easy task to do this, because each color has a different forward voltage drop — you need different resistors to ensure the same current through each LED. Not only that, each color of LED converts current to brightness with a different efficiency, which complicates things tremendously.
You might be used to mixing colored paint, but keep in mind you get different results doing this than mixing light. Paint mixing is known as subtractive mixing because each paint color you put into the mix takes out (or subtracts) some other color. This is how your color printer works. For subtractive mixing, the primary colors are cyan, magenta, and yellow; red, green, and blue being the secondary colors.Using diffusers
The light from three LEDs in the same package will still be seen as three separate points of light, unless there is some sort of diffuser, which allows the light to mix evenly. For individual RGB LEDs, this is sometimes provided by the package or body of the LED itself. Viewing distance alone can provide enough diffusion to mix the colors, but often a diffuser of some sort will help. Diffusers also reduce the brightness per unit area of the LED, making it much easer to take a good color picture.You can use anything that is translucent as a diffuser. Our favorite is a very thin styrene sheet — about 0.5mm thickness is fine and is easy to work with, because it can be cut with scissors. (A good alternative is a simple sheet of paper.) If you have several LEDs and want to see the light from each distinctly, then you have to have each one surrounded by a light baffle — sometimes known loosely as an egg box, or waffle box.
Without the baffle, the light from each LED mixes with those adjacent to it and gives a soft focus effect that is not at all unpleasant. The degree of diffusion you get is proportional to not only the diffusing material but also the distance of that material from the LED. In most cases, a few millimeters is fine.
You can turn the clear-plastic housing LED into a diffuser by rubbing it gently with very fine sandpaper or wire wool. Even better is to use a foam-backed sanding block, because it gets round the curves much better than paper. These LED housings are made of resin, so solvents like acetone do not affect the surface.
Making more colors on your Raspberry Pi
The trick to making more colors than the simple primary and secondary colors is to have different brightness of each of the three colors. In that way, many more subtle colors can be made. So how can you control the brightness of an LED? Well, the answer might not be immediately apparent, but what you need to do is to turn the LED on and off very rapidly. If you do this fast enough — that is, faster than about 30 times a second — then the eye/brain sees this as a light that is constantly on and not flickering.Furthermore, you perceive the brightness of the LED according to the relative length of the On and Off times. That is, if the LED is on and off for equal times, the LED appears to be only half as bright. This rapid switching technique is known as PWM — short for Pulse-Width Modulation — and is the way you control the LED's brightness. The waveforms are shown here.
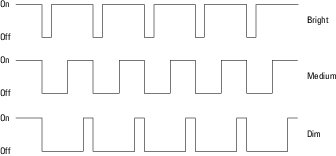 A PWM signal controlling the LED's brightness.
You can see that the three PWM signals go on an off at the same speed; however, the one that spends more time being on is brighter than the one that spends only half the time being on. Finally, the last waveform has a little time on but a long time off and produces a dim LED. The ratio of the On time to the Off time is known as the duty cycle of the waveform. Note that the frequency of this PWM signal does not matter once it is above the rate where you see it flicker.
The RPi.GPIO library has the ability to make the GPIO pins output a PWM signal, and the library can set both the frequency and duty cycle. If you wire up an RGB LED according to the image above, you can test out the colors an RGB LED can produce with this code.
#!/usr/bin/python3
import time
import RPi.GPIO as io
io.setmode(io.BCM)
io.setup(17,io.OUT) # make pins into an output
io.setup(27,io.OUT)
io.setup(22,io.OUT)
ledR = io.PWM(17,60) # Set up outputs as PWM @ 60Hz
ledG = io.PWM(27,60)
ledB = io.PWM(22,60)
ledR.start(0) # start off the PWM
ledG.start(0)
ledB.start(0)
print("RGB color cycle an LED using RPi.GPIO - By Mike Cook")
print("Ctrl C to quit")
try:
while(1):
print("Start cycle")
time.sleep(2.0)
for stepR in range(0,100,5):
for stepG in range(0,100,5):
for stepB in range(0,100,5):
ledR.ChangeDutyCycle(stepR)
ledG.ChangeDutyCycle(stepG)
ledB.ChangeDutyCycle(stepB)
time.sleep(0.1) # Whole cycle 8000 times this
ledR.ChangeDutyCycle(0)
ledG.ChangeDutyCycle(0)
ledB.ChangeDutyCycle(0)
except KeyboardInterrupt:
pass
ledR.stop(0) #stop the PWM
ledG.stop(0)
ledB.stop(0)
io.cleanup() # Restore default GPIO state
When you walk through this listing, you see that the first thing the code does is set three GPIO pins to be outputs and then set them up to produce a PWM signal. The value 60 in these opening lines of code is the frequency 60 Hz, which is the frequency the PWM signal will go at. The duty cycle goes from 0, which is off all the time, to 100, which is on all the time.
The main part of the program consists of three nested for loops, which ensure that all combinations of red, green, and blue are produced in duty cycle steps of five. It takes 800 seconds — just over 13 minutes — to do a complete cycle where 8,000 colors are produced. It might not look like that many colors when you test your LED output running this code, but they are all there.
It’s just that many of them from this demonstration might look the same. This has to do with the way people perceive colors — they’re much more sensitive to the difference between two colors than to the colors themselves.
