If you want to wipe your computer and install Windows 8.1 from scratch, do that by booting from a DVD or USB drive and running a clean install. If you’re going to upgrade from Windows 7 to Windows 8.1, and want to keep your data and programs intact, perform the online upgrade.
As long as you stick to upgrading 32-bit Win7 to 32-bit Win8.1, or 64-bit Win7 to 64-bit Win8.1, the online installer works great.
You must make full backups of all your data, write down all your passwords (unless they’re stored online someplace like LastPass), get all your software installation CDs and DVDs, and make yet another backup just in case, before starting this process.
If you buy a shrink-wrapped copy of Windows 8.1, you get a DVD (or possibly a USB drive) that’s ready to boot. With a bootable USB drive or DVD in hand, you may have to adjust your computer so that it boots from the USB or DVD.
Here’s how to go through the whole process — and survive to tell the tale:
With your old version of Windows running, insert the Windows installation disk in the DVD drive, or the installation USB in a USB port.
Choose Start→Shut Down to go through a full shutdown.
Windows may offer to install itself while you’re trying to shut down. If it does, click the Cancel button.
Power off the PC, wait at least a full minute, and then turn on the power.
If the PC can start (or boot) from the DVD drive or USB drive, you see text on the screen that says something like Press any key to boot from CD or Press Esc to choose boot device.
Press whatever key is recommended.
If the PC doesn’t offer to boot from the DVD drive or USB stick, you have to look in your PC’s documentation for the correct setting in your PC’s BIOS. If you’re not familiar with your PC’s BIOS, go to the website for your PC manufacturer and search for the terms change boot sequence.
When the PC boots, you may be asked if you want to go online to get the latest updates.
If you do, choose Go Online to Install Updates Now and click Next.
In the Windows Setup screen, change the language if you wish, click Next, and then click Install Now.

When the installer prompts for the product key, enter it. When a license terms screen appears, accept it.
The Which Type of Installation Do You Want? dialog box appears.
To wipe everything and start fresh, click Custom Install Windows Only (Advanced).
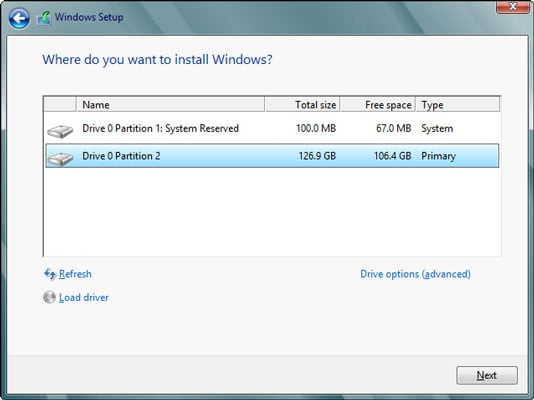
The installer asks you where you want to install Windows.
If there is more than one entry in the upper box, choose Drive Options (Advanced), click each entry in the upper box, one by one, and click on the link that say Delete. When you’re done, click Next.
Then go have another latte . . . or two . . . or three. Your computer restarts several times.
If you had to jimmy your BIOS to make your PC boot from a DVD drive or USB, you may reach an odd situation where you see the setup screen again, and your computer just sits there waiting for you to start again. If that happens, pull the DVD or USB drive out of its slot and manually restart your computer. The installer kicks back in again the second time.
By the time the installer comes up for air, you’re ready to personalize your copy of Windows.
Choose a background color for the tiled Start screen (don’t worry, it’s easy to change later), type a name for the PC (better if you stick to letters and numbers, no spaces or weird characters), and click Next.
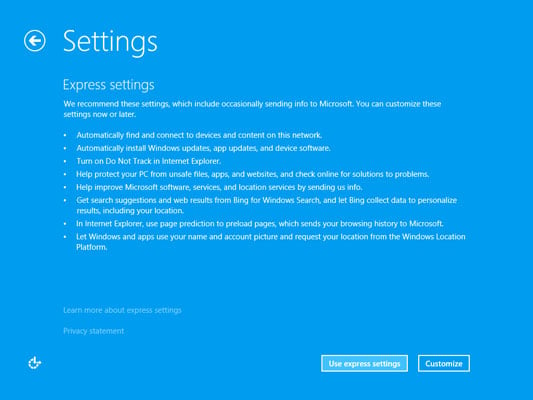
Windows asks about your initial settings.
If you trust Microsoft, choose Use Express Settings. If not, choose Customize.
If you choose Customize, the installer takes you through a series of questions. Here’s what you should do:
Turn on sharing. Tell Windows Update “Don’t set up Windows Update (not recommended).”
Automatically get new device drivers/apps (both set to On). Turn on the SmartScreen filter. Choose to send Do Not Track requests to websites that you visit. That doesn’t really accomplish anything at this point, but someday maybe it will.
Use Windows Error Reporting and IE Compatibility lists. Don’t let Microsoft collect information about your location when you’re using location-aware apps (turn it Off). The only real downsides are in the Windows Store apps Maps and Weather — and you can turn on location tracking when you fire up those apps, if you like.
You probably don’t want to participate in the Customer Experience Improvement Spying Program, and you don’t want Microsoft to learn about how you use Help in the Help Experience Improvement Program — Off and Off again.
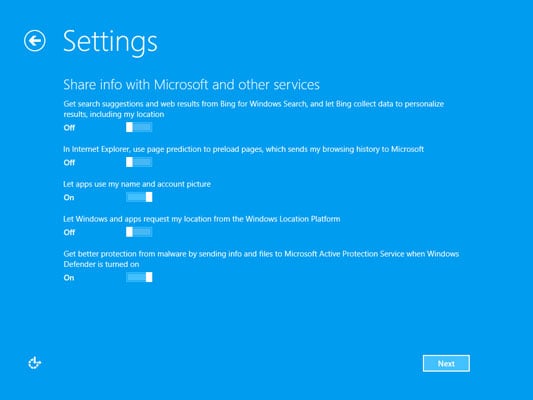
Next comes the most pernicious setting in Windows 8.1. Microsoft asks if it can get search suggestions and web results from Bing for Windows Search. Turn it Off. You don’t want to send your IE browsing history to Microsoft — that goes Off.
Do let apps use your name and account picture — On. Don’t let Windows and apps request your location, unless you specifically grant it later. But do turn on Microsoft Active Protection Service, because it provides a worthwhile service.
If you just upgraded from Windows 7, provide your account’s password.
If you performed a clean install, don’t let Windows bully you into using a Microsoft account. Enter the account name (and type!) you like.
Set up SkyDrive.
Finally, you’re given a chance to set up SkyDrive automatically. Click Use SkyDrive. That installs SkyDrive and sets it as the default location for many of your apps. It also adds a SkyDrive link to your Documents library.
Click Finish and stand back.
The tiled Metro Start screen appears, and you’re done.