If any of the computers in your house or small office use Windows XP or Vista, you have to change some settings in order for these older PCs recognize your Windows 7 PCs on a network. In order to get all your PCs working together, you’ll need to create a traditional network and then change the way the PCs look for each other.
Be sure to create a Homegroup on your Windows 7 PC before following these steps.
Create a working network on your Windows XP and Windows Vista PCs.
If you already have an existing network set up, move to the next step.
Connect to that network with your Windows 7 PCs.
Windows 7 PCs can join a wired or wireless network. Once they’ve connected, you need to tell your Windows 7 PCs to share their files with the PCs running older versions of Windows.
On your Windows 7 PC, click the Start button, choose Control Panel, choose Network and Internet, and choose Network and Sharing Center.
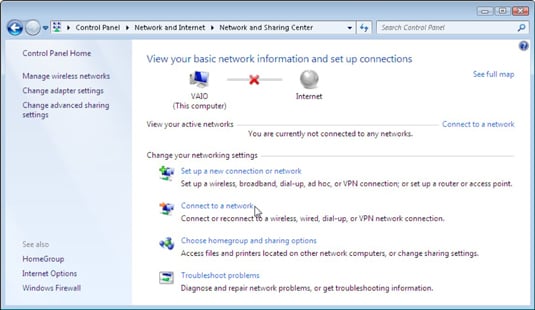
You can also open the Network and Sharing Center by clicking one of your taskbar’s network adapter icons and choosing Open Network and Sharing Center from the pop-up menu.
Click the Change Advanced Sharing Settings link in the Network and Sharing Center’s left pane.
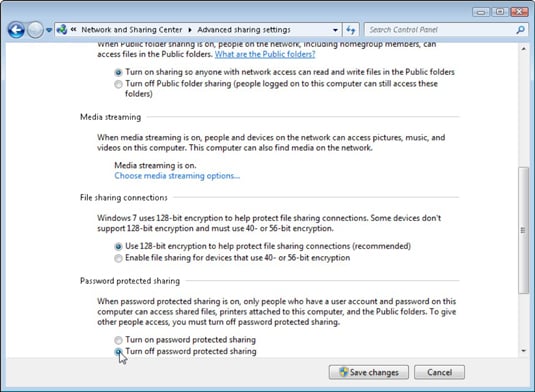
The Advanced Sharing Settings window appears, offering a plethora of options.
Change these items in the Advanced Sharing Settings window:
Ensure that each of these options is set accordingly.
Network Discovery: Turn on this setting to let your Windows 7 PC and your networked PCs find each other on the network.
File and Printer Sharing: Turn on file and printer sharing so that the PCs can see each other’s files and printers, as well.
Public Folder Sharing: Turn on Public folder sharing to let anyone with network access read and write files in the Public folders.
Password Protected Sharing: The clincher, this should be turned off, so that people on Windows XP and Vista PCs won’t have to deal with a name/password prompt whenever they want access to your Public folders.
If you own an Xbox 360 or a SmartMedia TV, feel free to turn on Media Streaming, as well. That lets your Xbox access music, pictures, and videos stored on your Windows 7 PC.
Click Save Changes.
Windows 7 saves your new settings, allowing other PCs on your network to share the files in the Public folders of your Windows 7 PCs.
Be sure to change only the settings on the Home or Work (Current Profile) section of the Advanced Sharing Settings window. Don’t modify the settings in the Public portion of that window. You don’t want to share your laptop’s files with everybody in the coffee shop.