
- If your digital camera came with a cable, connect that cable to the camera, connect the other end of the cable to a USB port on your computer, and turn your camera on. If your laptop or tablet has a built-in card slot, you can take the memory card out of the camera and insert it in that slot.
If your computer doesn't have a built-in card slot, consider buying a small memory card reader that plugs into your computer and works with your camera's memory card. You don't need a multicard reader, just a reader with a single slot the size of your camera card. I consider a card reader more convenient than using a cable.
The techniques described here for importing photos from a camera also apply to videos. Follow these steps as well to copy videos from your digital camera to your computer.
- Windows 10 detects your camera and may briefly display a notification indicating Select to choose what happens with this device. If you're quick enough to tap or click this notification, Windows 10 displays your choices, as shown.
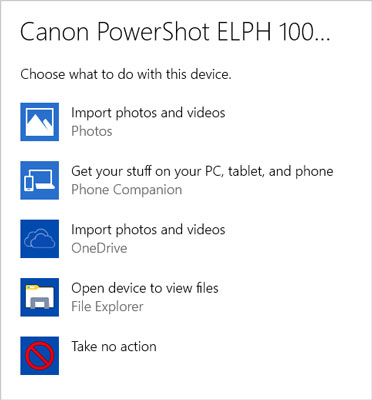
- Select Open Device to View Files, if that option is available, to open File Explorer to the photos on your camera, as shown.
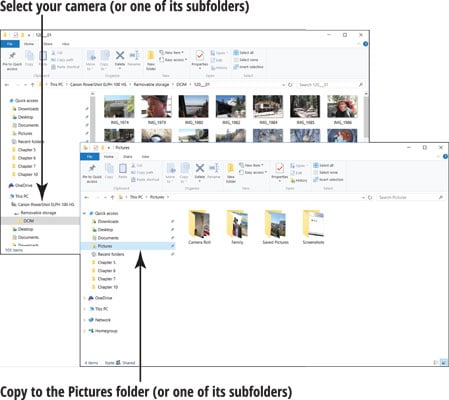
- Select the File Explorer icon on the taskbar to start File Explorer. Then look for and select your camera in the Folders panel on the left side of the screen. Your camera is located under This PC in the Folder pane.
- In File Explorer, select the photos you want to copy from your camera to your computer. Depending on your camera setup, the photos may be in a subfolder. Use these techniques to select the photos:
- Hold down the Ctrl button and click or tap photos to select them individually.
- Press Ctrl+A to select all the photos in a folder.
- Copy the photos you selected so that you can paste them into a folder on your computer. Use one of these techniques to copy the photos:
- Press Ctrl+C.
- On the Home tab in File Explorer, select the Copy button.
- In File Explorer, select the folder where you want to copy your photos.
If you want to be able to view and edit your photos with the Photos app, select the Pictures folder or one of its subfolders and copy the photos there.
Organizing photos can be a challenge. If you dump more than a few dozen photos into the Pictures folder without using folders, finding a specific photo later will be difficult. Using folders with unintelligible names doesn't help, either.
- Paste the photos into the folder you selected earlier. Use one of these techniques:
- Press Ctrl+V.
- On the Home tab in File Explorer, select the Paste button.
If you often import photos from a digital camera or memory card, you can speed the process by telling Windows to open File Explorer immediately when you attach your camera or memory card to your computer. On the Start menu, choose Settings and type autoplay in the Find a Setting box. In the Search Results panel, select AutoPlay Settings. The AutoPlay window opens, as shown. In the Memory Card and Camera sections, choose Open Folder to View Files (File Explorer).
