Need more control of your DC motor? You can use the MotorControl sketch for the Arduino to put some input into a DC motor to give you full control of the motor on the fly.
The MotorControl sketch
To gain control of the speed of your motor whenever you need it, you need to add a potentiometer to your circuit.
You need:
An Arduino Uno
A breadboard
A transistor
A DC motor
A diode
A 10k ohm variable resistor
A 2.2k ohm resistor
Jump wires
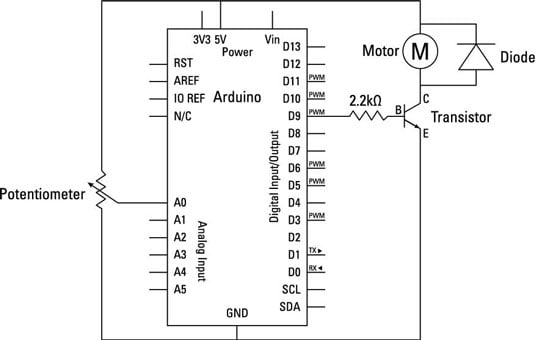
Find a space on your breadboard to place your potentiometer. The central pin of the potentiometer is connected back to pin 9 using a jump wire, and the remaining two pins are connected to 5V on one side and GND on the other.
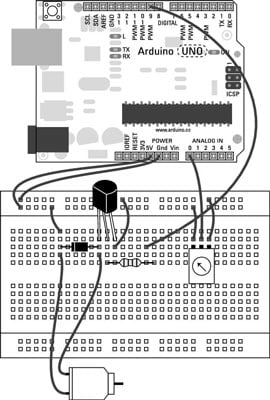
The 5V and GND can be on either side, but switching them will invert the value that the potentiometer sends to the Arduino. Although the potentiometer uses the same power and ground as the motor, note that they are separate circuits that both communicate through the Arduino.
After you have built the circuit, open a new Arduino sketch and save it with another memorable name, such as myMotorControl. Then type the following code.
<b>int</b> potPin = A0;
<b>int</b> motorPin = 9;
<b>int</b> potValue = 0;
<b>int</b> motorValue = 0;
void setup() {
 Serial.begin(9600);
}
void loop() {
 potValue = <b>analogRead</b>(potPin);
 motorValue = <b>map</b>(potValue, 0, 1023, 0, 255);
 <b>analogWrite</b>(motorPin, motorValue);
 Serial.print("potentiometer = " );
 <b>Serial.print</b>(potValue);
 Serial.print("t motor = ");
 <b>Serial.println</b>(motorValue);
 <b>delay</b>(2);
}
After you’ve typed the sketch, save it and click the Compile button to highlight any syntax errors. .
If the sketch compiles correctly, click Upload to upload the sketch to your board. When it is done uploading, you should be able to control your motor using the potentiometer. Turning the potentiometer in one direction causes the motor to speed up; turning it the other way causes it to slow down.
The MotorControl Sketch breakdown
This sketch is a variation on the AnalogInOutSerial sketch and works in exactly the same way with a few name changes to better indicate what you are controlling and monitoring on the circuit.
As always, you declare the different variables used in the sketch. You use the potPin to assign the potentiometer pin and motorPin to send a signal to the motor. The potValue variable is used to store the raw value of the potentiometer and the motorValue variable stores the converted value that you want to output to the transistor to switch the motor.
<b>int</b> potPin = A0;
<b>int</b> motorPin = 9;
<b>int</b> potValue = 0;
<b>int</b> motorValue = 0;
How to tweak the MotorControl sketch
You may find that there is a minimum speed after which the motor will just hum. It does so because it doesn’t have enough power to spin. By monitoring the values sent to the motor using the MotorControl sketch, you can find the motor’s minimum value to turn and optimize the motorValue to turn the motor within its true range.
To find the range of motorValue, follow these steps:
With the MotorControl sketch uploaded, click the serial monitor button at the top right of your Arduino window.
The serial monitor window will show you the potentiometer value followed by the output value that is being sent to the motor, in this fashion:
potentiometer = 1023 motor = 255
These values are displayed in a long list and update as you turn the potentiometer. If you don’t see the list scrolling down, make sure that the Autoscroll option is selected.
Starting with your potentiometer reading a value of 0, turn your potentiometer very slowly until the humming stops and the motor starts spinning.
Make a note of the value displayed at this point.
Use an if statement to tell the motor to change speed only if the value is greater than the minimum speed needed to spin the motor, as follows:
(a). Find the part of your code that writes the motorValue to the motor:
<b>analogWrite</b>(motorPin, motorValue);
(b). Replace it with the following piece of code:
<b>if</b>(motorValue > yourValue) {
<b> </b><b>analogWrite</b>(motorPin, motorValue);
} <b>else</b> {
<b> </b><b>digitalWrite</b>(motorPin, LOW);
}
Now replace yourValue with the number that you made a note of.
If the value motorValue is greater than that, the motor speeds up. If it is lower than that, the pin is written LOW so that it is fully off. You could also type analogWrite(motorPin, 0) to accomplish the same thing. Tiny optimizations like this can help your project function smoothly, with no wasted movement or values.