-
Front view
-
Three-quarter view
-
Side view
-
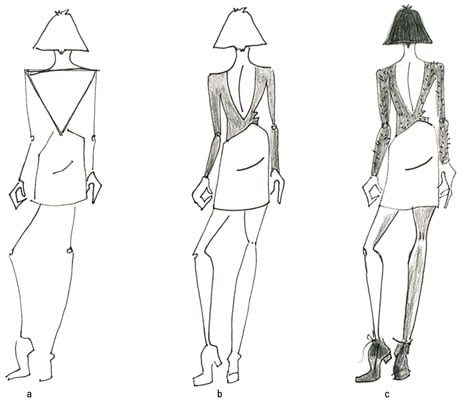
Back view
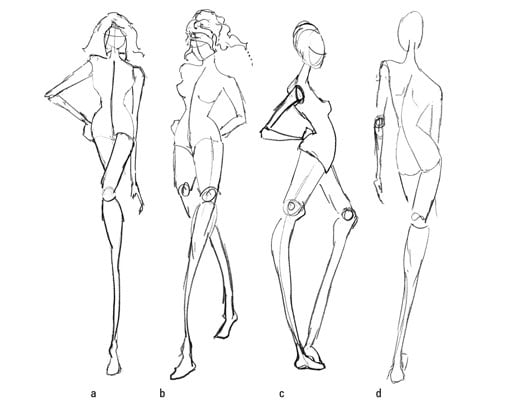
Facing forward: The front view
Artists — and that’s you! — often consider the front view the easiest to draw. Imagine looking straight on at a person or at yourself in the mirror — that’s a front view. The front view allows you to see a complete view of both sides of the body, keeping the imaginary center front line exactly down the middle.The front view is great for fashion illustration because seeing all the details is easy; clothes hang well and look fun! Add the angled shoulders and hips that convey attitude in fashion drawing, and you have a great start on fashion illustrations.
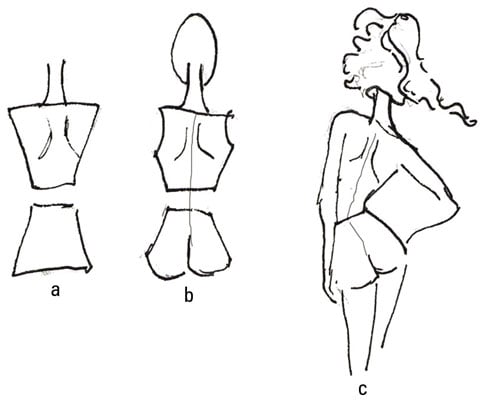
Teasing the viewer with the three-quarter view
Think about the stars on the red carpet posing for pictures. As they pose, they tend to turn their bodies slightly for a slimming effect and bring one foot forward. This pose is referred to as the three-quarter view. The three-quarter view allows you to see the front of the body, but one side is shown more than the other.In the figure, you can see a sexy yet demure three-quarter view that shows more of the figure’s left arm than her right. Compare this to the front view, in which you can see both arms equally well.
With the three-quarter view, the head can face any direction; play with various directions for different looks and feelings. Drawing the three-quarter view is a bit advanced, but that makes it all the more fun to explore, so don’t let it scare you!
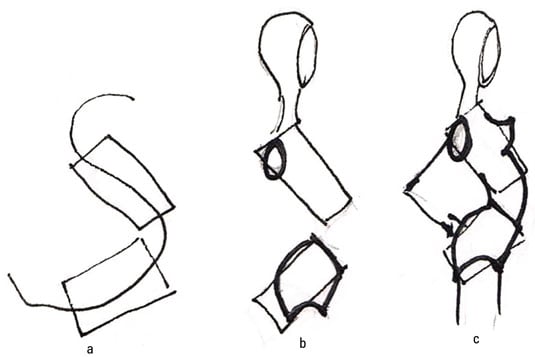
Drawing the three-quarter view
- Draw two stacked trapezoids. Draw the center front line off center, about a third of the way across the torso instead of halfway. Add the apex line in its normal location on the upper torso.
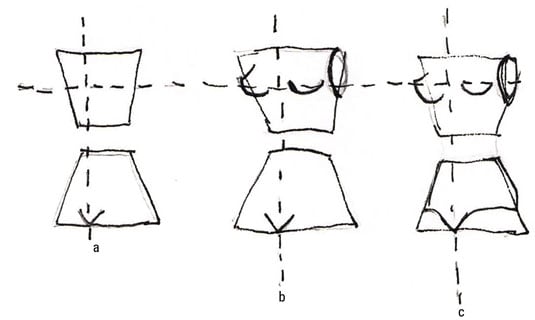
- To show the slight side turn to the side, add a breast to the upper torso in slight profile; the breast extends slightly outward from the torso. Draw the other breast so that it extends almost but not quite to the center front line.
- The upper half of the breasts goes above the apex line, and the other half goes below the apex line.
- On the upper trapezoid, add an oval for the armhole on your figure’s left side.
- Add a V shape for the crotch at the center front line on the lower trapezoid.
- Add downward arcs on the lower trapezoid for the legs.
- The arc on the left leg is wider than the one on the right because you see more of that leg. Finish your figure with a neck and head if you like.
Turning to the side view
Drawing from a side view lets you vary your looks. Certain types of clothes show best from certain angles.The look of the torso from the side really counts in fashion illustration: A woman can show off her bod, and a guy can look pretty ripped in a simple T-shirt. Use the S curve to show side attitude; women get a more extreme curve than dudes, who get just a slight curve.
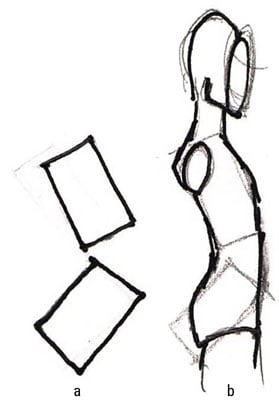
To create a side look for a female, try these steps:
-
Draw two rectangles at nearly a 90-degree angle to each other. Draw an S curve that passes through the center of both rectangles.
From the side view, a fashion figure doesn’t taper much at the waist, so you can replace the trapezoids with rectangles when drawing the torso.
-
Sketch in a neck and head facing sideways.
-
Add an oval for the armhole in the top left corner of the upper rectangle. On the lower rectangle, curve the back of the butt for a round derrière and then add the downward arc for the right leg.
-
Connect the upper and lower rectangles at the tummy, using a gradual curve to keep the belly flat. Also connect the rectangles at the back to form the figure’s lower back.
-
Add a perky breast at approximately the same level as the armhole.
The shape of a guy’s torso is getting a lot of media play these days. Shirts are left unbuttoned, are worn tight to the torso with no room to spare, and are often sleeveless. All this exposure requires a lot of torso upkeep! When drawing a guy’s torso, use a slightly less extreme S curve for his back and a slight and gradual curving line for the front of his torso.
Follow these simple steps to draw the side view of a guy:
-
Draw two rectangles that are at a slight angle to one another.
-
Sketch in a neck and head facing sideways.
-
Add an oval for the armhole in the top left corner of the upper rectangle. Slightly curve the left side of the lower rectangle to create a rounded buttock — but don’t make it too round! Add the downward arc for the right leg.
-
Finish with a flat chest, a line that connects the rectangles at the stomach, and a small curve to connect the two rectangles at the lower back.
Spinning around to see the back view
Although you won’t draw a fashion design from the back every day, you’ll use the back view occasionally. A woman’s back in fashion illustration is quite beautiful, with sleek lines and shoulder blades that look like angel wings. Outrageous dresses for women with barely there backs, including wedding gowns, cry out for a back view. And a guy’s broad back looks hot when he’s sporting board shorts.Drawing the back isn’t all that different from drawing the front — they both start with the basic trapezoids and the arm and leg holes.
Follow these steps to create a female torso from the back view:-
Draw two trapezoids just like you do for the front view and add the back of the neck as a reference. Draw “angel wing” curves to show the back shoulder blades.
-
Add arcs for the arms and the upward arcs for the cheeks of the derrière.
The imaginary center front line — or in this case, the center back — passes through the derrière cheeks. Sketch in a head and arms, too, if you’d like.
For attitude, draw the trapezoids at two different angles, remembering to lengthen the shoulder blade on the side that leans closer to the ground because the arm extends in that direction. The figure shows a finished sketch of a figure with her shoulders angled.
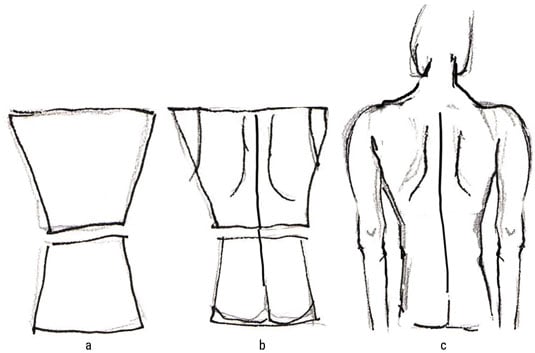
A guy’s back is broad and trim, at least in fashion illustration. It tapers to the waist, whether you’re drawing a surfer or just a really hot shirtless dude.To draw a guy that’s too hot to handle from the back view, follow these steps:
-
Draw two trapezoids, keeping the waist wide and the shoulders broad.
-
Add in longer angel wings that extend about two-thirds of the way down the upper trapezoid. Draw arcs for the arms and small arcs for the buttocks.
-
Finish with broad shoulders and a wide neck.
Add style to your fashion back
Drawing the fashion back with style is easy — and necessary, given all the backless numbers you see in the fashion industry. Forget rippling muscles, because drawing a fashion back is mostly about a smooth and simple style that works for your fashion figure.Drawing poses from the back conveys an attitude of confidence — both in your fashion model and in yourself. As with certain front poses, you can create striking poses with angled shoulders and hips.
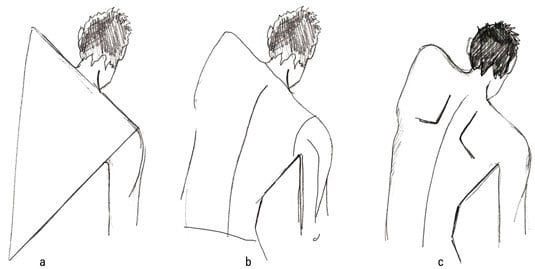
Draw the sexy spine
Supple spines are graceful looking and convey just the right accent when you’re using the inverted triangle for the shape of a back. A long, slightly curved line works wonders when defining the back of a fashion figure.To draw a supple and sexy spine:
-
Draw the back of a female fashion figure using a thin inverted triangle.
-
Draw a long, slight curve for the spine and fill in the fashion figure.
Draw the hair short to show off the back.
-
Add shading and texture.
How to draw broad backs
Broad backs are obviously for drawing fashion figure dudes. This is the look you want when you draw an awesome guy in a bathing suit or wearing jeans only. It’s show-off time, and drawing a wide inverted triangle for the back helps you do just that!To draw a guy with a broad back:
-
Draw the top half of a dude using a wide inverted triangle for a back shape.
Use the base of the inverted triangle for a strong shoulder line. Draw the shoulder line at an angle.
-
Add a strong line to show a good spine and add in the waist.
-
Draw masculine-shaped angel wings for muscle definition.